

Make Payments for an Airline Order
This guide explains how to complete payments for an unpaid or partially paid airline order using the Travel Workbench.
1. Retrieve the Order
Begin by locating the booking you wish to pay for.
To find the booking, follow the instructions in the Retrieve an Order tutorial to locate your passenger's existing PNR and open the Order View page. Once you have the Order View open, proceed to the next step.
2. Verify Payment Status & Prerequisites
Before proceeding, check the Ticketing Time Limit in the order details. This indicates the deadline by which payment and ticketing must be completed.
If a payment is required, you will see a red warning banner at the top of the Order View:
- "Your order requires payment to be completed. Please proceed to the payment section to finalize your booking."
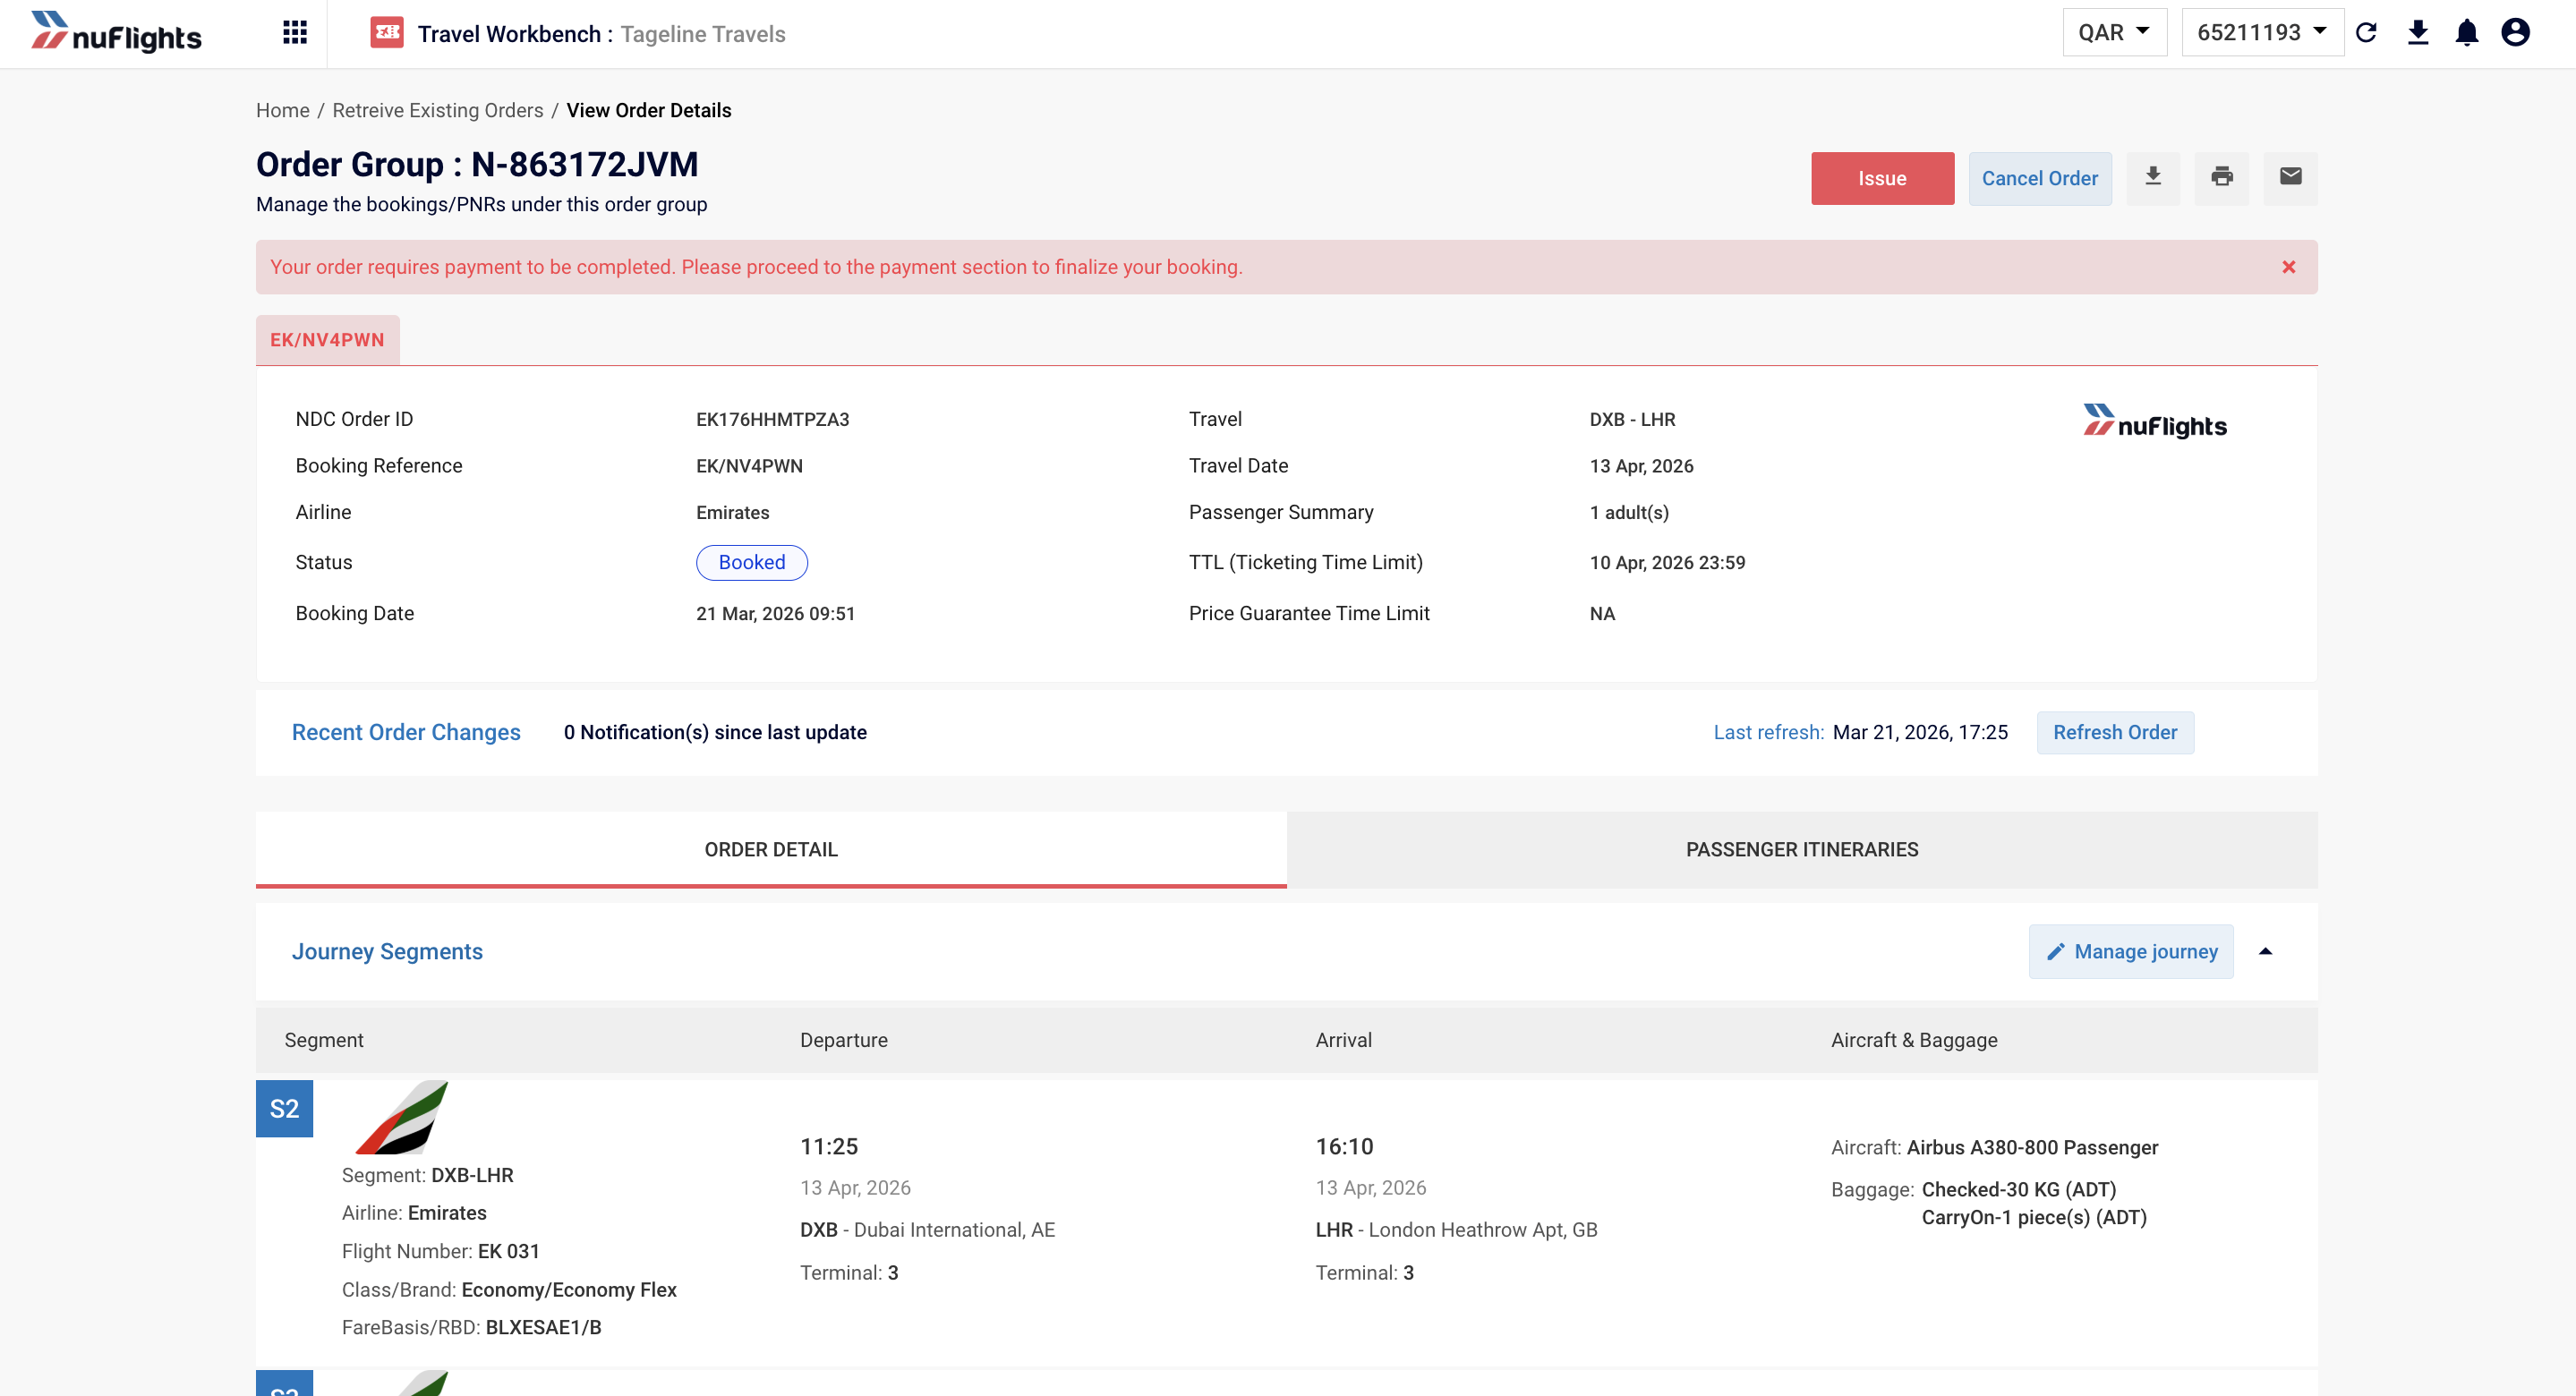
Order View with Payment Warning Banner
3. Initiate Payment
- Locate the Issue button near the Order Group section.
- Click Issue.
- A popup may appear regarding Price Guarantee. Click Proceed to enter the Payment Page.
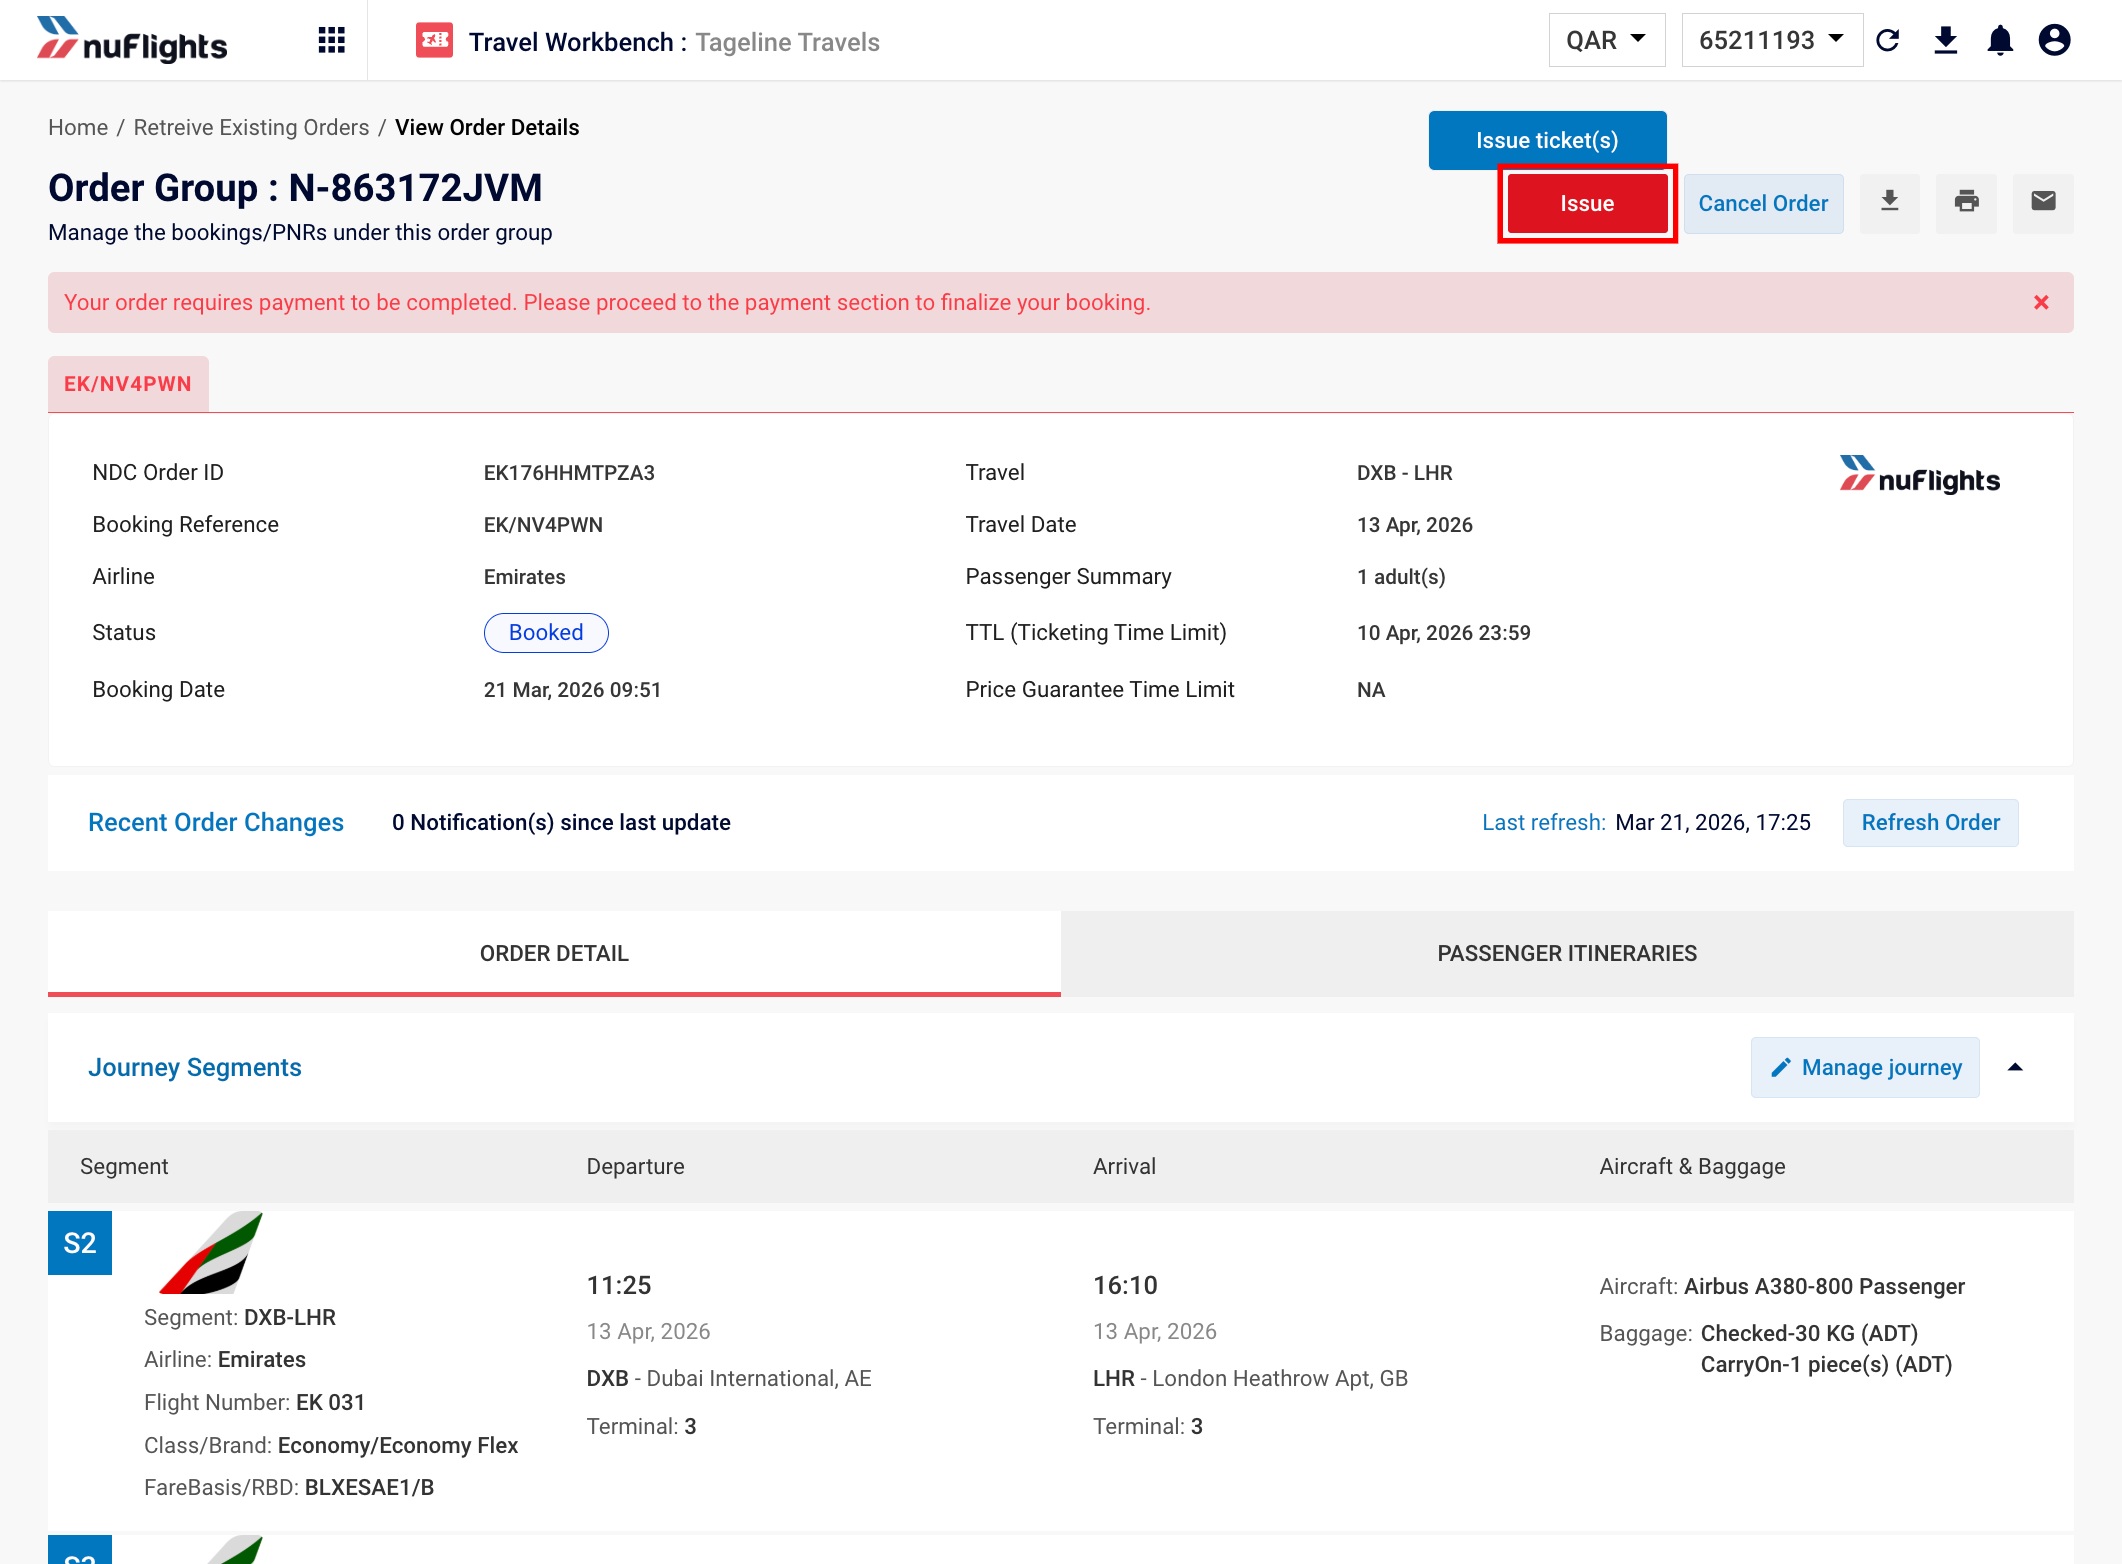
Click on Issue button
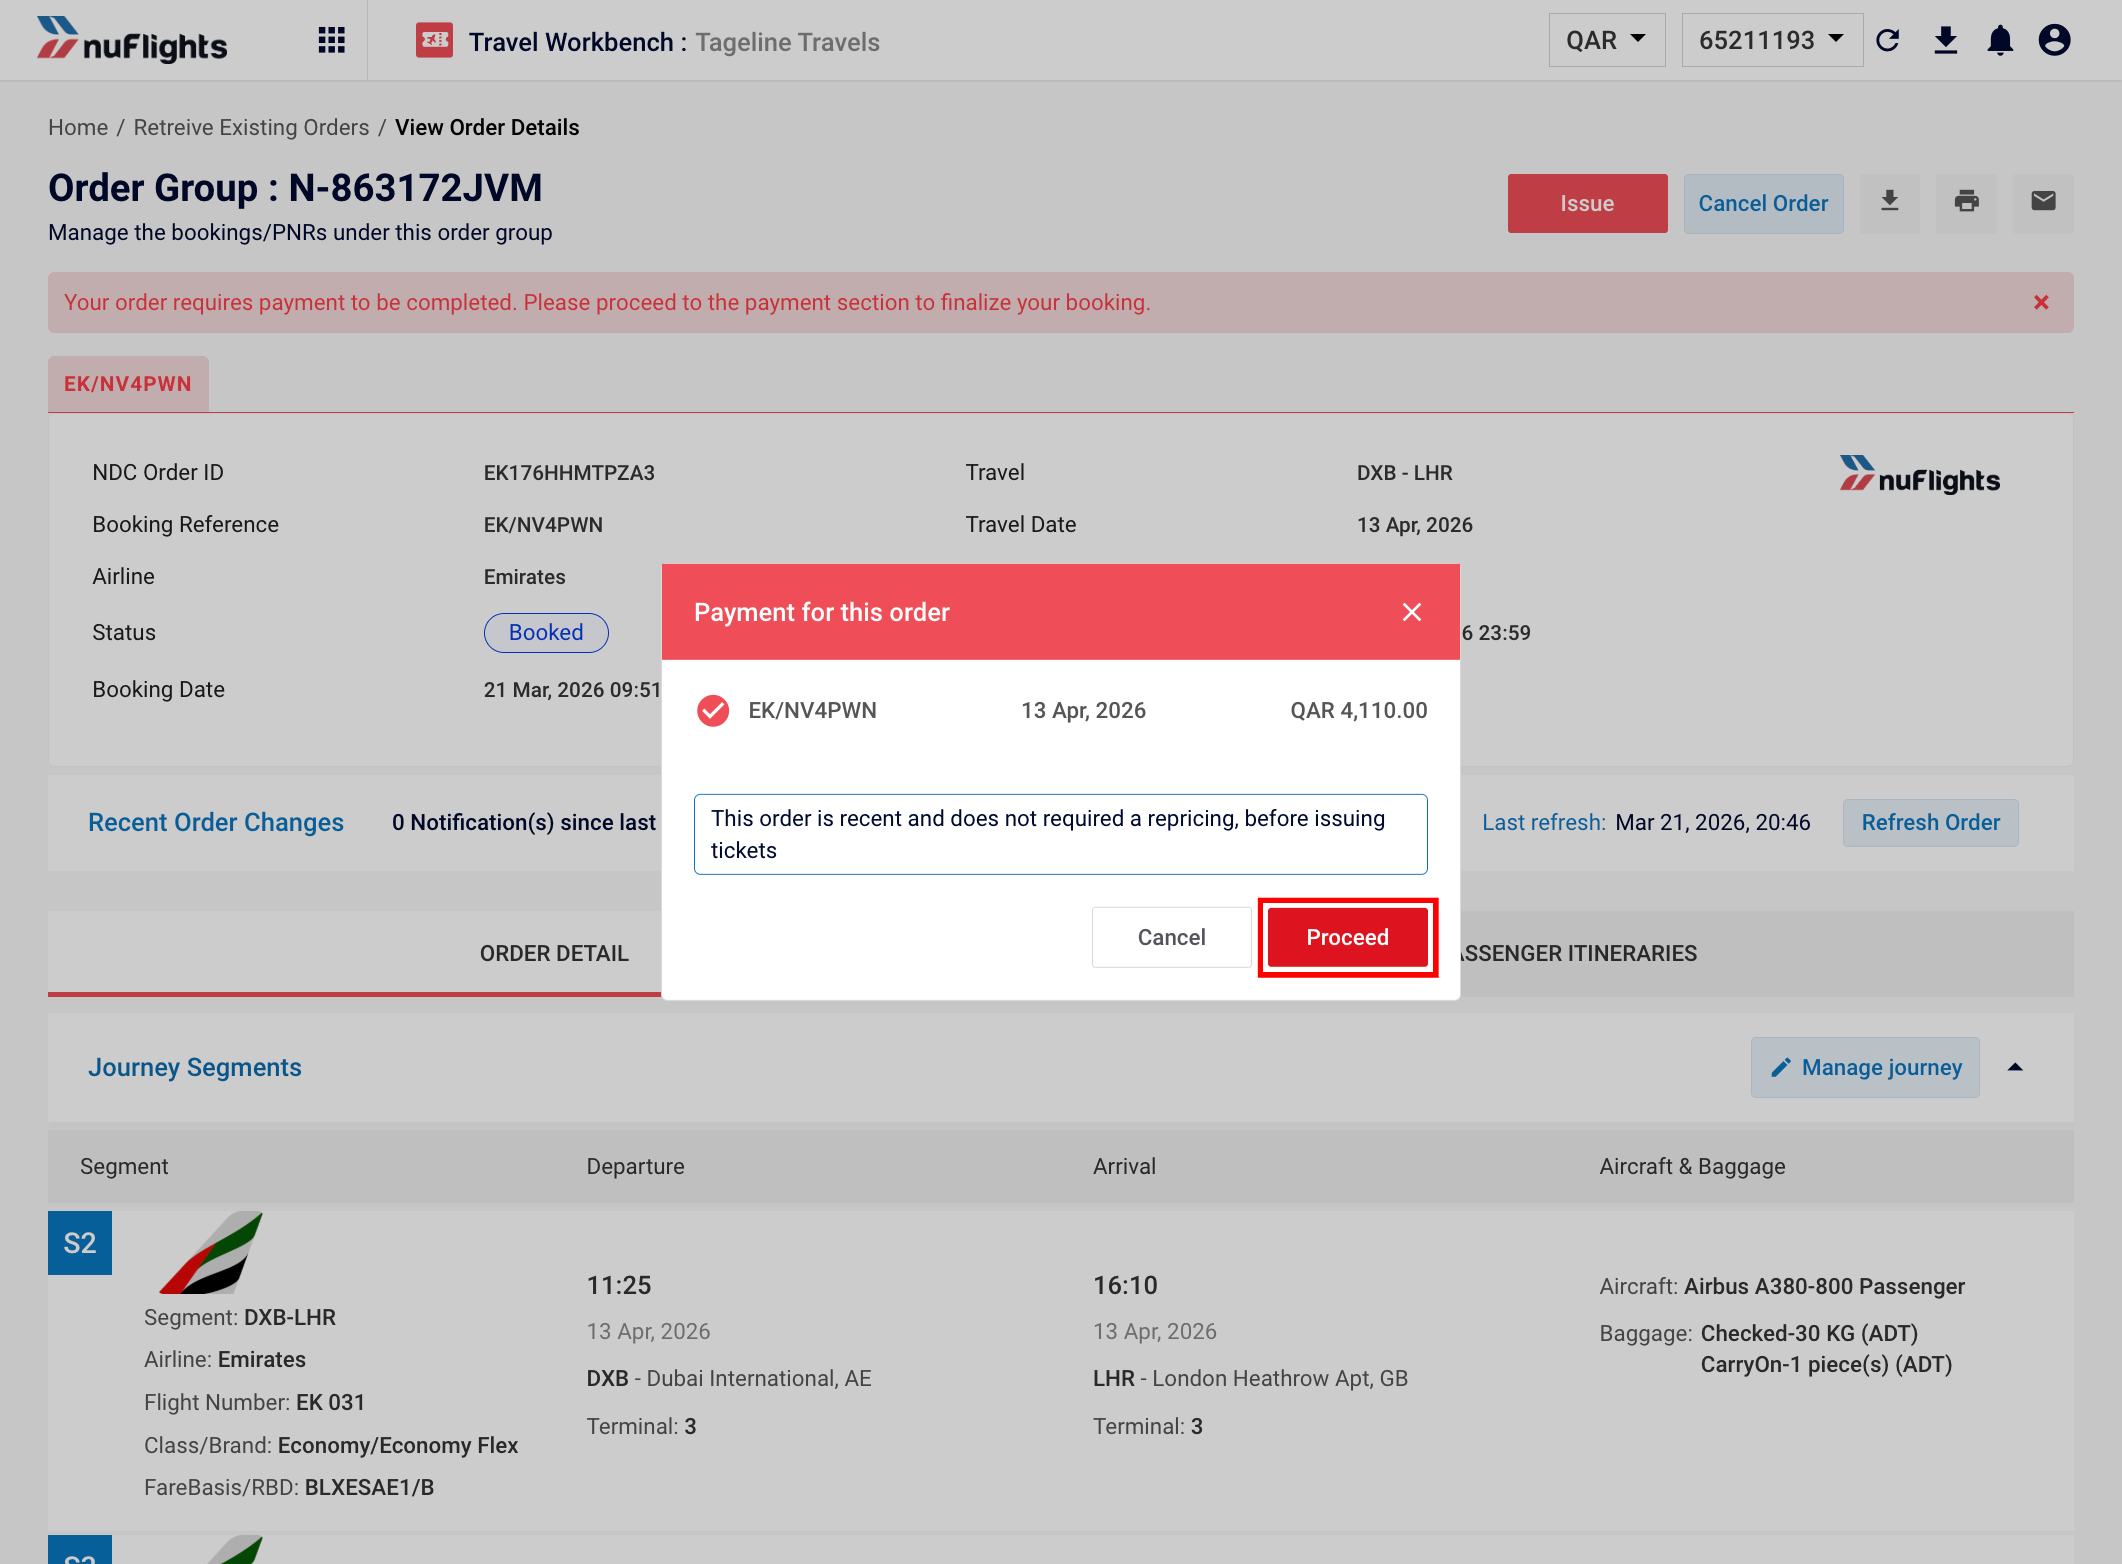
Reprice Price Check Popup
4. The Payment Page
The Payment Page displays the amount details.
- Supplier Payment: Amount to be paid to the airline.
- Customer Payment: Total amount collected from the traveler.
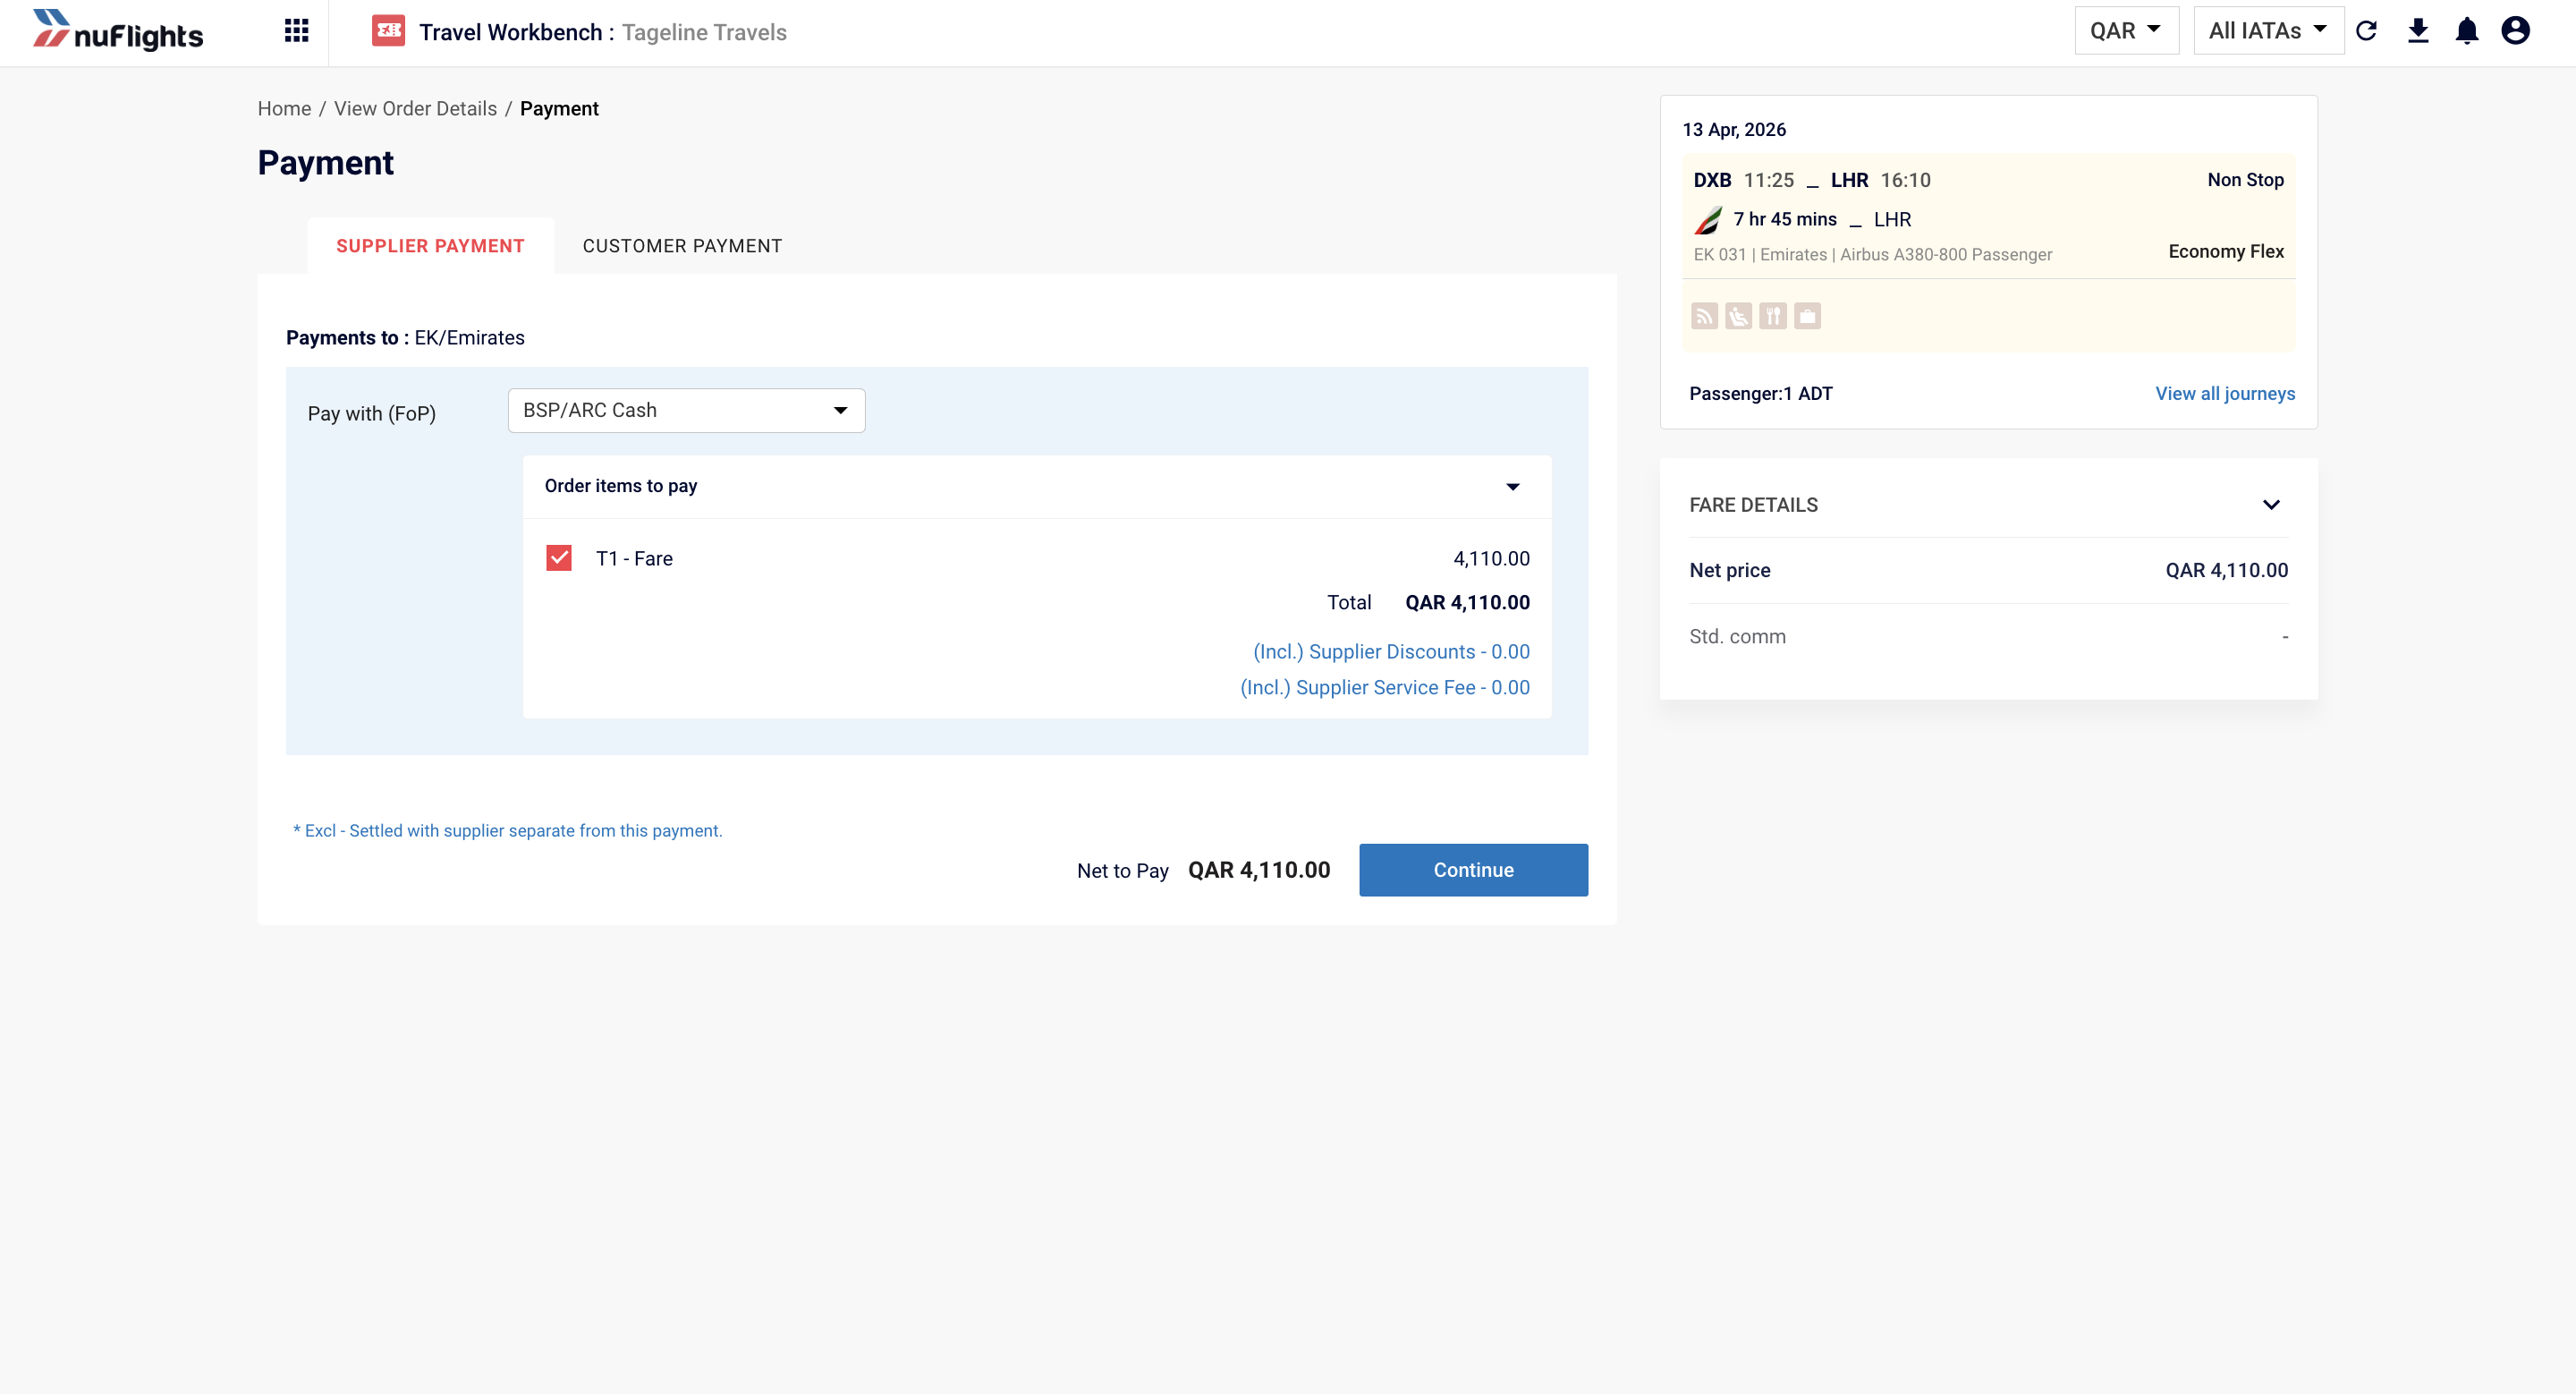
Payment Page
5. Select Payment Method
In the Supplier Payment section, select your Form of Payment (FOP):
- BSP/ARC Cash
- Stored Card
- IATA EasyPay
- Passenger Card
- Miscellaneous (For Local Inventory bookings, select Miscellaneous as the provider is NuFlights)
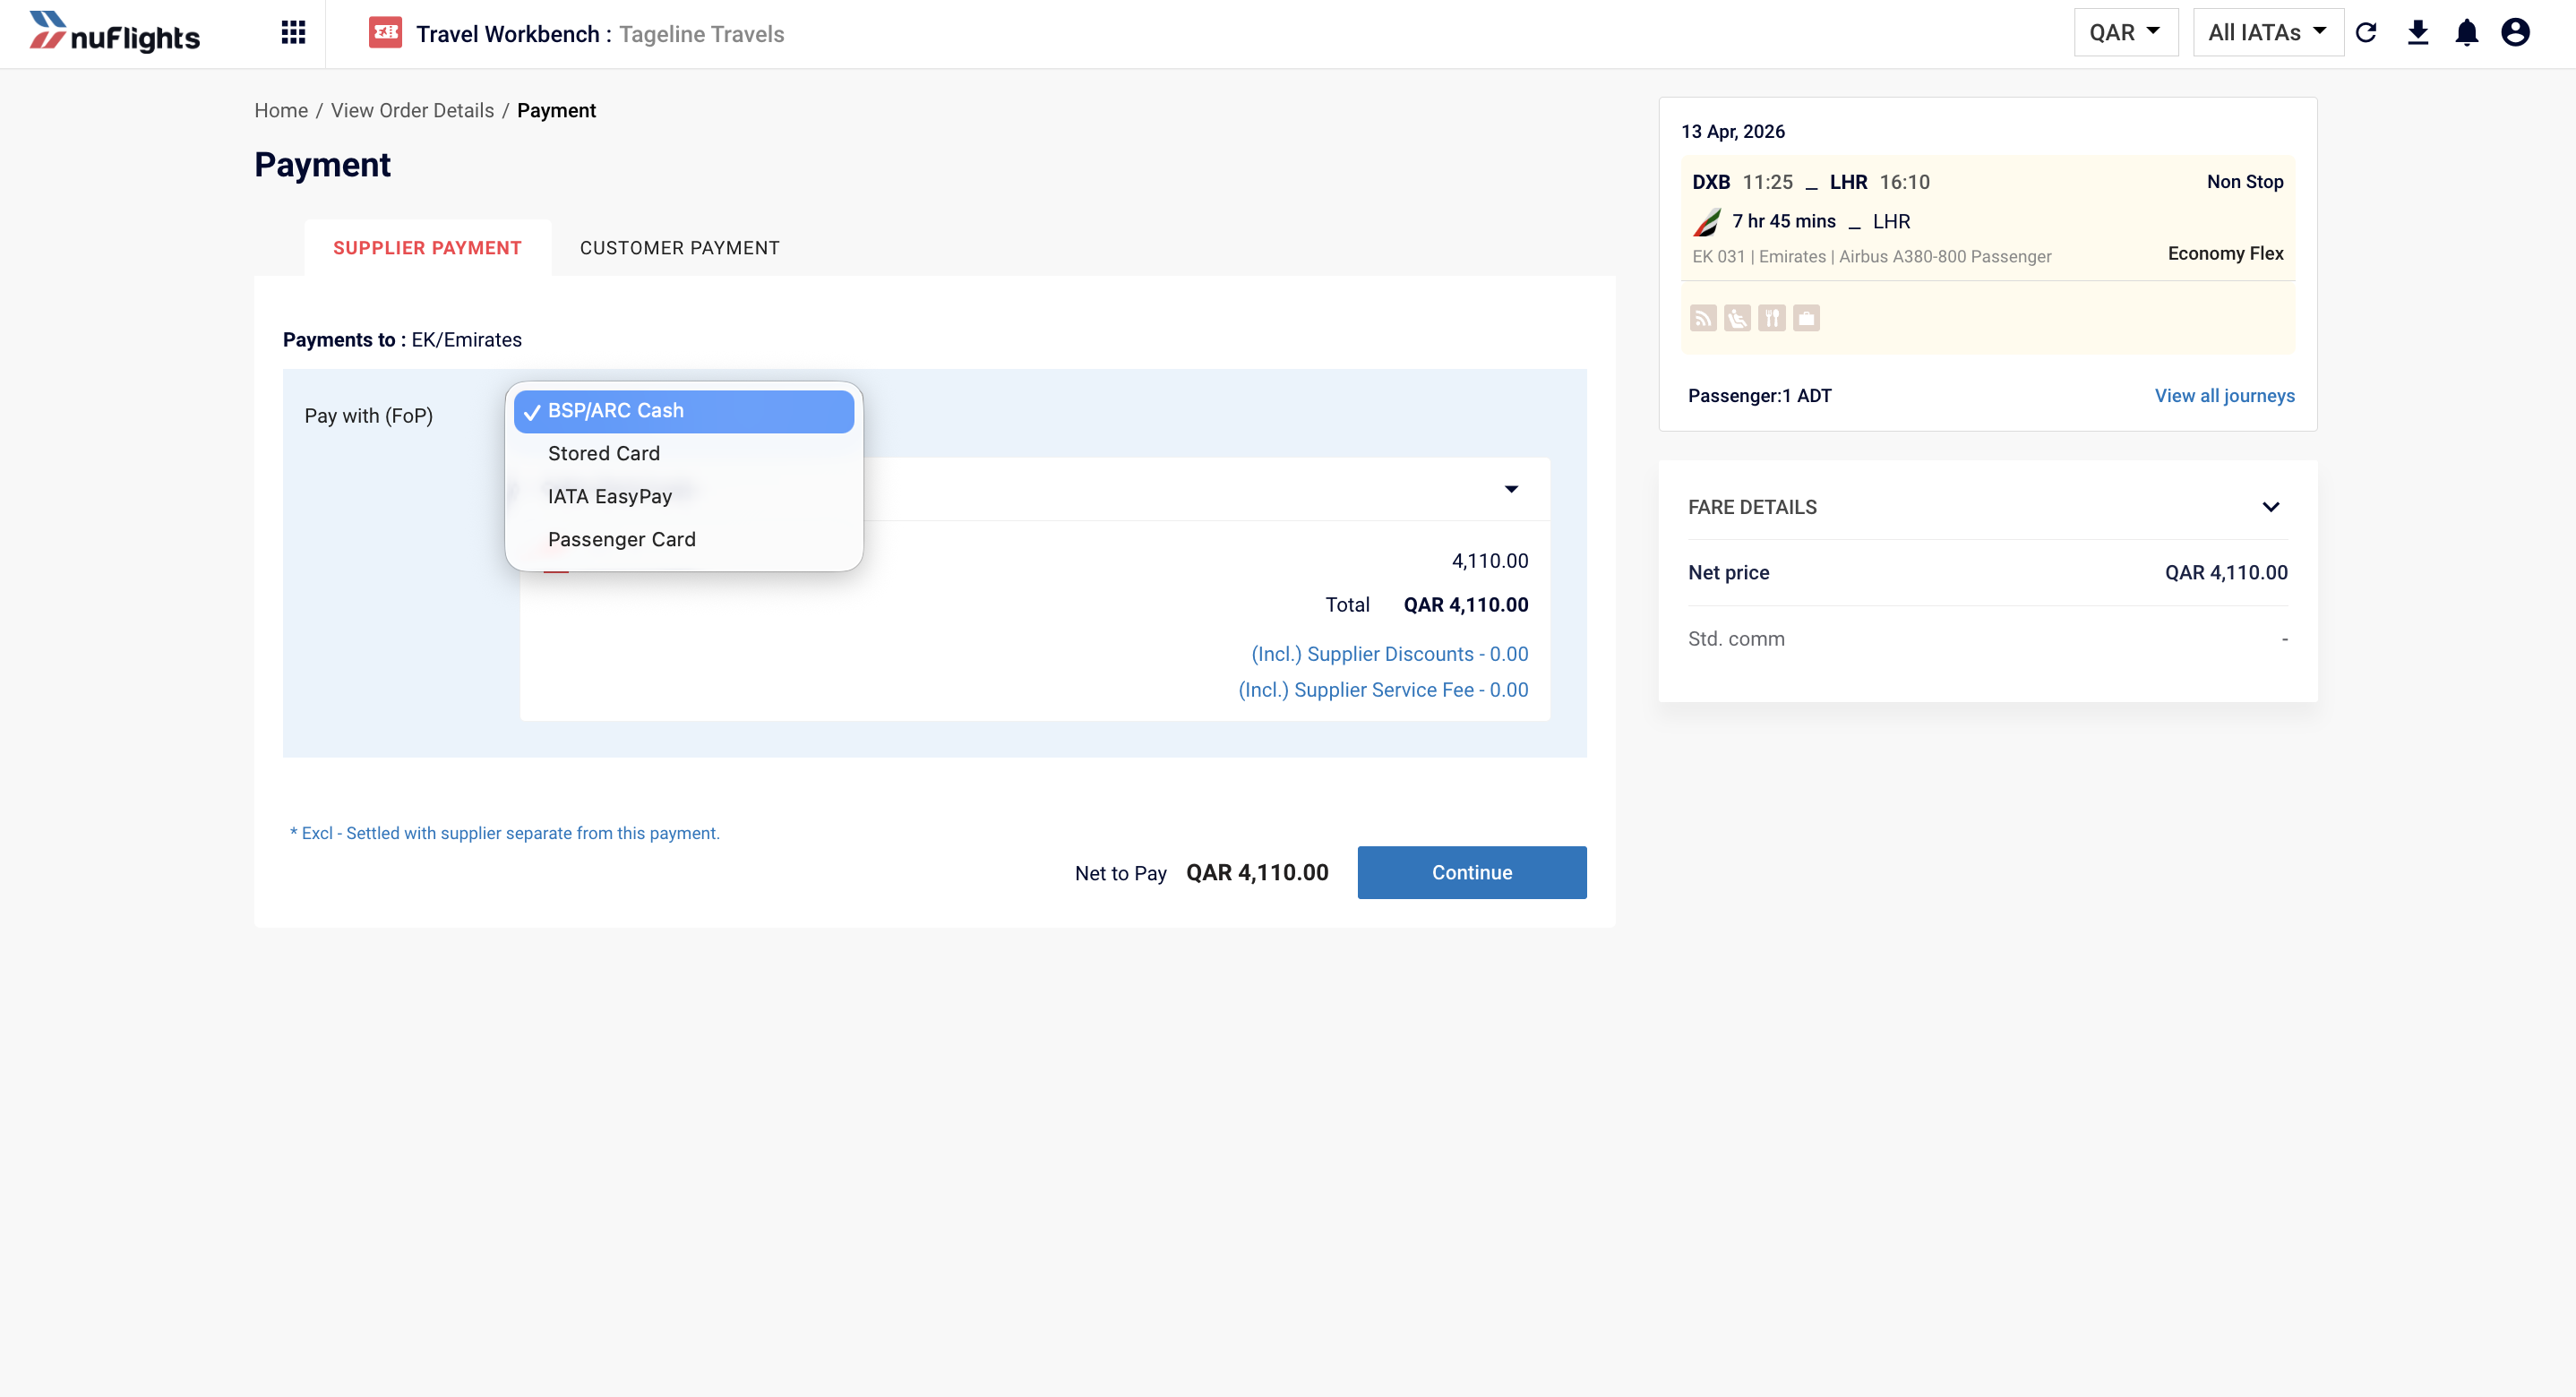
Select Payment Method
To use Credit Cards or IATA EasyPay, they must first be configured in the Agency Admin application. Go to Agency Admin Configuration.
6. Review and Confirm
- Review the Order Items to Pay breakdown.
- Ensure the Amounts to be Paid are correct.
- Click the Issue button at the bottom of the page.
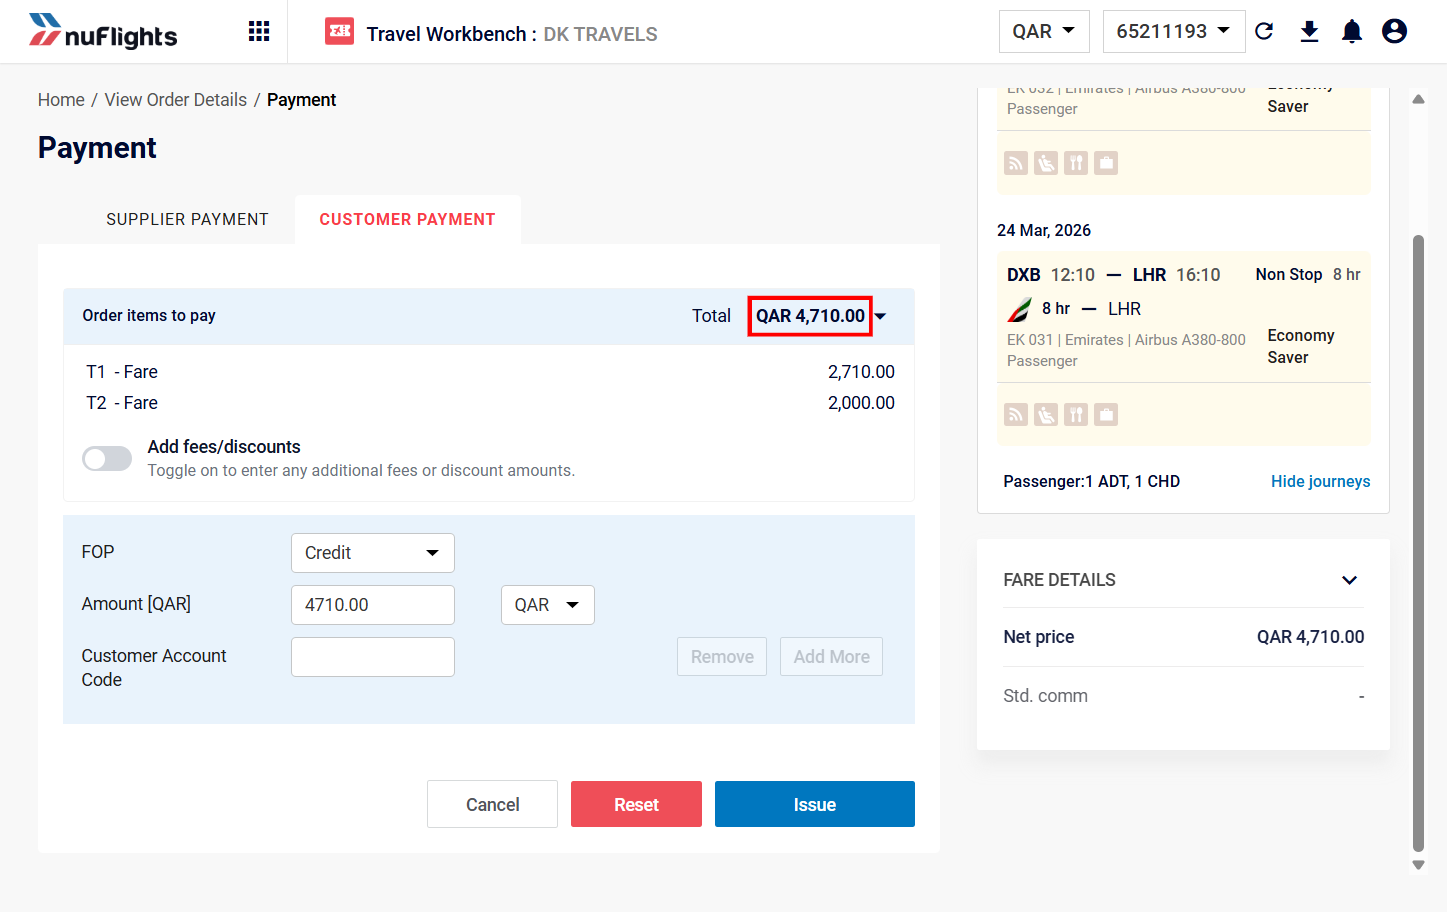
Click "Issue" to finalize payment and ticketing
For back-office tracking purposes, you can optionally enter a Customer Account Code in the designated field before clicking Issue.
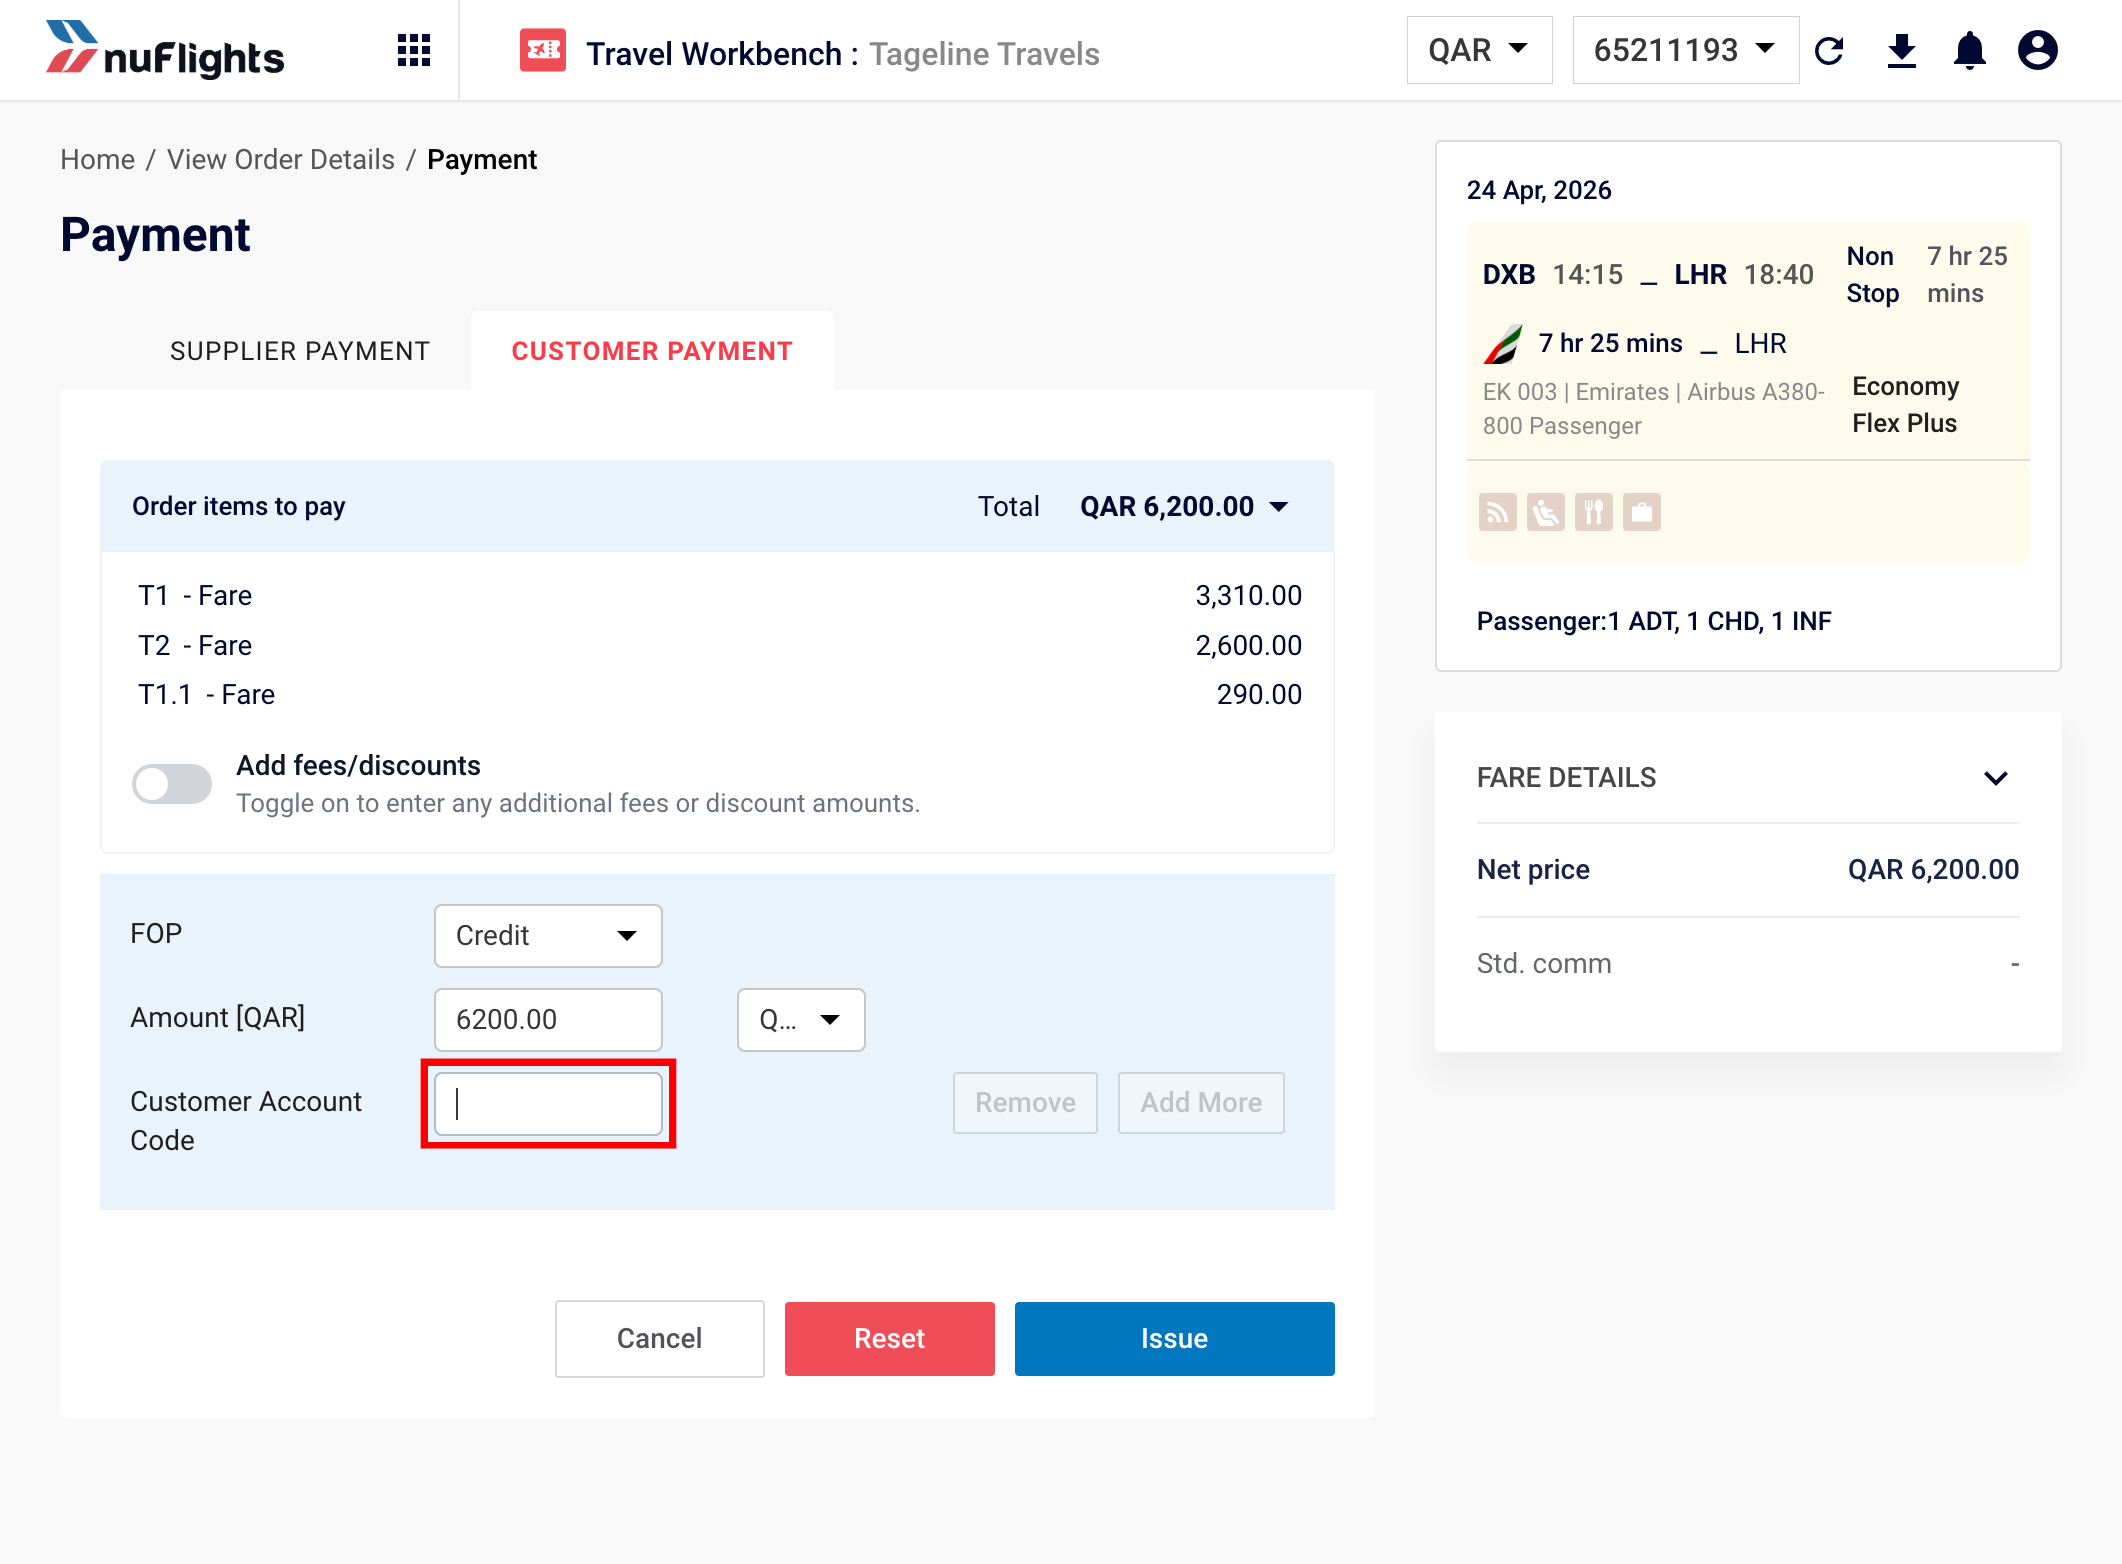
Customer Code for Backoffice
A success message will appear upon completion. You can then view the ticketed order.
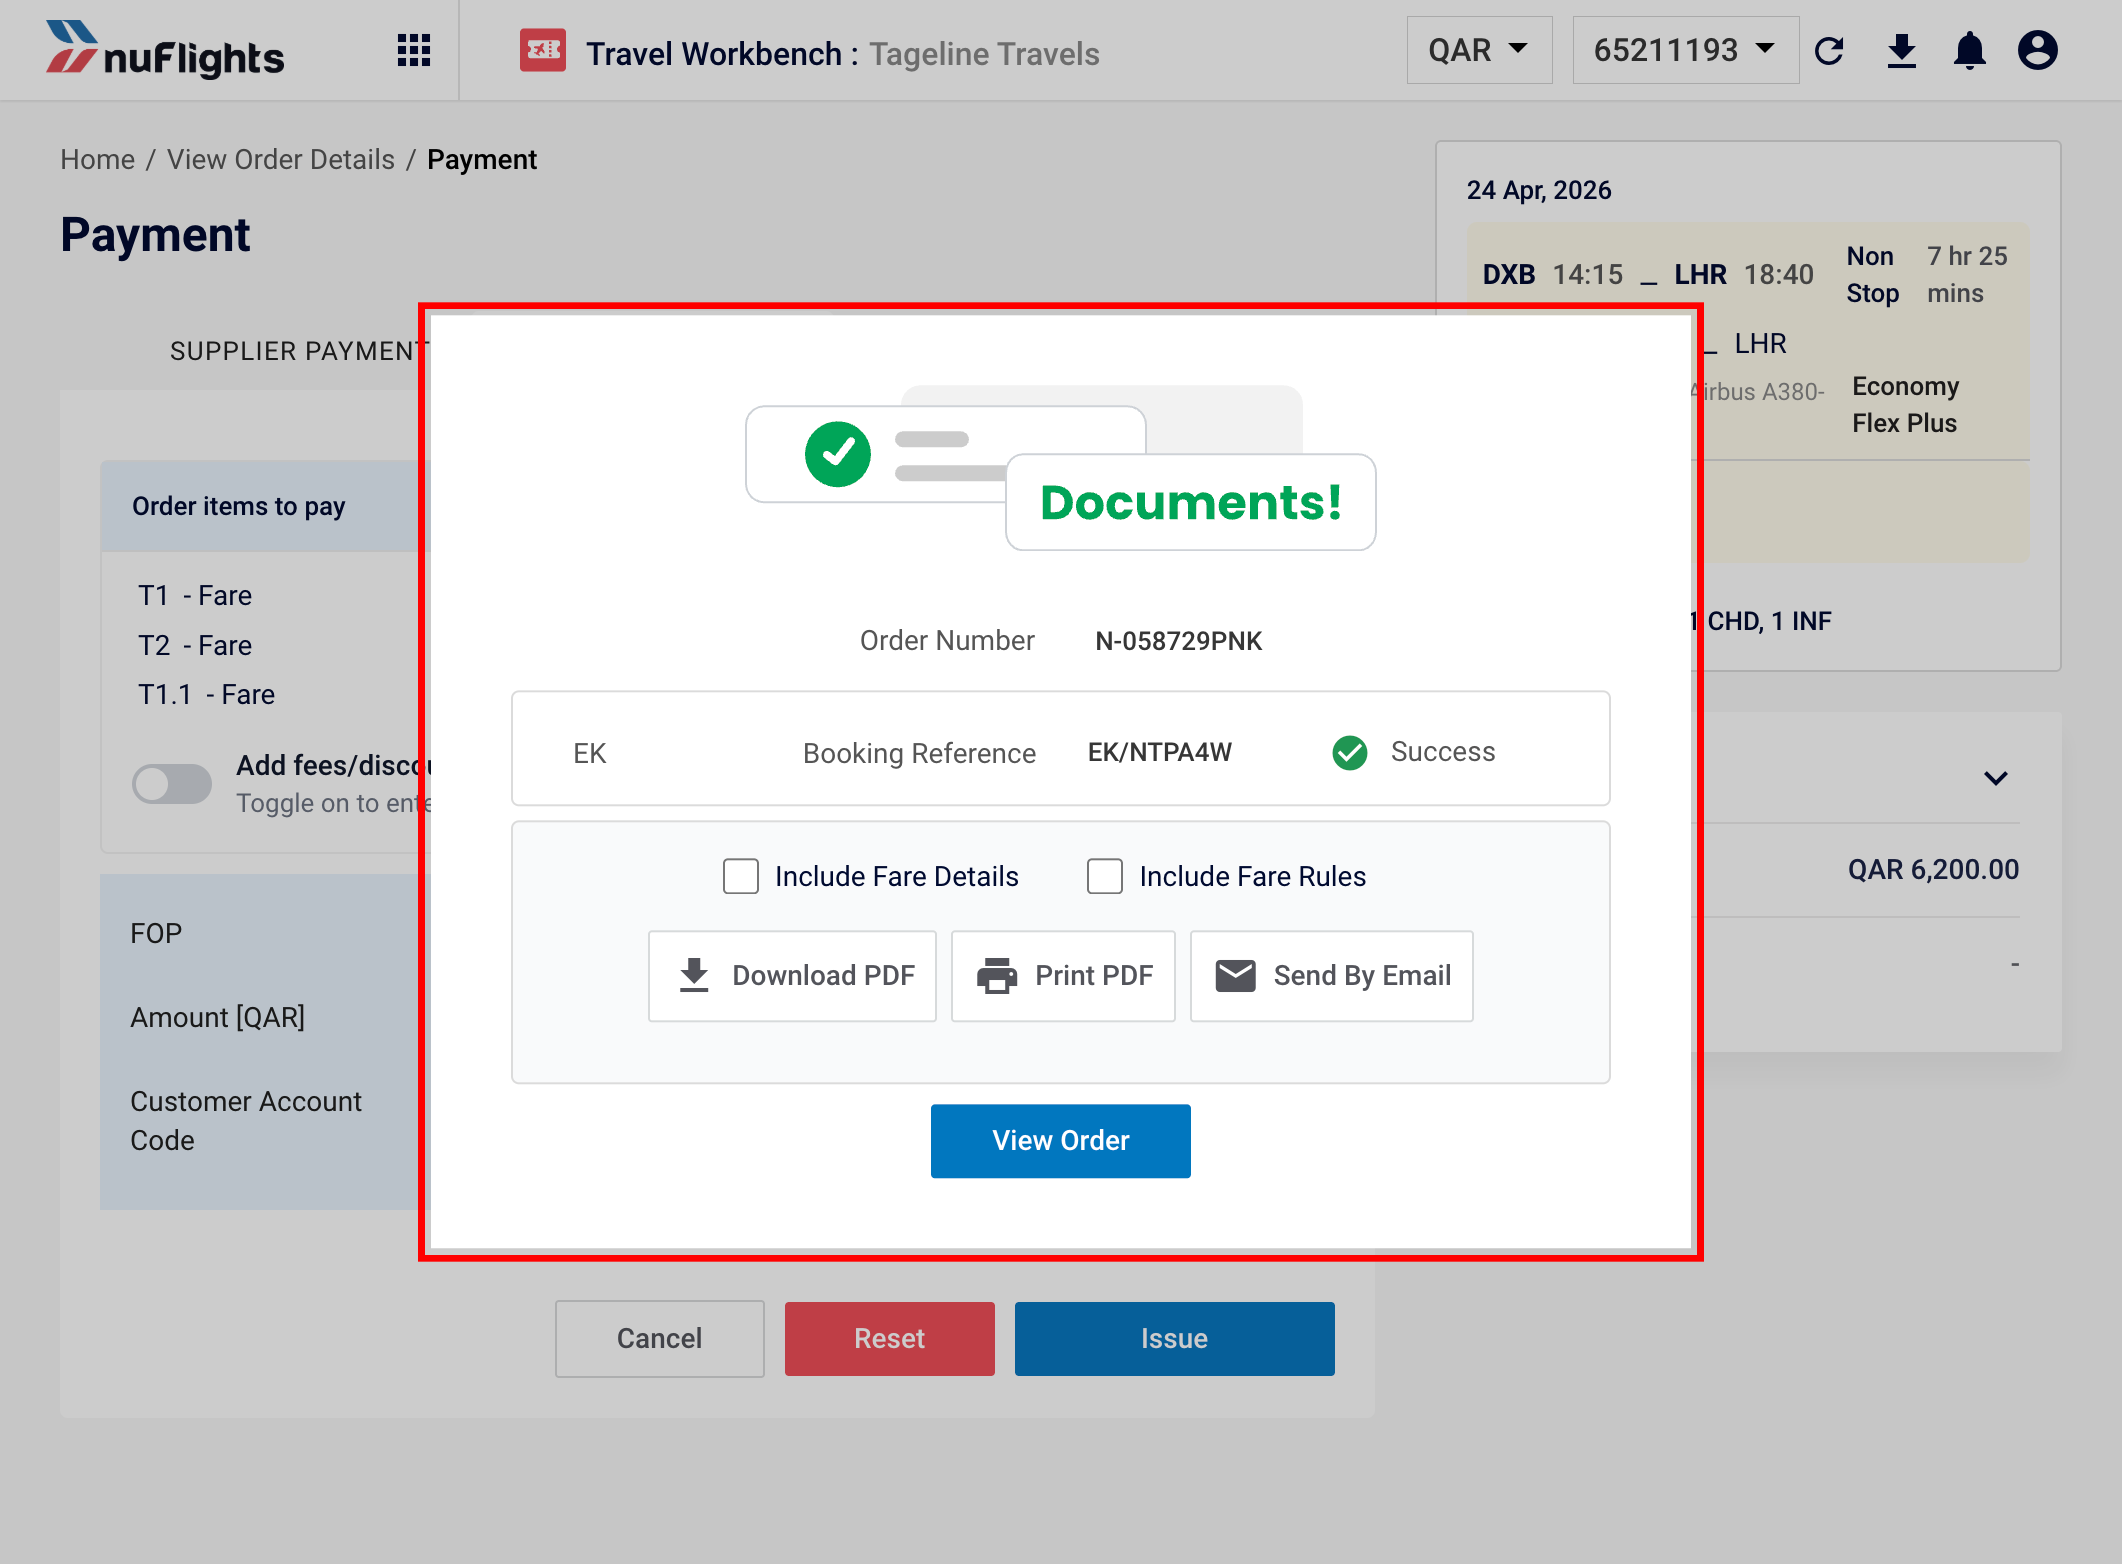
Payment Success Confirmation
Tickets issued under the NF LOCAL INV carrier are generated by NuFlights rather than an operating airline. The order will show the NuFlights NDC Order ID (e.g., NF_D4321F) alongside the booking reference provided by the airline bulk purchase.
Additional Guidance
Service Fees and Discounts
To add an agency fee or discount:
- Locate the Order Items to Pay table.
- Toggle the Service Fee / Discount switch.
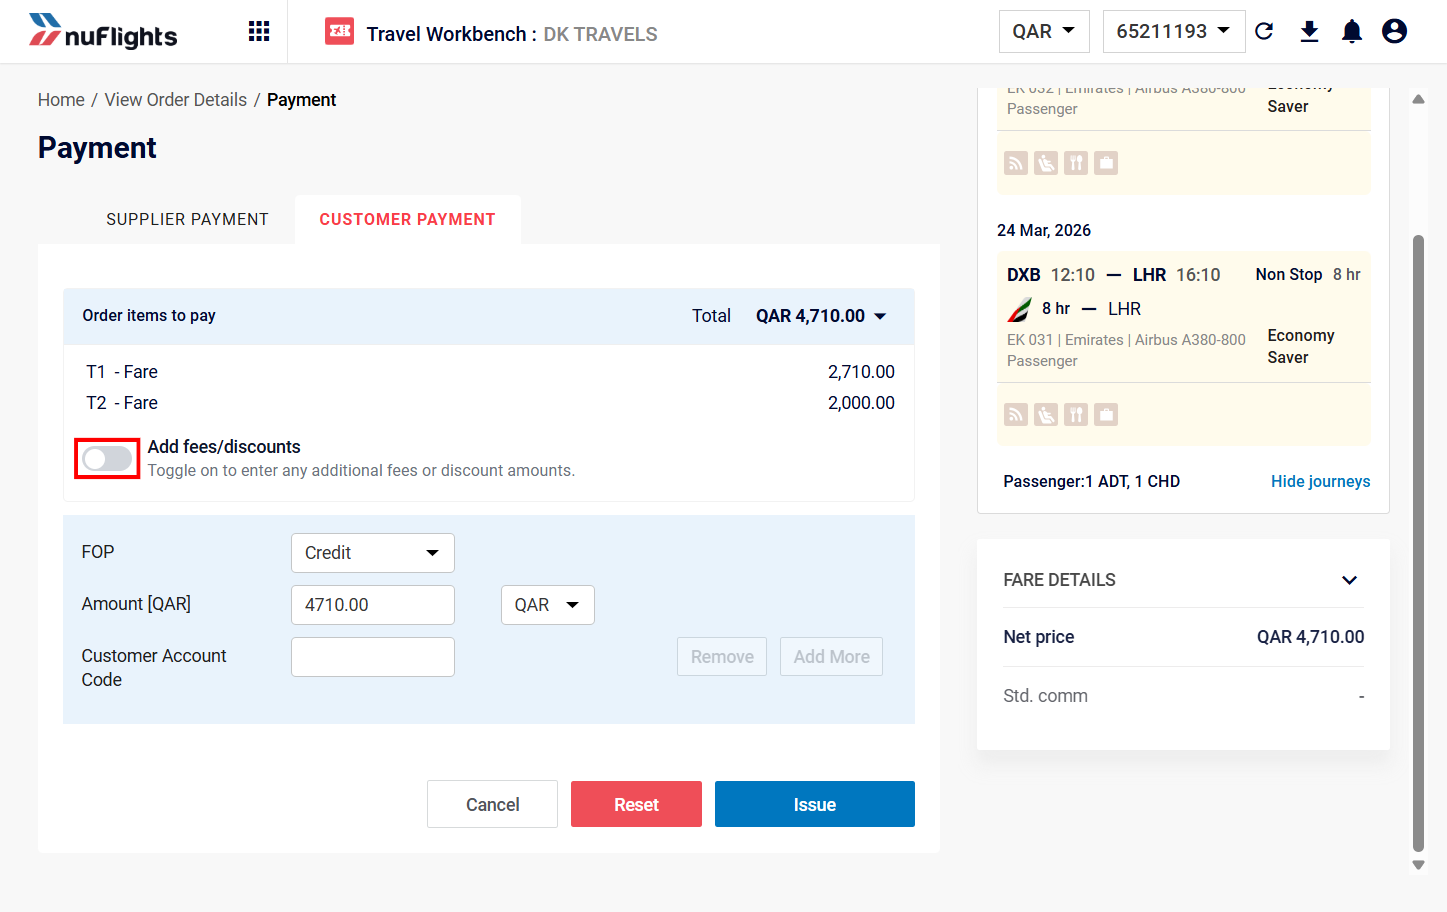
Toggle the Service Fee / Discount switch
- Enter the fee or discount amount. The Customer Payment total will update accordingly.
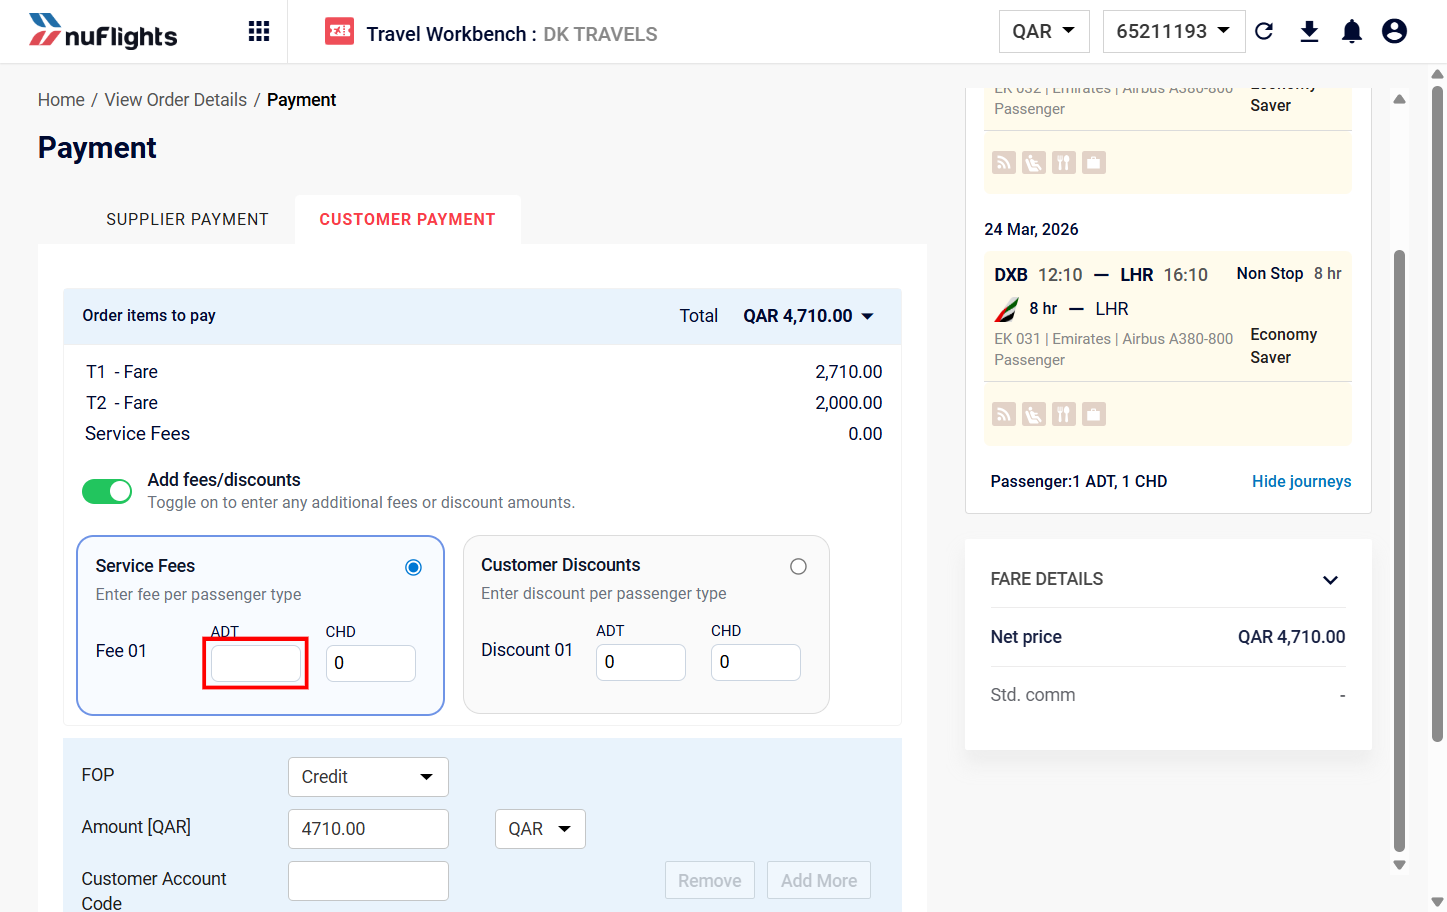
Entering a Discount and Agency Service Fee
To configure the available service fees labels and defaults, refer to the Customer Payment Guide.
TRAACS Credit Control & Customer Account Code
The Customer Account Code field on the Payment page behaves differently depending on your agency's backoffice configuration. This section explains the three scenarios.
Billing Profiles must be configured in the Agency Admin portal before using the Customer Account Code features described below. See the Billing Profiles Guide for setup instructions.
Scenario 1: Wave TRAACS Customers
For agencies connected to Wave TRAACS, the Customer Account Code field is a searchable dropdown — it is no longer a free text input.
How It Works
- On the Payment page, locate the Customer Account Code field under Customer Payment.
- Start typing a customer code or name to search. Matching billing profiles will appear in a dropdown.
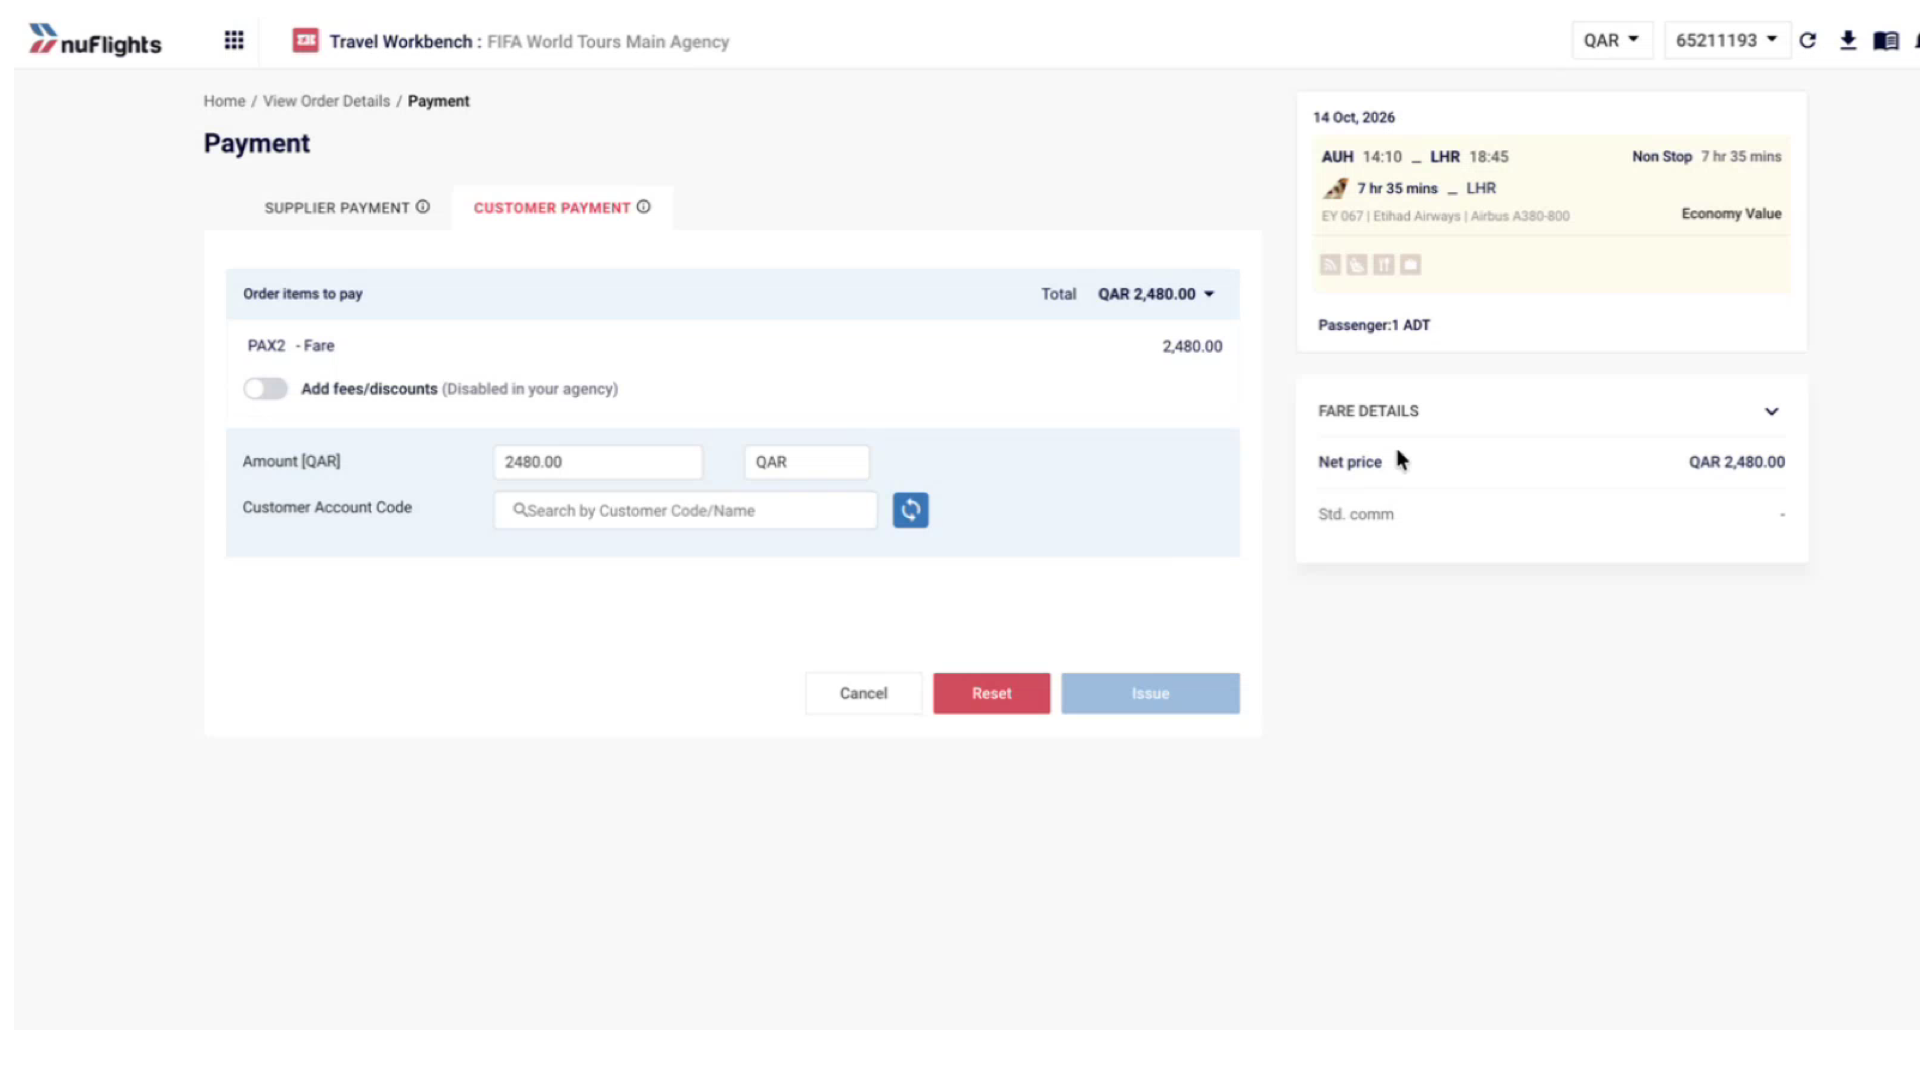
Customer Account Code is now a searchable dropdown for TRAACS-connected agencies
- Select the appropriate billing profile from the results.
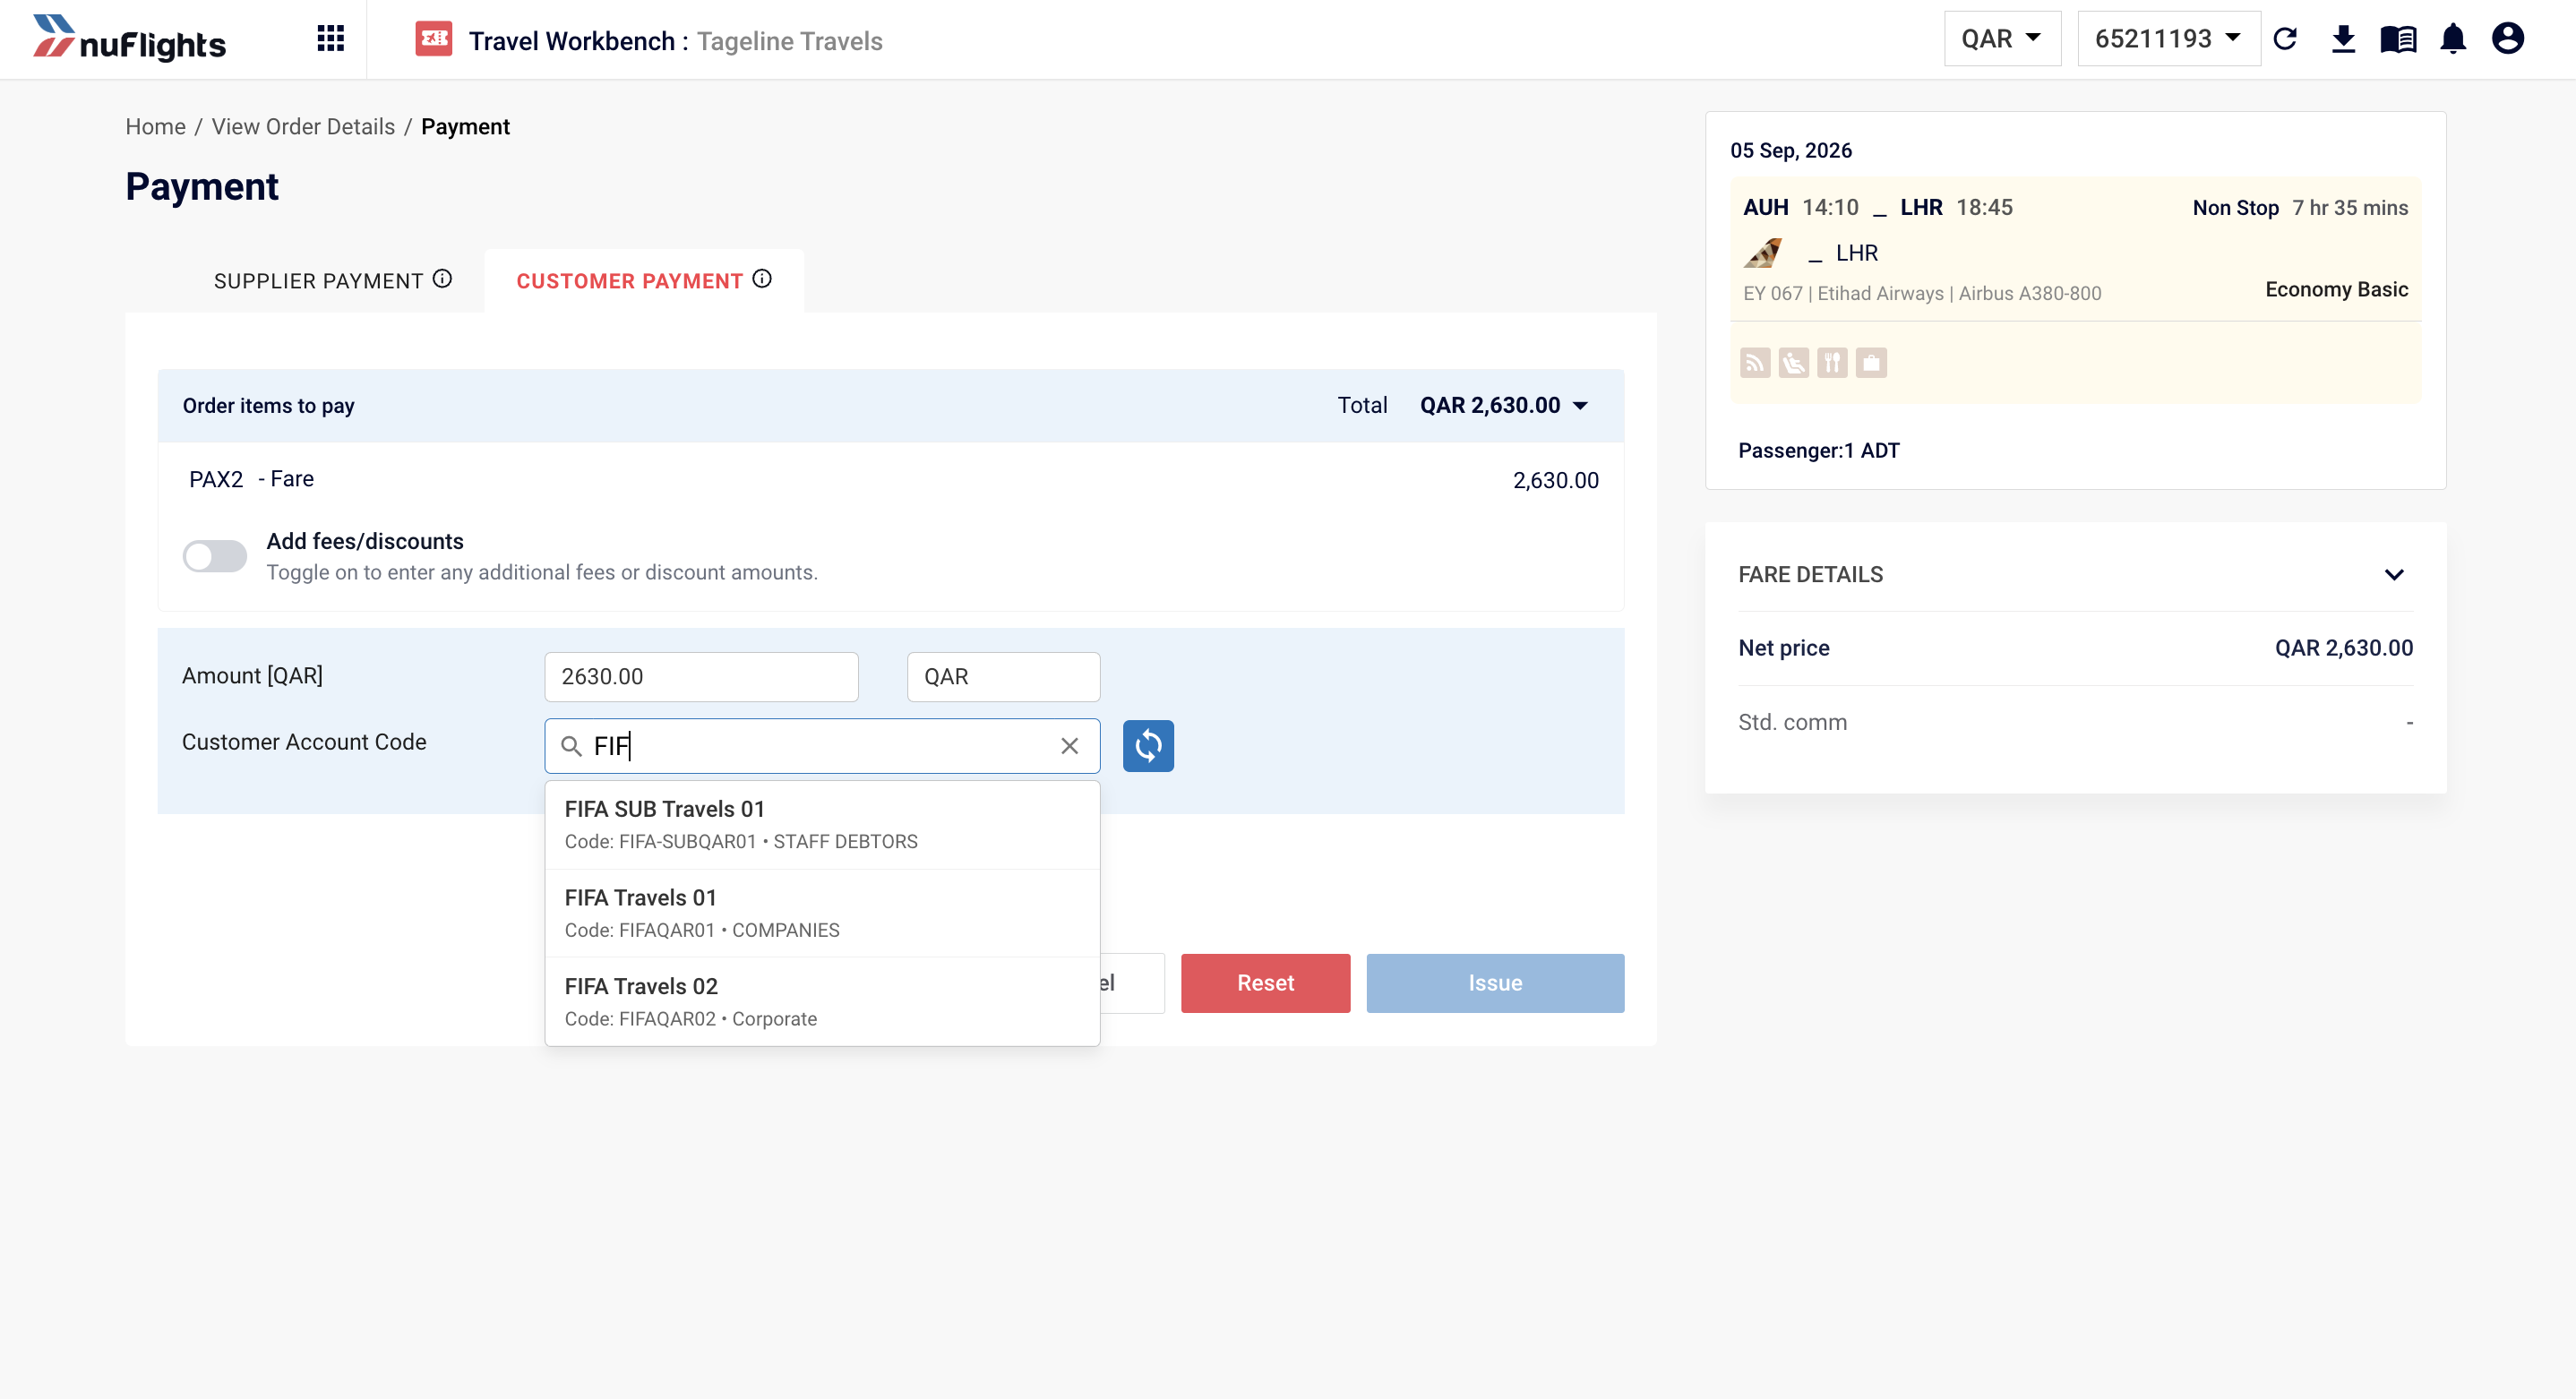
Search results showing customer name, code, and available credit
Real-Time Credit Check
Once a billing profile is selected, NuFlights performs a real-time credit check against your Wave TRAACS system. There are two possible outcomes:
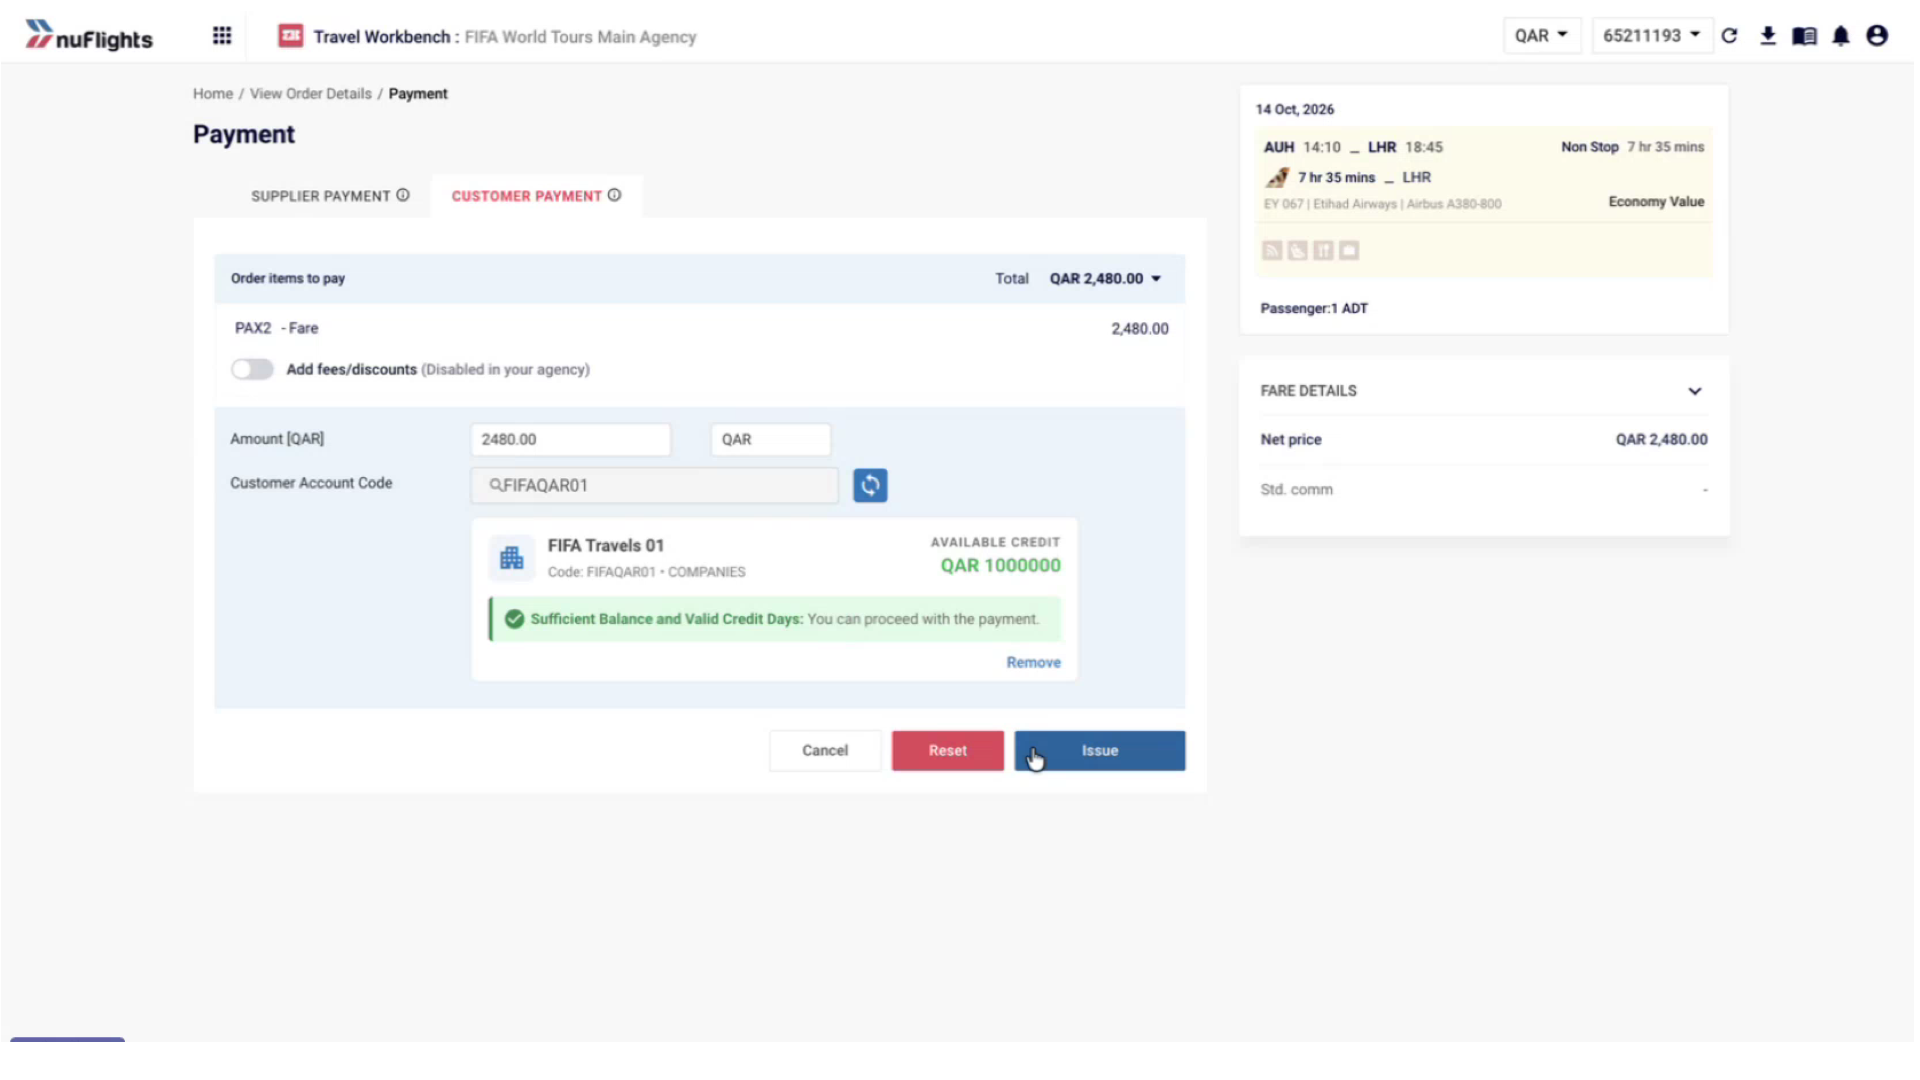
✅ Sufficient Balance — The credit check passes. A green indicator confirms: "Sufficient Balance and Valid Credit Days: You can proceed with the payment." The Issue button remains active.
Credit check passed — sufficient balance confirmed
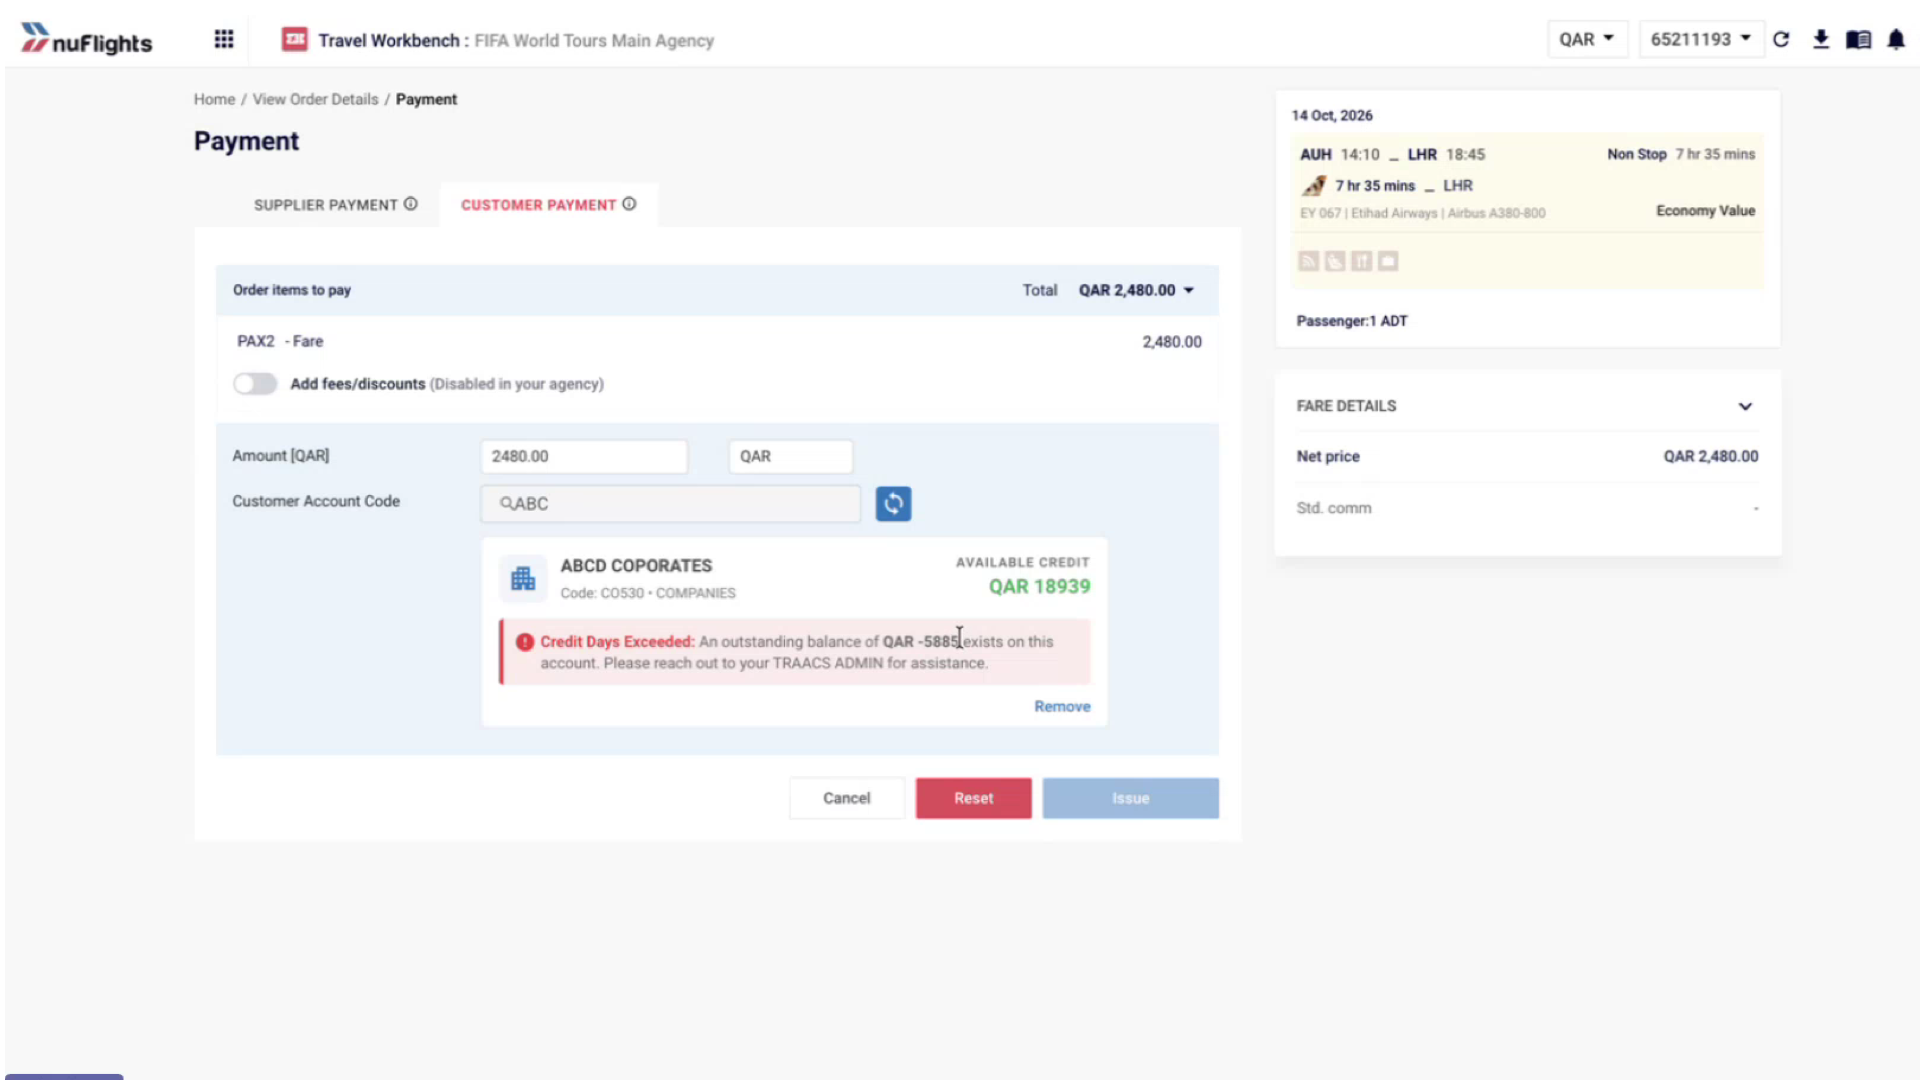
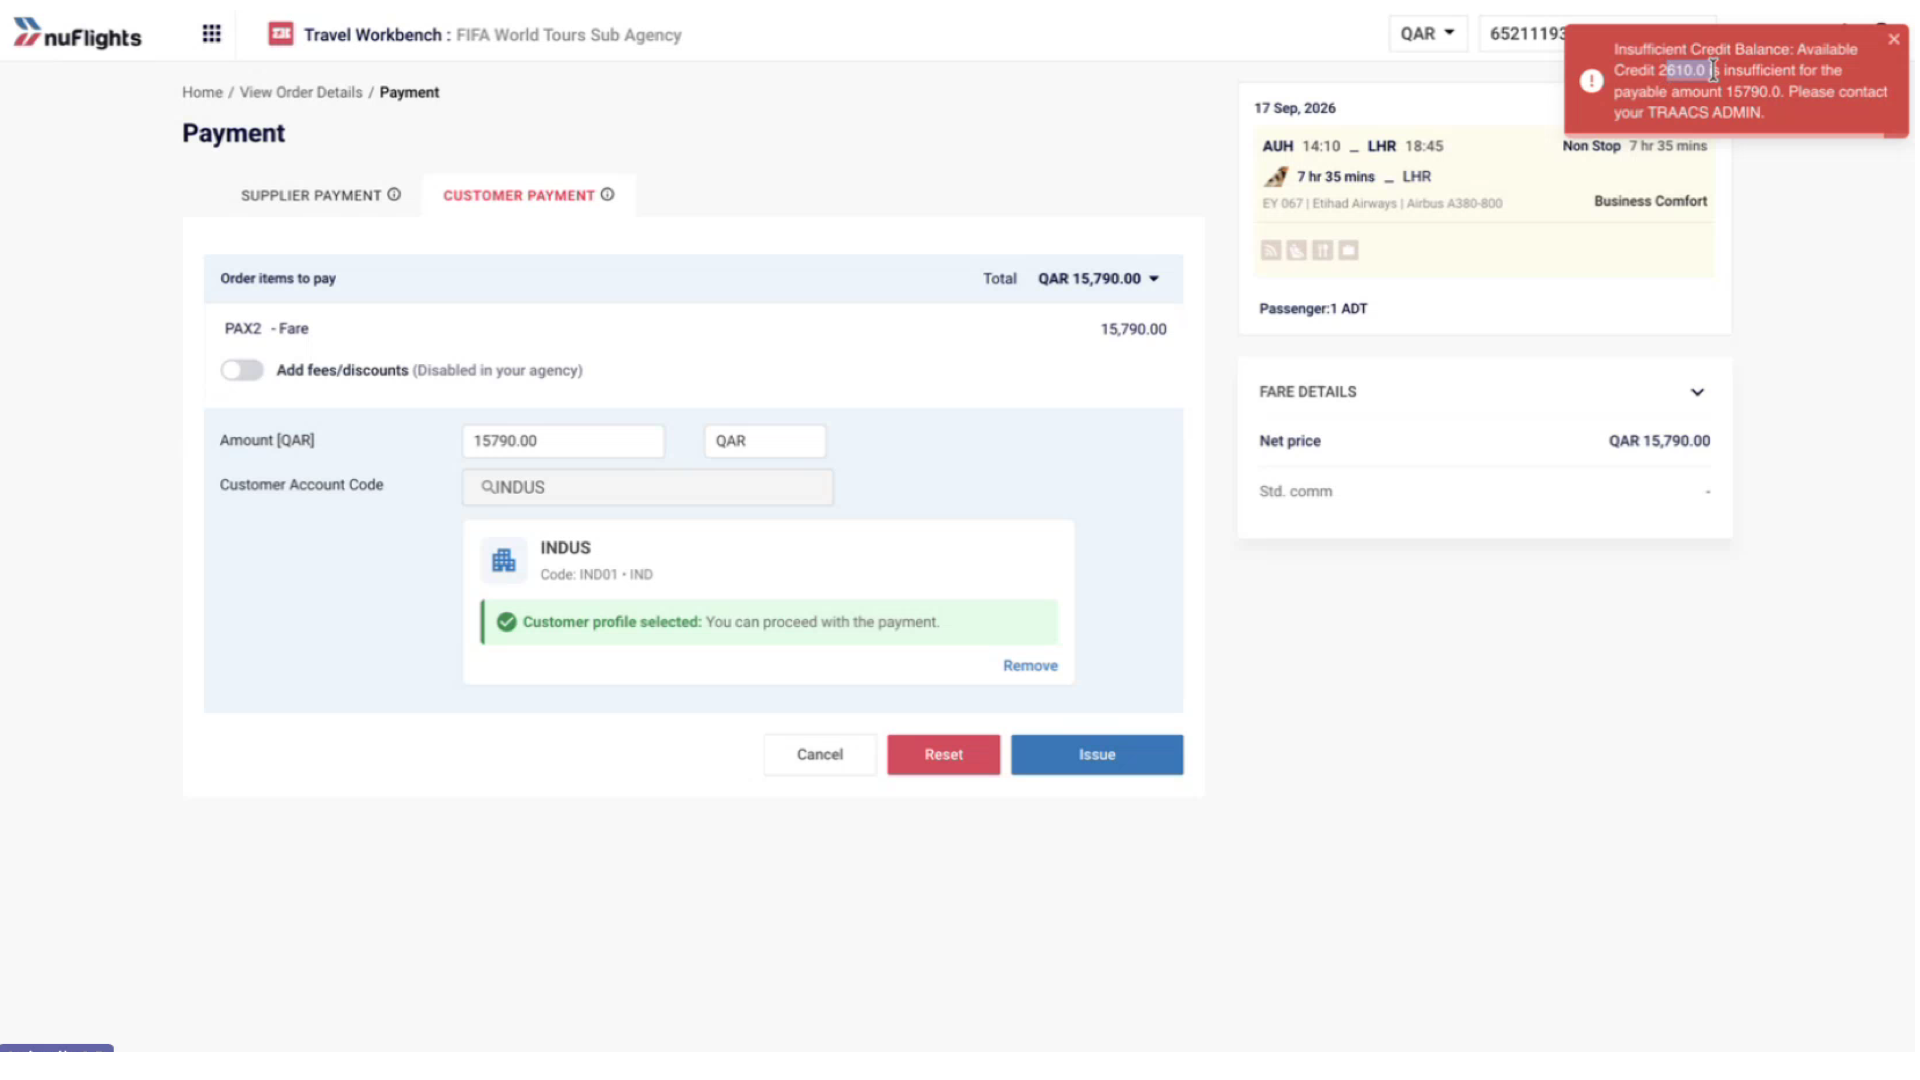
❌ Insufficient Credit — The credit check fails. A red warning indicates: "Credit Days Exceeded: An outstanding balance of [amount] exists on this account. Please reach out to your TRAACS ADMIN for assistance." Additionally, a popup notification displays the exact credit shortfall. The agent cannot issue the ticket until the customer's credit is resolved in TRAACS.
Credit check failed — outstanding balance warning
Popup showing insufficient credit details with the available balance and payable amount
When a credit check fails, the ticket cannot be issued. The customer must settle their outstanding balance with the agency's finance team first. Once the credit is updated in TRAACS, the agent can retry the issuance.
Cash Customer — No Credit Check
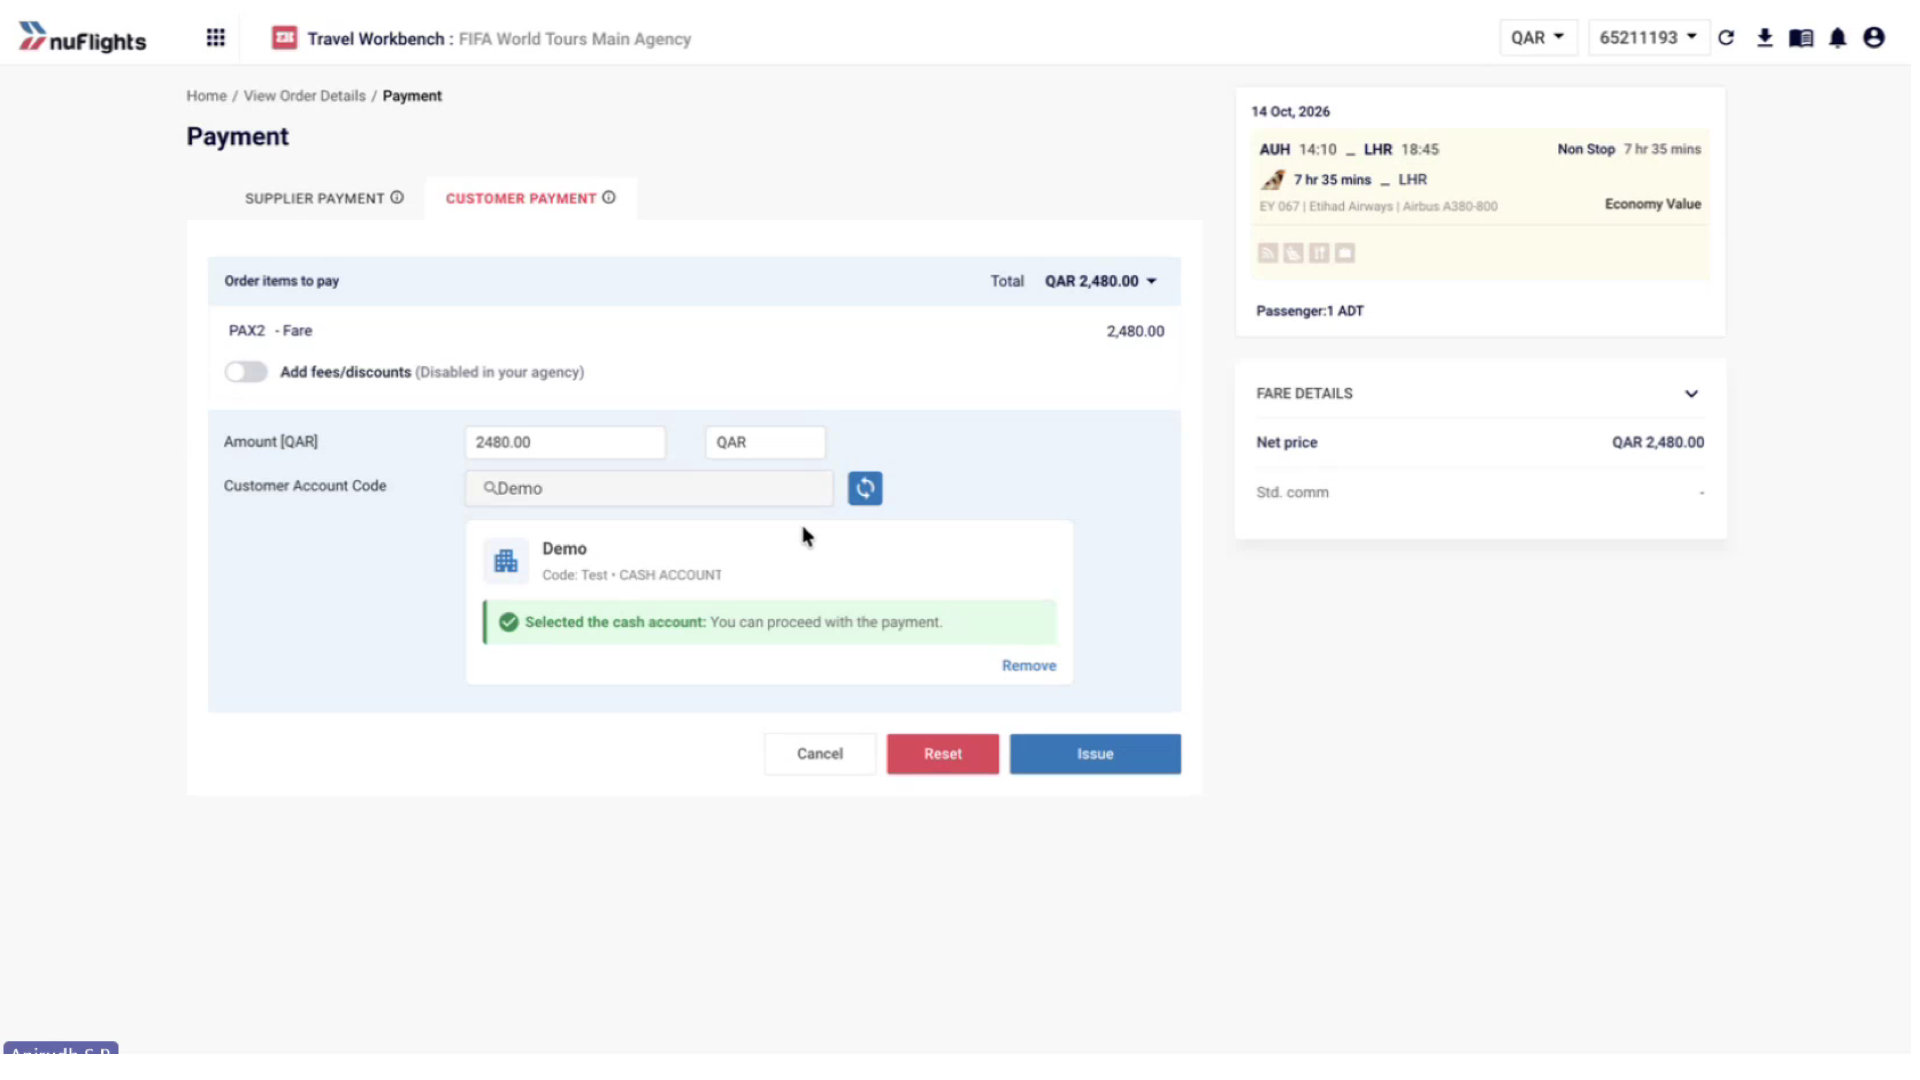
If a Cash Customer profile is selected (for walk-in or general customers), no credit check is performed. The agent can proceed to issue the ticket immediately.
Cash Customer selected — no credit check, ticket can be issued directly
Sync from TRAACS (On the Payment Page)
If a billing profile is missing from the search results (e.g., a new customer was recently added in TRAACS), the agent can sync profiles directly from the Payment page without navigating to Agency Admin:
- Click the Sync from TRAACS icon (↻) next to the Customer Account Code field.
- Wait for the sync to complete.
- Search for the customer code again — the new profile will now appear.
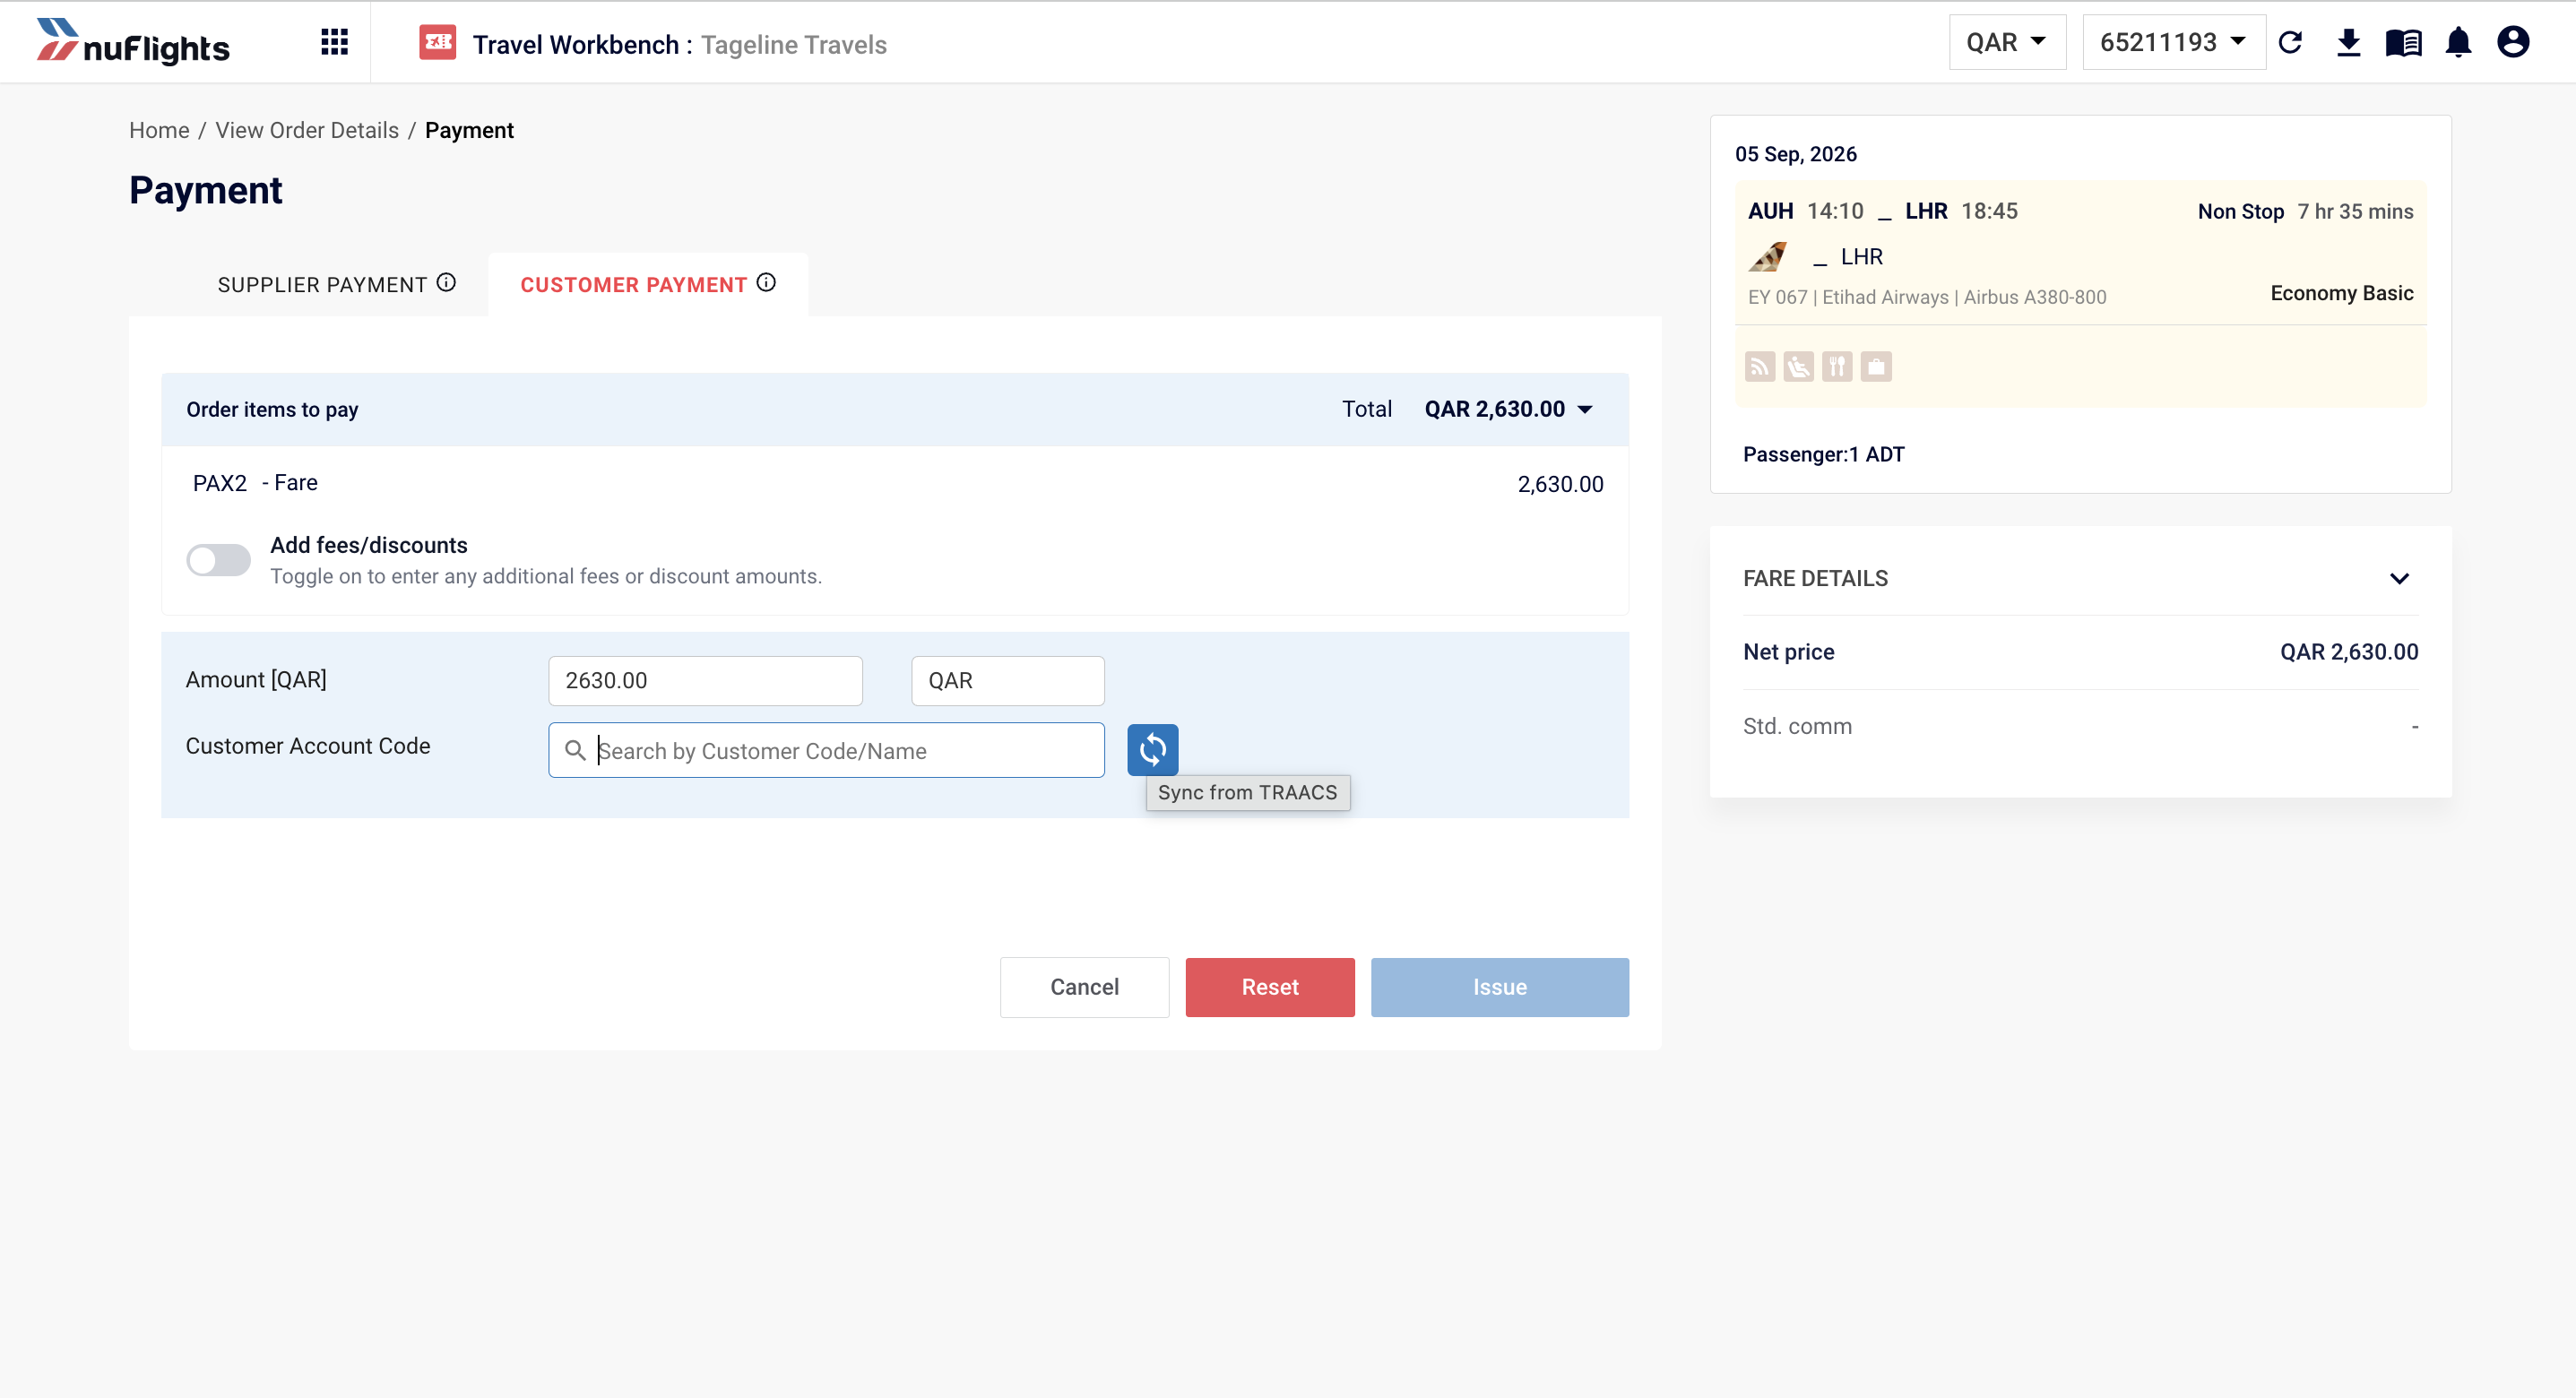
Sync from TRAACS button on the Payment page
Scenario 2: NuTRAACS & AIR File Export Customers
For agencies using NuTRAACS or AIR File Export mode, the Customer Account Code field is also a searchable dropdown linked to your Billing Profiles. However, there is no real-time credit check — the system does not validate the credit balance against NuTRAACS.
How It Works
- Search for a customer code or name in the dropdown.
- Select the billing profile. A green confirmation appears: "Customer profile selected: You can proceed with the payment."
- Click Issue to proceed.
Adding a Profile from the Payment Page
If the required billing profile is not found, the agent can add one directly from the Payment page:
- Click the Add option next to the search field.
- Enter the customer details (Profile Type, Customer Code, Customer Name, Currency).
- Save the profile. It will be available immediately and also reflected in the Agency Admin Billing Profiles section.
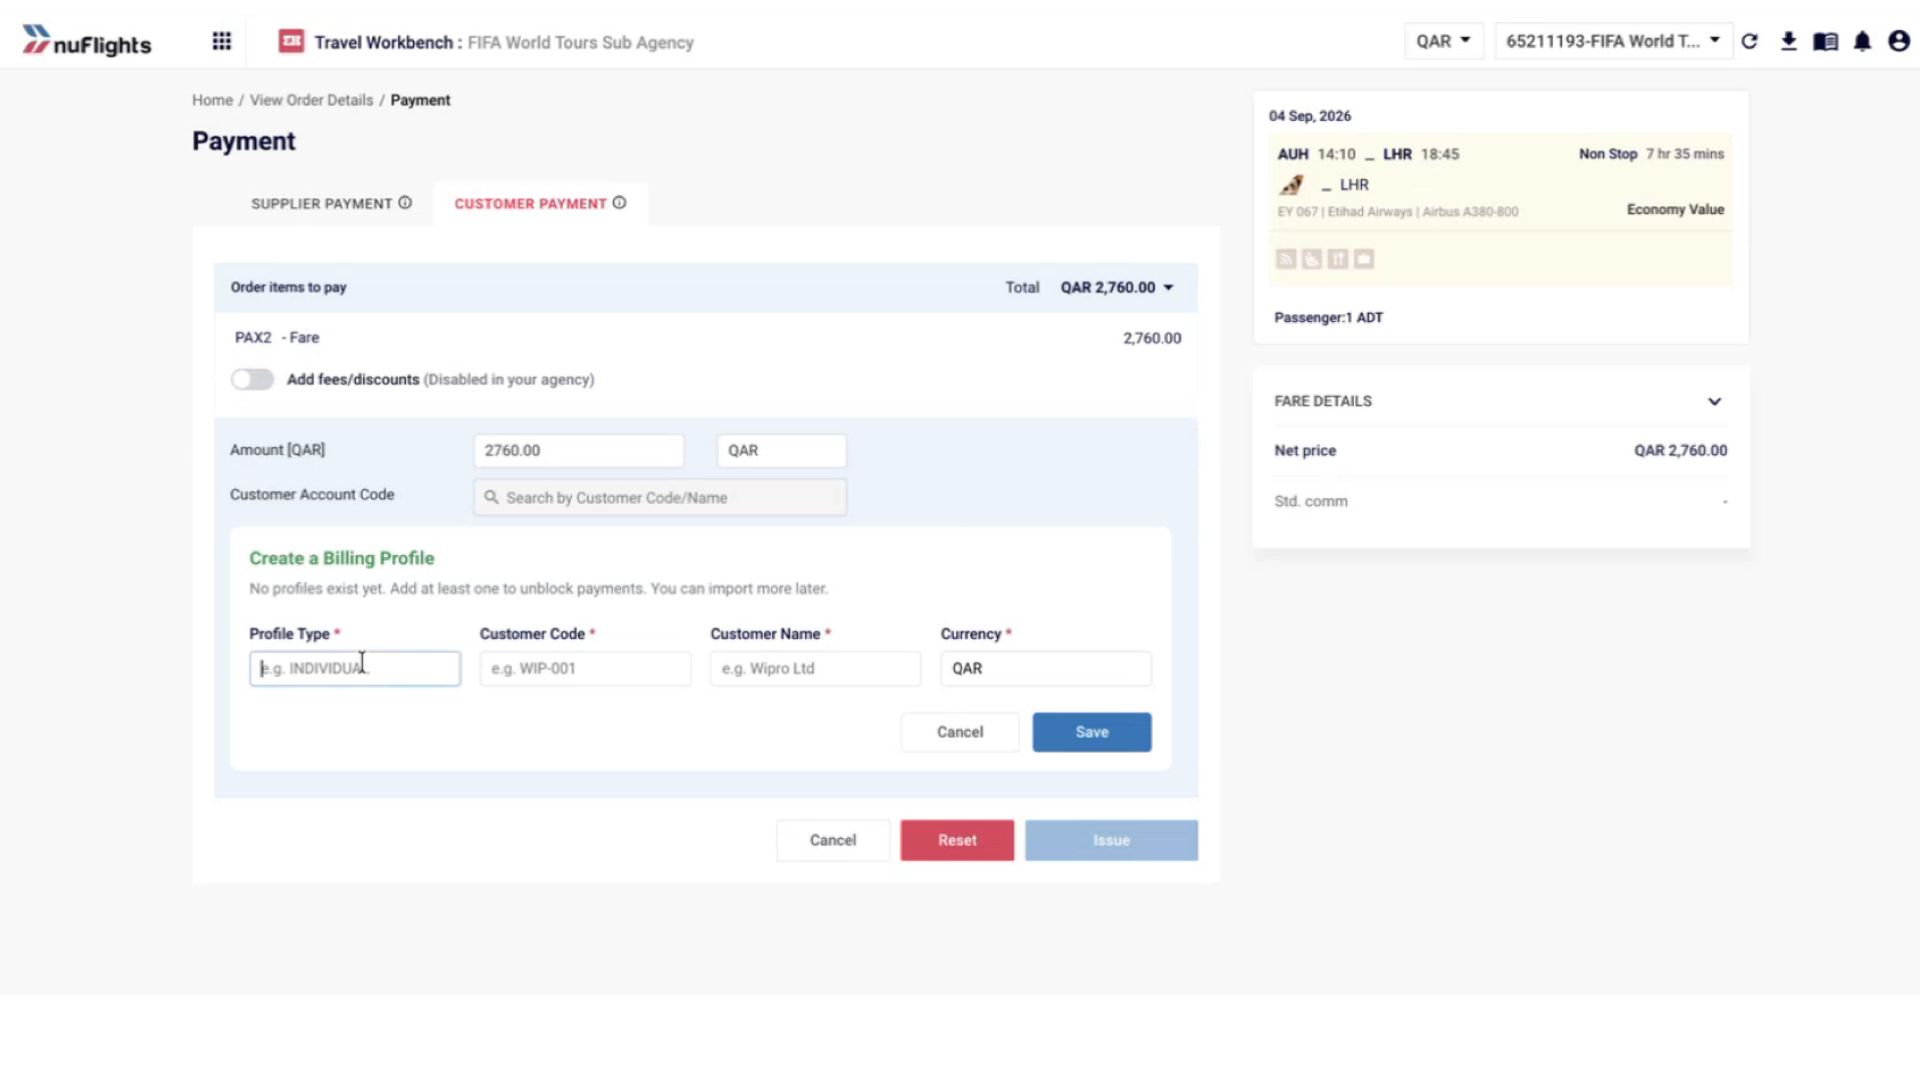
Adding a new billing profile directly from the Payment page
For NuTRAACS and AIR File Export agencies, billing profiles can also be imported in bulk via CSV from the Billing Profiles section in Agency Admin.
Scenario 3: Backoffice Disabled
For agencies without a backoffice connector (no TRAACS, NuTRAACS, or AIR File Export configured), the Customer Account Code field remains a free text input — exactly as it was before this update.
- Agents can enter any value or leave it blank.
- No credit check or profile validation is performed.
- The entered code is captured for reporting purposes only.
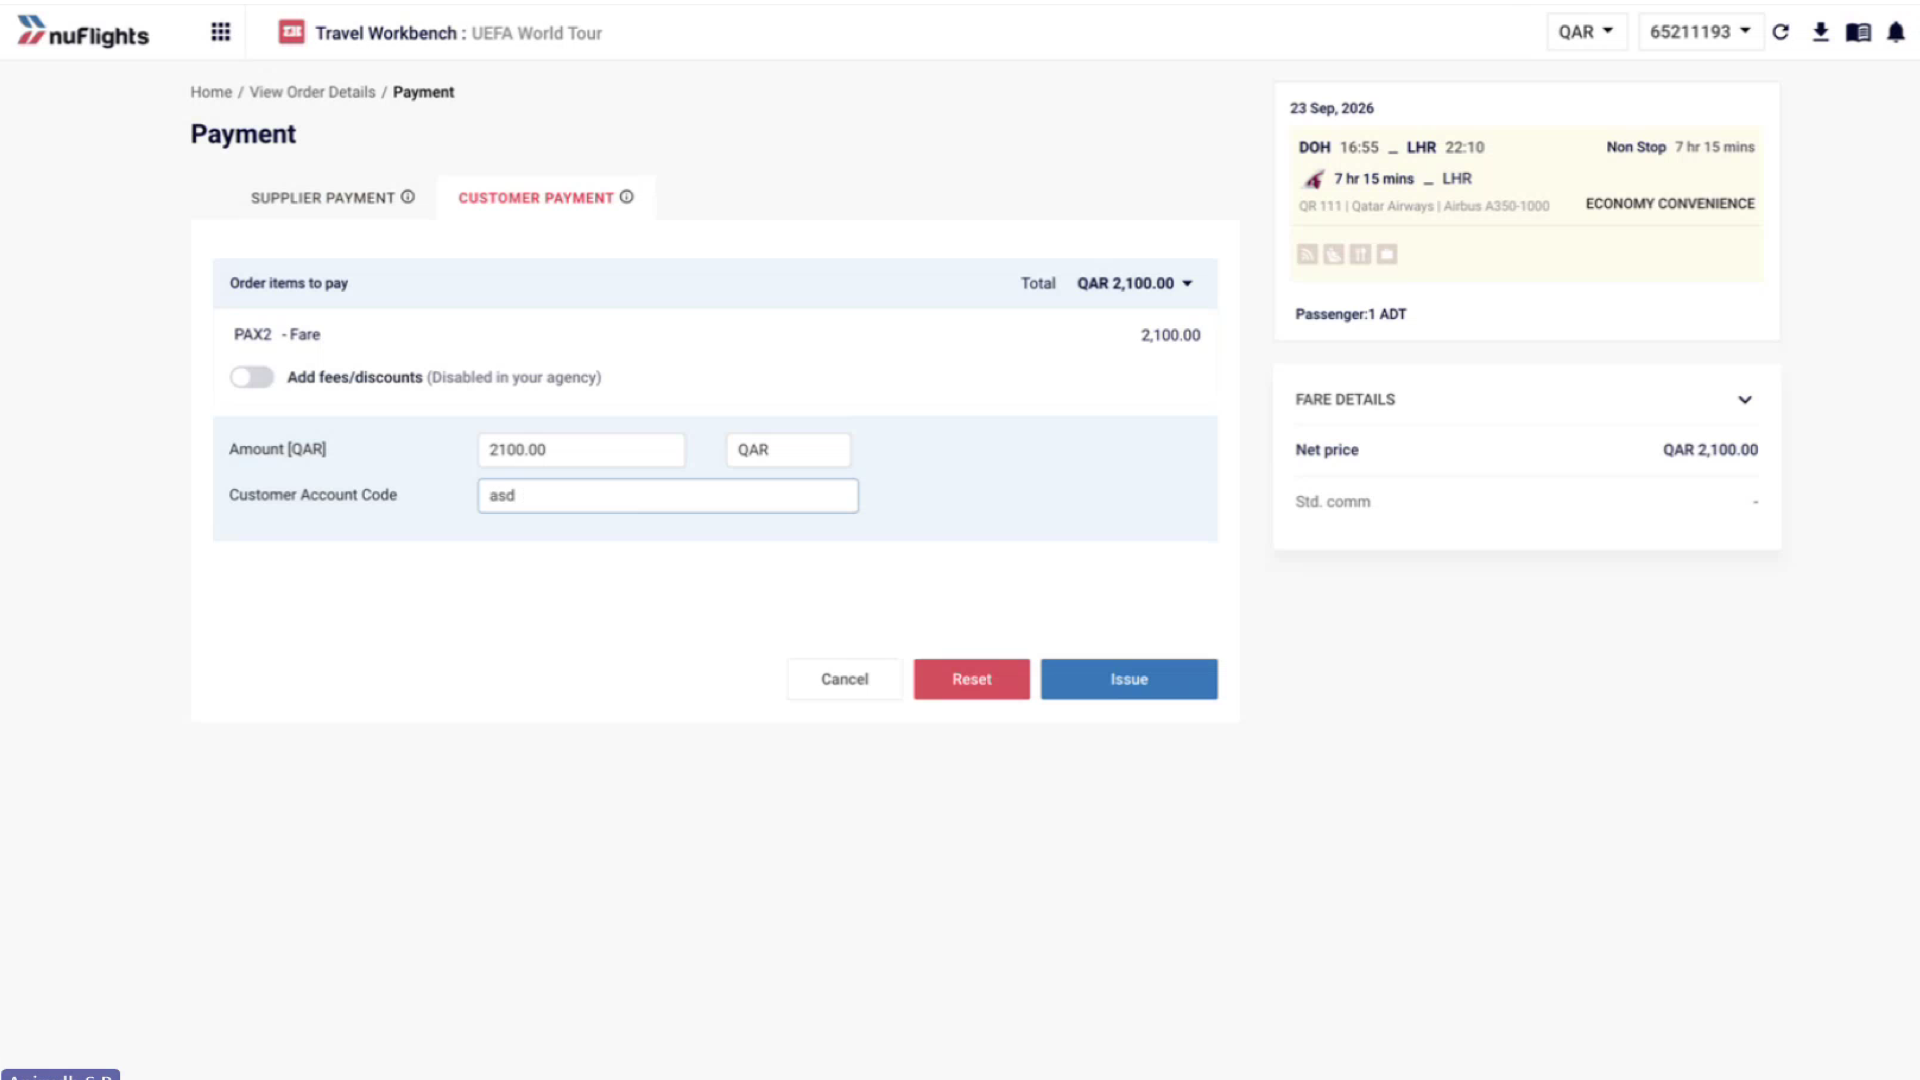
For agencies without a backoffice, the Customer Account Code remains a free text field
There is no change in behavior for agencies without a backoffice connector. The Customer Account Code field operates exactly as before.