

Sub-Account Setup & Management
A parent agency can add a sub-agency account and configure the Credit Control limit for that sub-agency.
This guide provides an end-to-end tutorial for Travel Agency users on how to share subscriptions, set up sub-accounts step-by-step.
Part 1: Sub-Agency - Requesting a Partnership
The process is initiated by the sub-agency, which must request a subscription link from their desired main agency partner.
1.1 Accessing Subscriptions
Log into your Agency Admin portal and navigate to the Subscriptions menu. This page displays your current airline subscriptions and any pending requests.
1.2 Initiating the Request
Click on the Request a subscription button to open the partnership request modal.
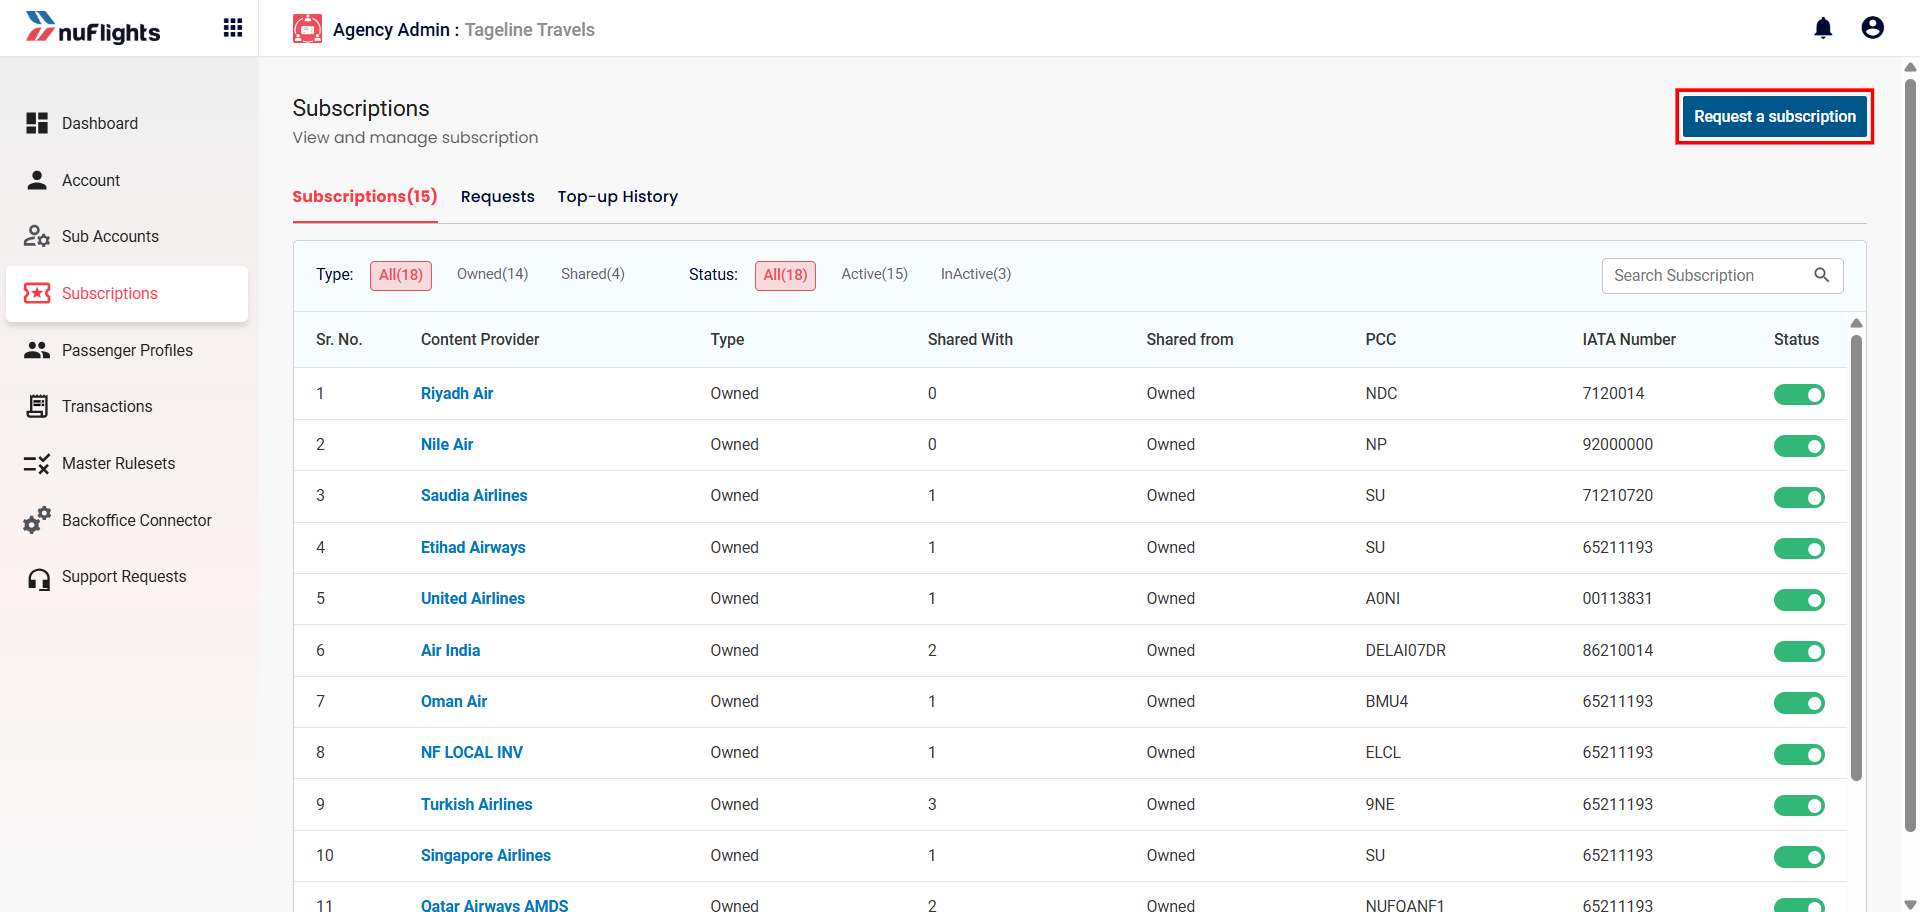
Request Button
1.3 Enter Request Details
A pop-up window will appear. Fill in the required details:
- Main Agency Contact Name – Enter the name of the person you want to send the request to.
- Main Agency Contact Email – Enter the recipient's email address.
- Your Note (Optional) – Add any additional information related to the request.
Example note: "I would like to request the EK subscription." (You may replace EK with any airline or subscription name as required.)
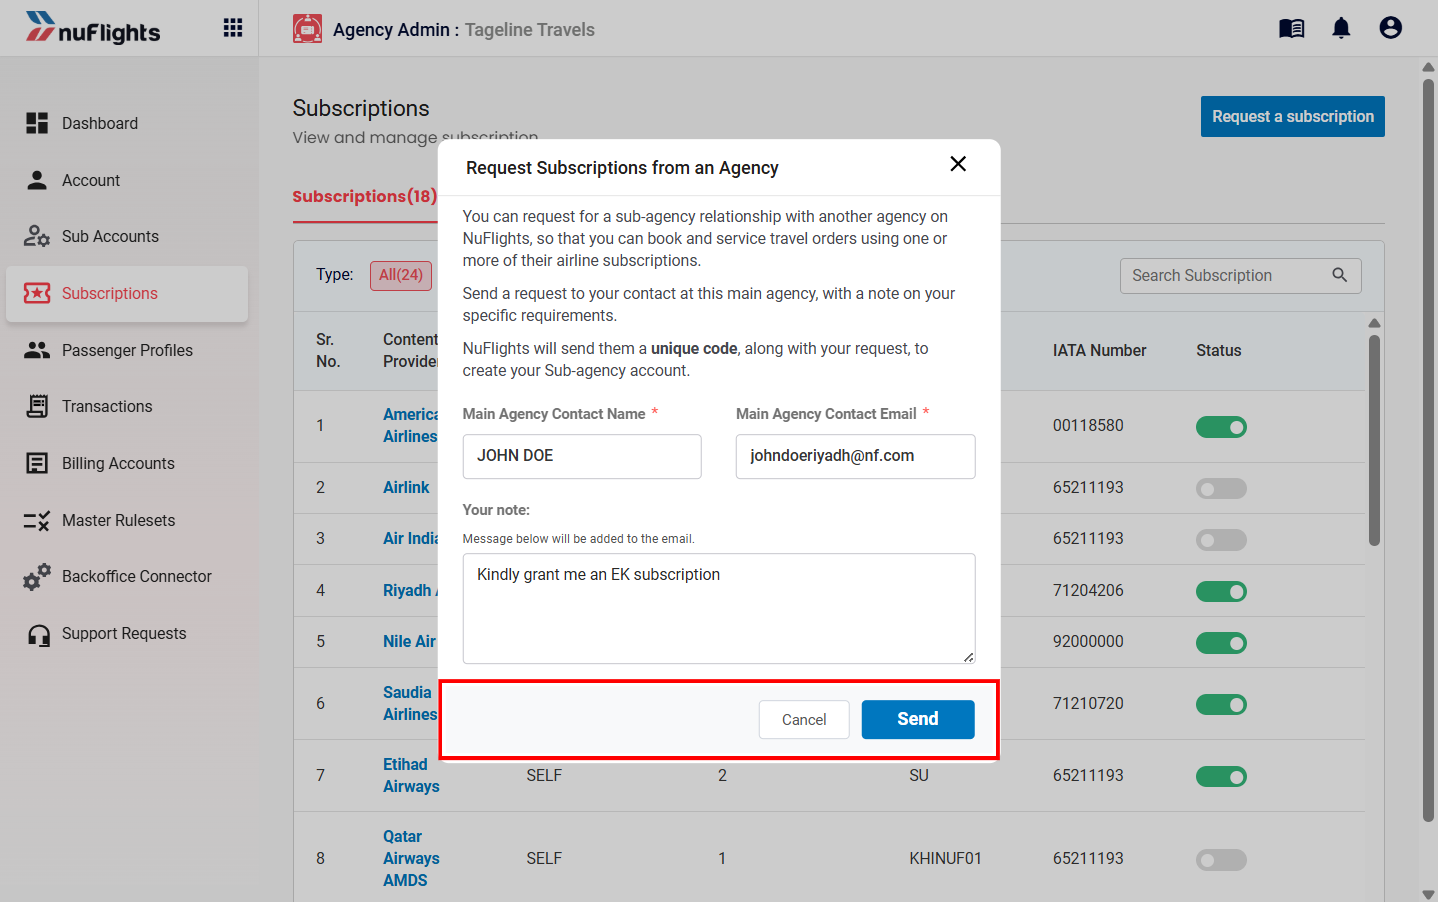
Request Details – form filled with contact name, email, and note
1.4 Send the Request
After entering all the required details, click Send to submit the request.
1.5 Receive the Generated Request Code
Once the request is submitted, a confirmation pop-up will appear displaying a unique generated request code.
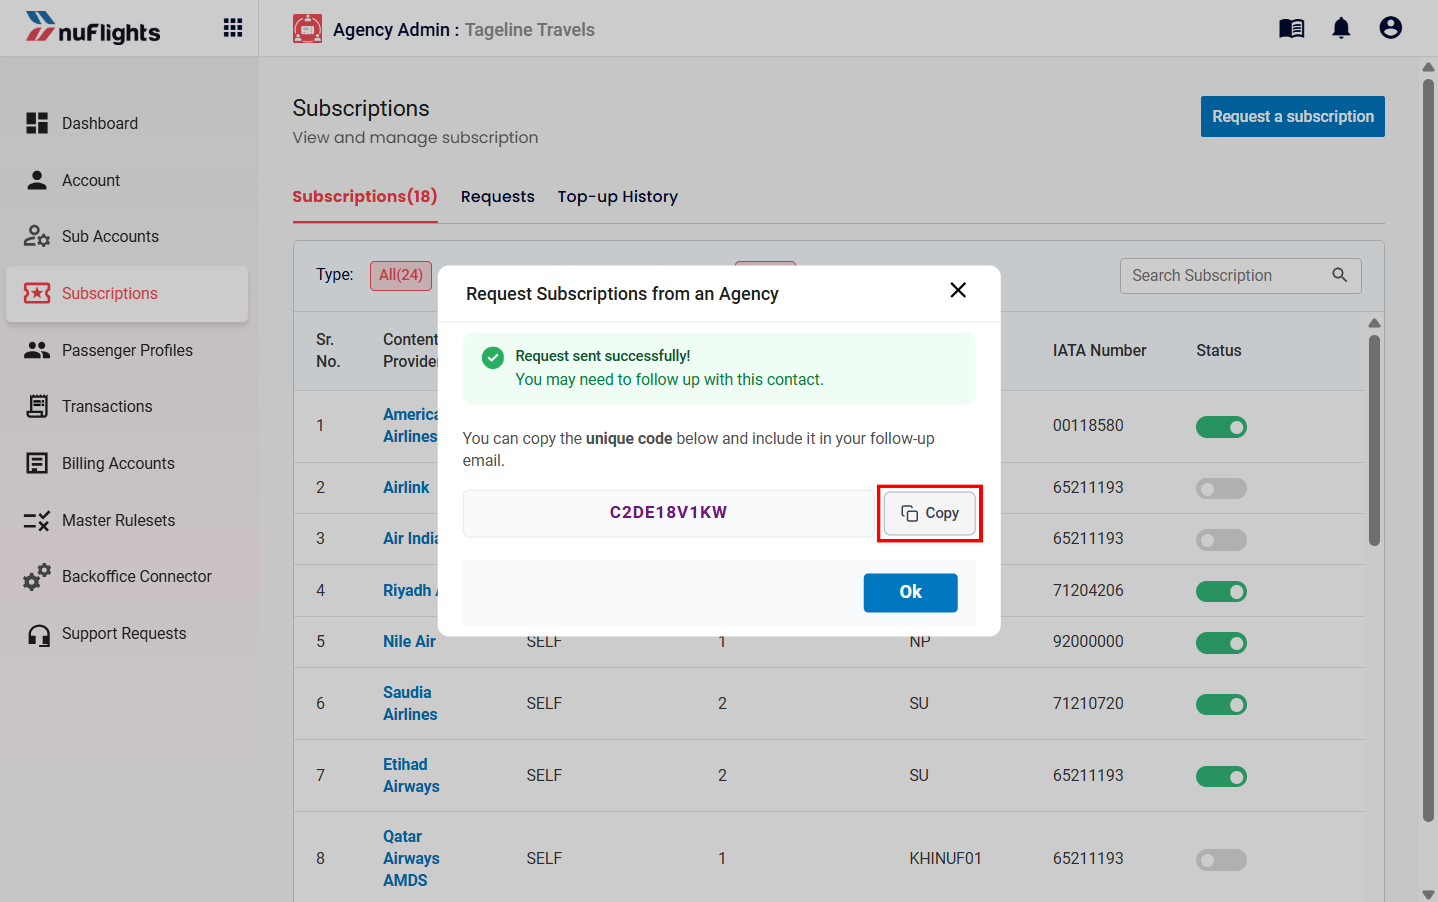
Request Confirmation Pop-up
1.6 Share the Request Code
If you want to notice main agency directly about the request, you can copy the generated code and share it with the agent through internal communication channels. This step is optional and depends on your preferred method of sending the request.
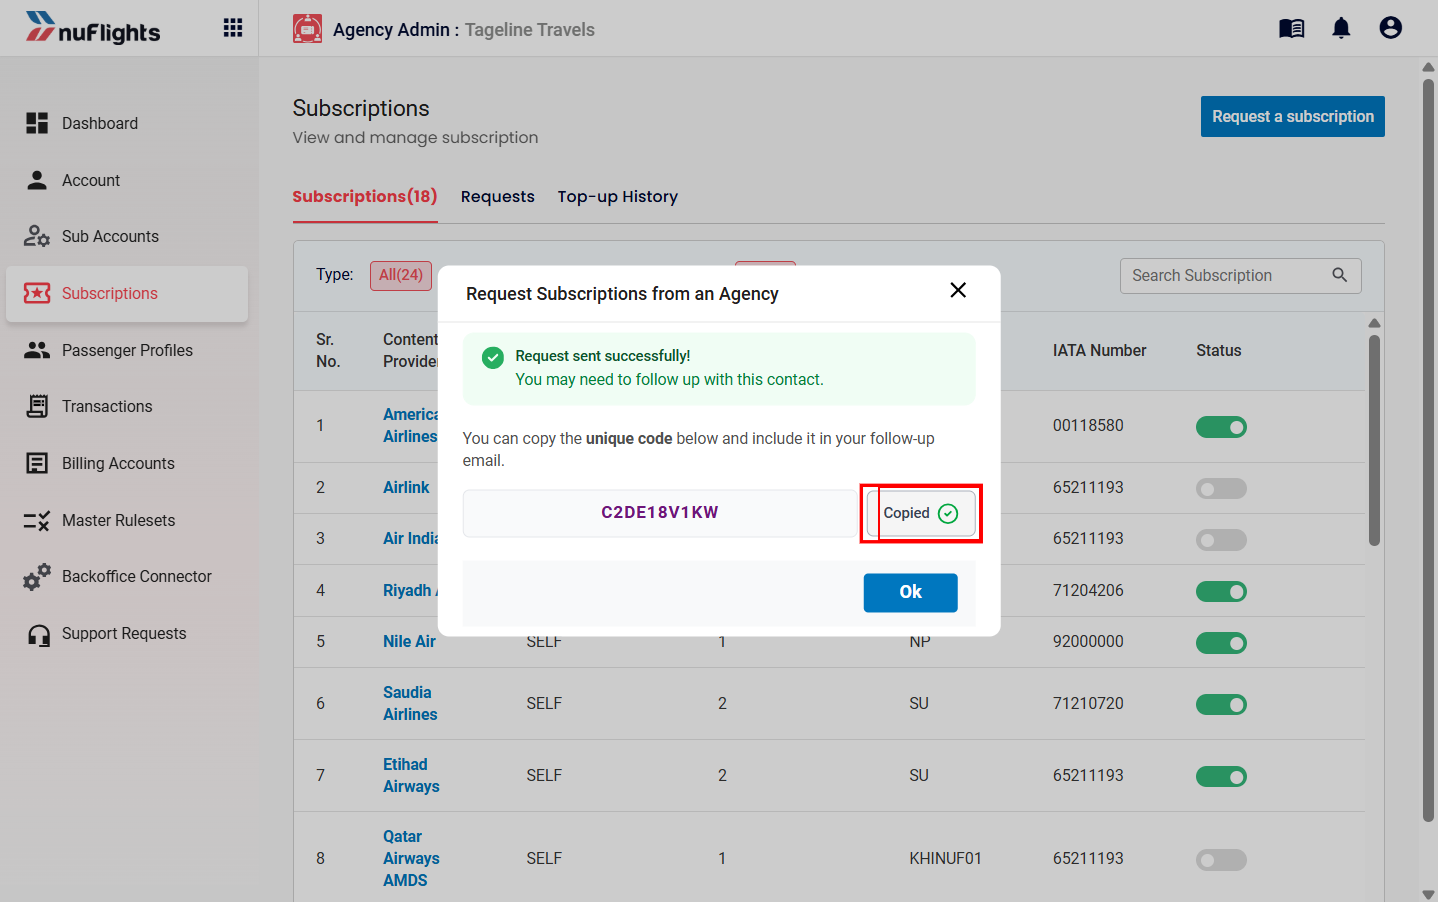
Copy Request Code
1.7 Complete the Process
After copying or sharing the request code, click OK to close the pop-up and complete the request process.
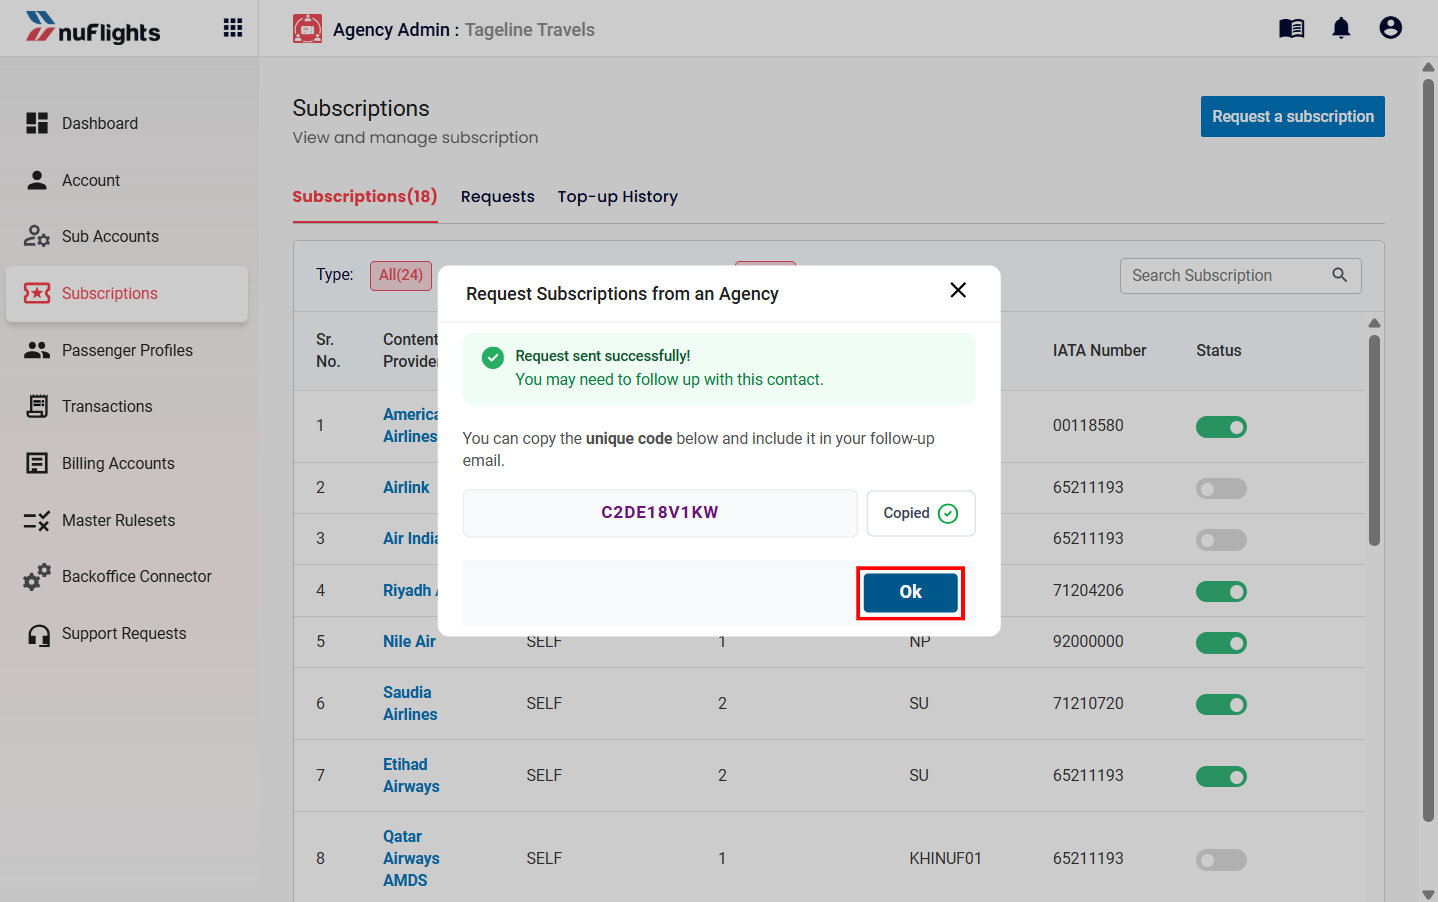
Complete the Process
1.8 Tracking Request Status
You can monitor the status of your request (e.g., Pending, Approved, Rejected) under the Requested tab. Each entry includes the Request ID, Date, and Main Agency.
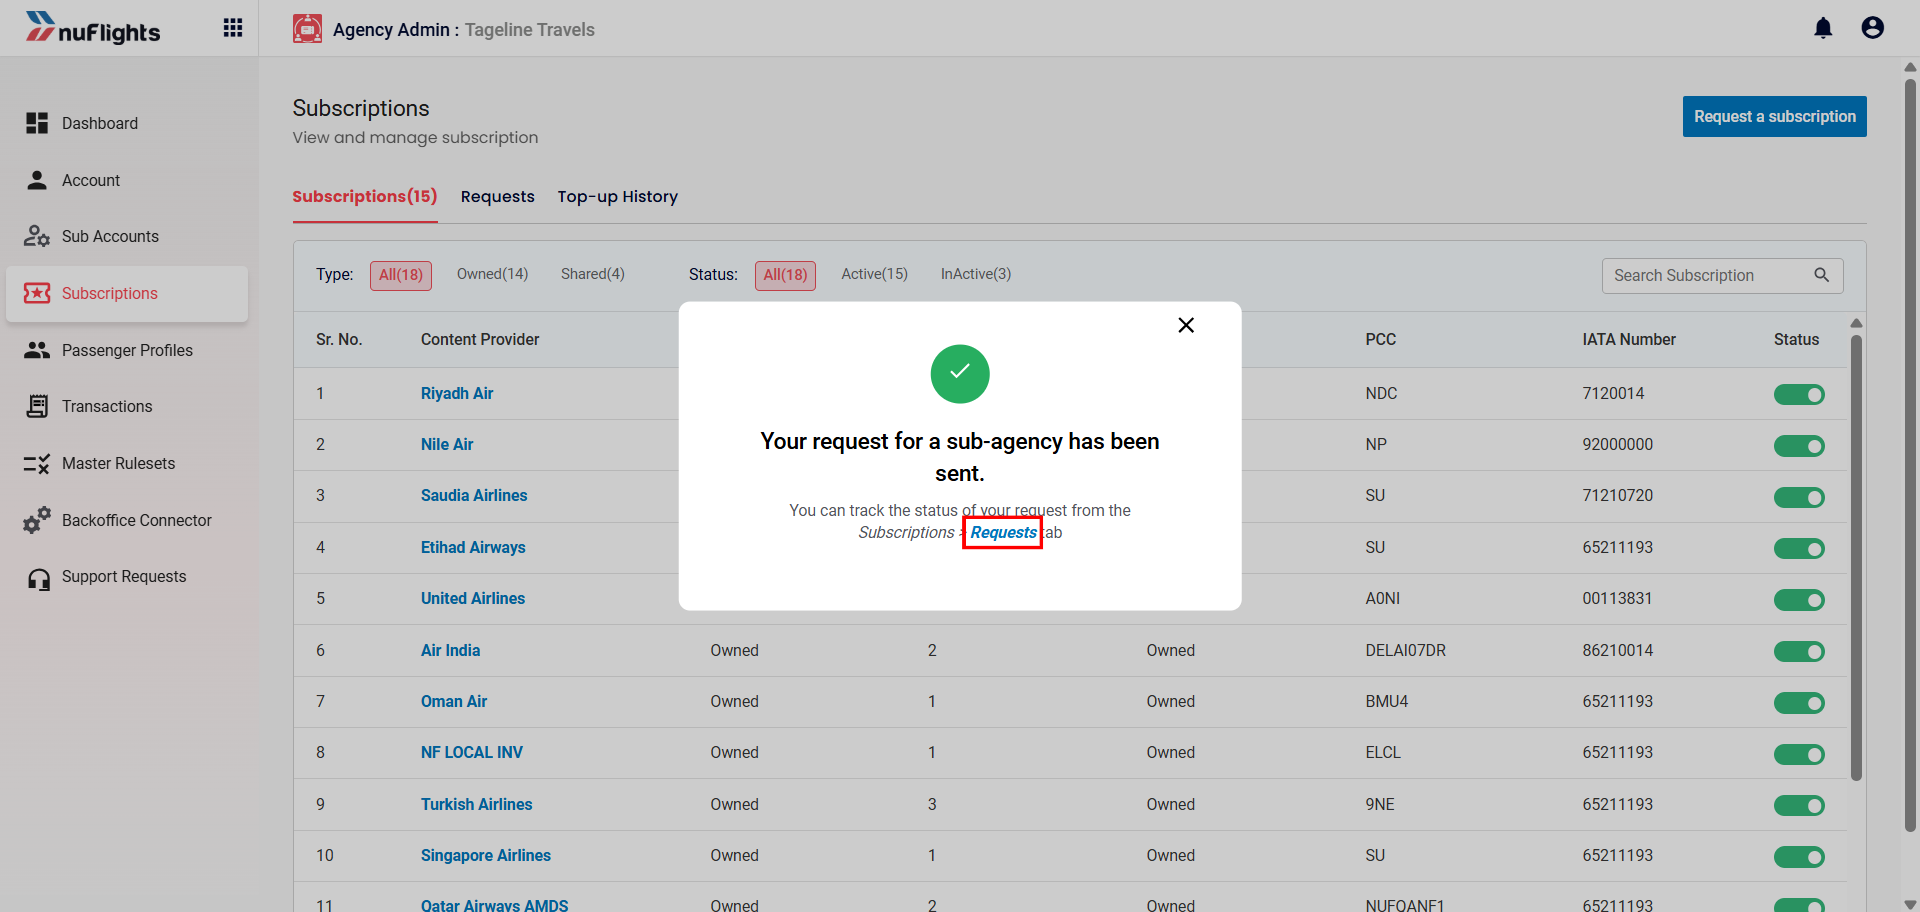
Status View
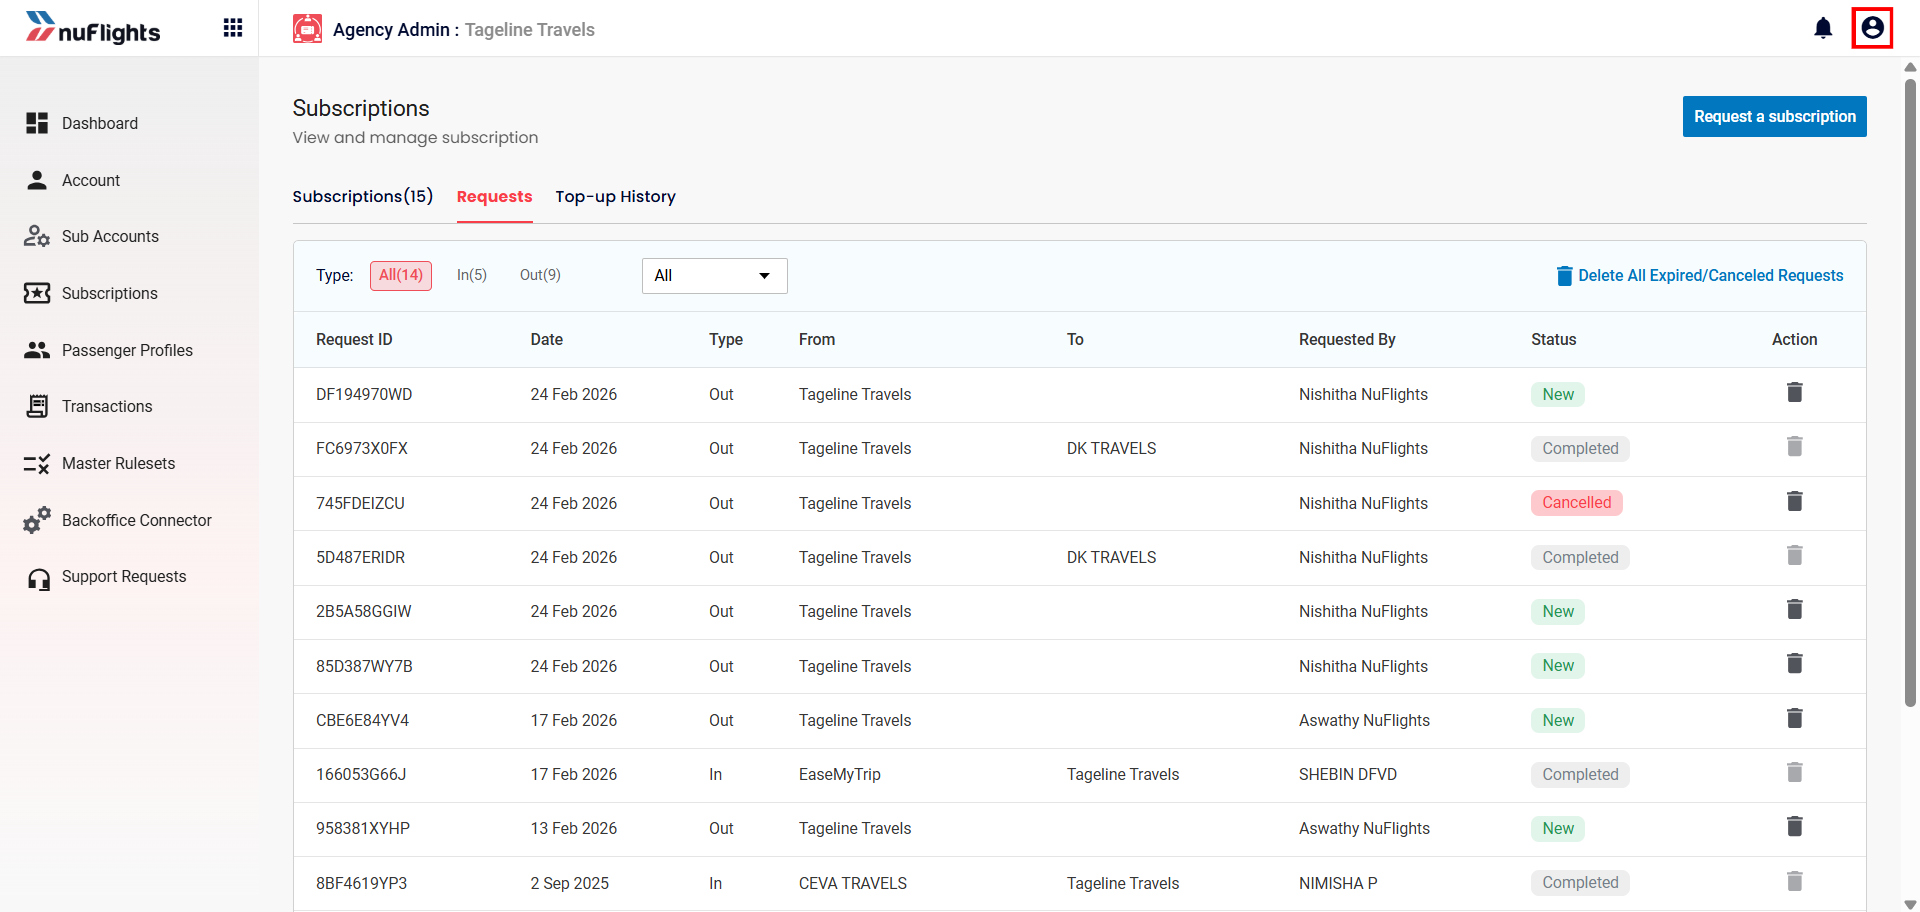
Screenshot 20260224 1605 019
Part 2: Main Agency - Link & Configure Sub-Account
Once the main agency receives the request code (via email), they must link the sub-account and configure its operational parameters.
2.1 Navigate to Sub-Accounts
Log in to the Main Agency Portal.
From the left navigation menu:
- Go to Agency Admin
- Open Subscriptions
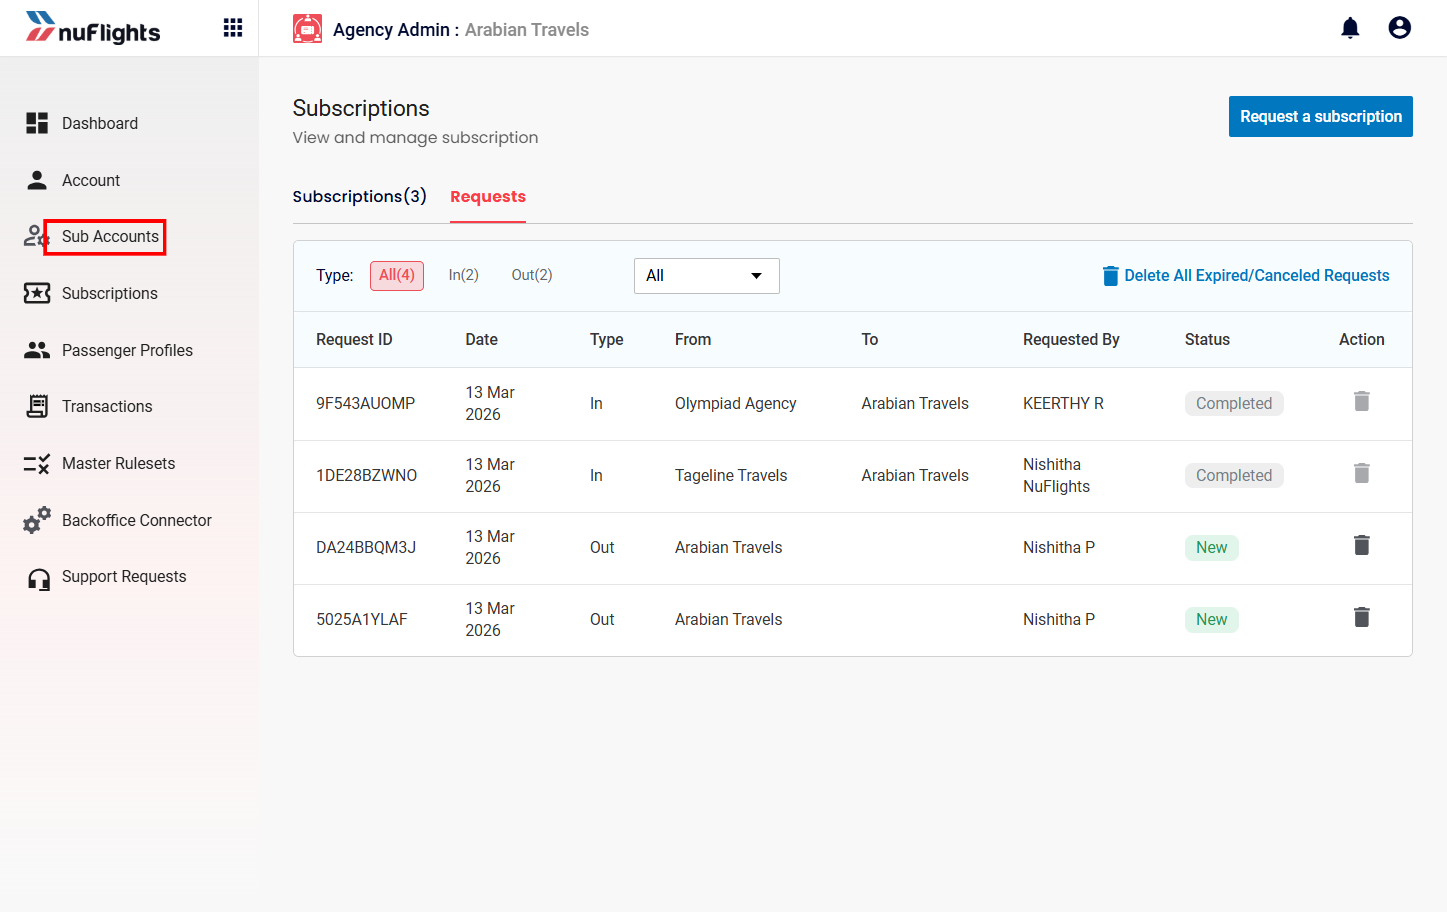
Sub Accounts Navigation
2.2 Click Add Sub-Account
On the Sub Accounts page, click the Add Sub Account button.
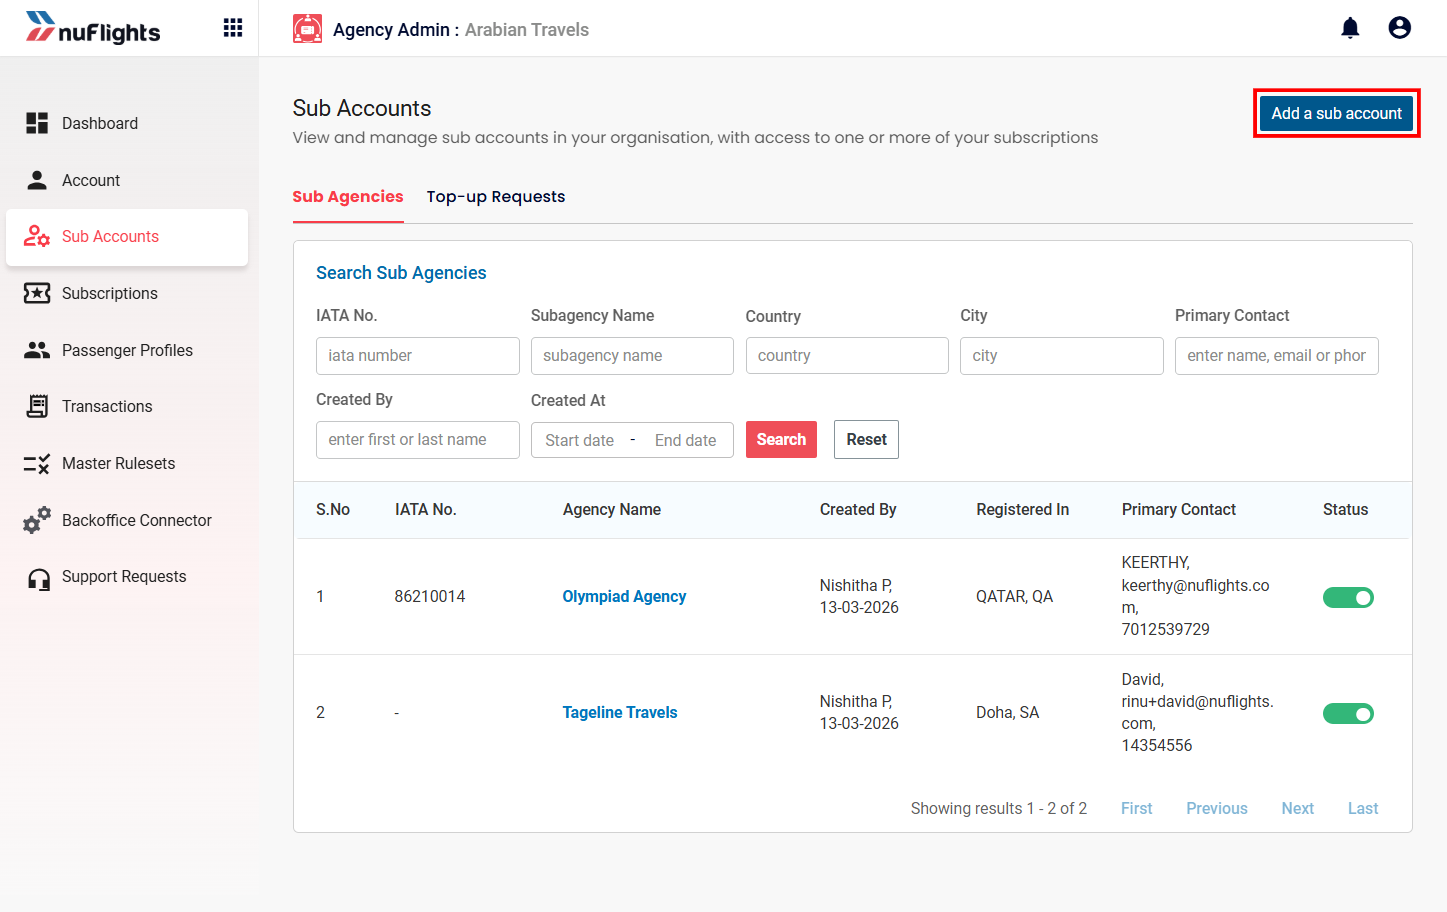
Add Sub Account Button
2.3 Enter Request code
Paste the Request code received by the sub-agency(via mail).
Click Continue.
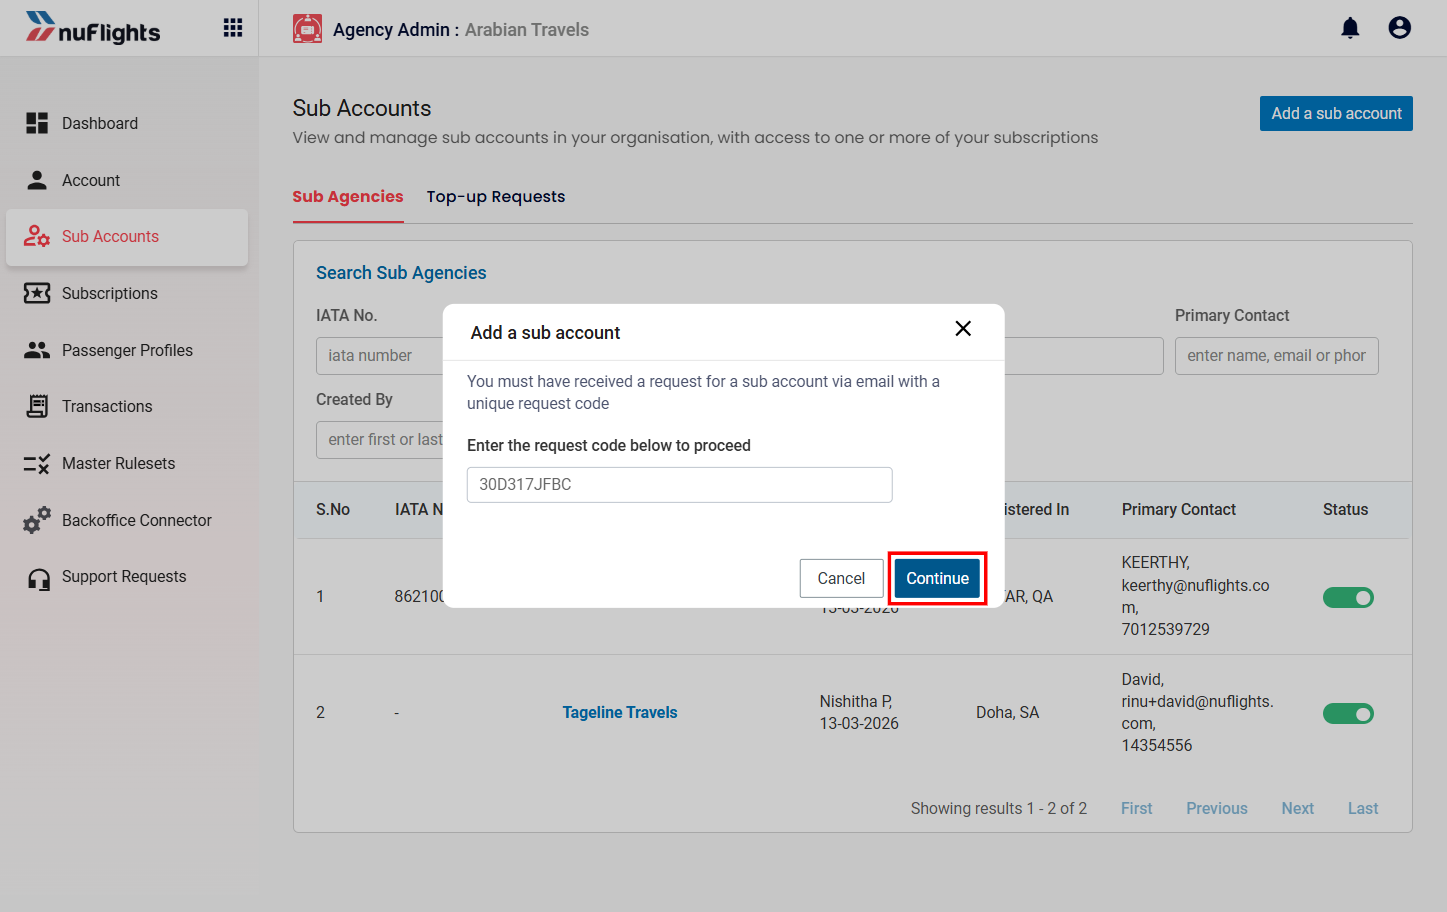
Enter Subscription ID
Create a New Sub Account / Link to Existing Sub Account – Share Subscription Guide
Step 1: Enter the Agency Code
Enter the agency code and continue.
The system validates the agency details and displays the agency name for confirmation.
Enter Subscription ID
Step 2: Verify the Requesting Account
The system will display the account name for verification.
Click Confirm and continue to proceed.
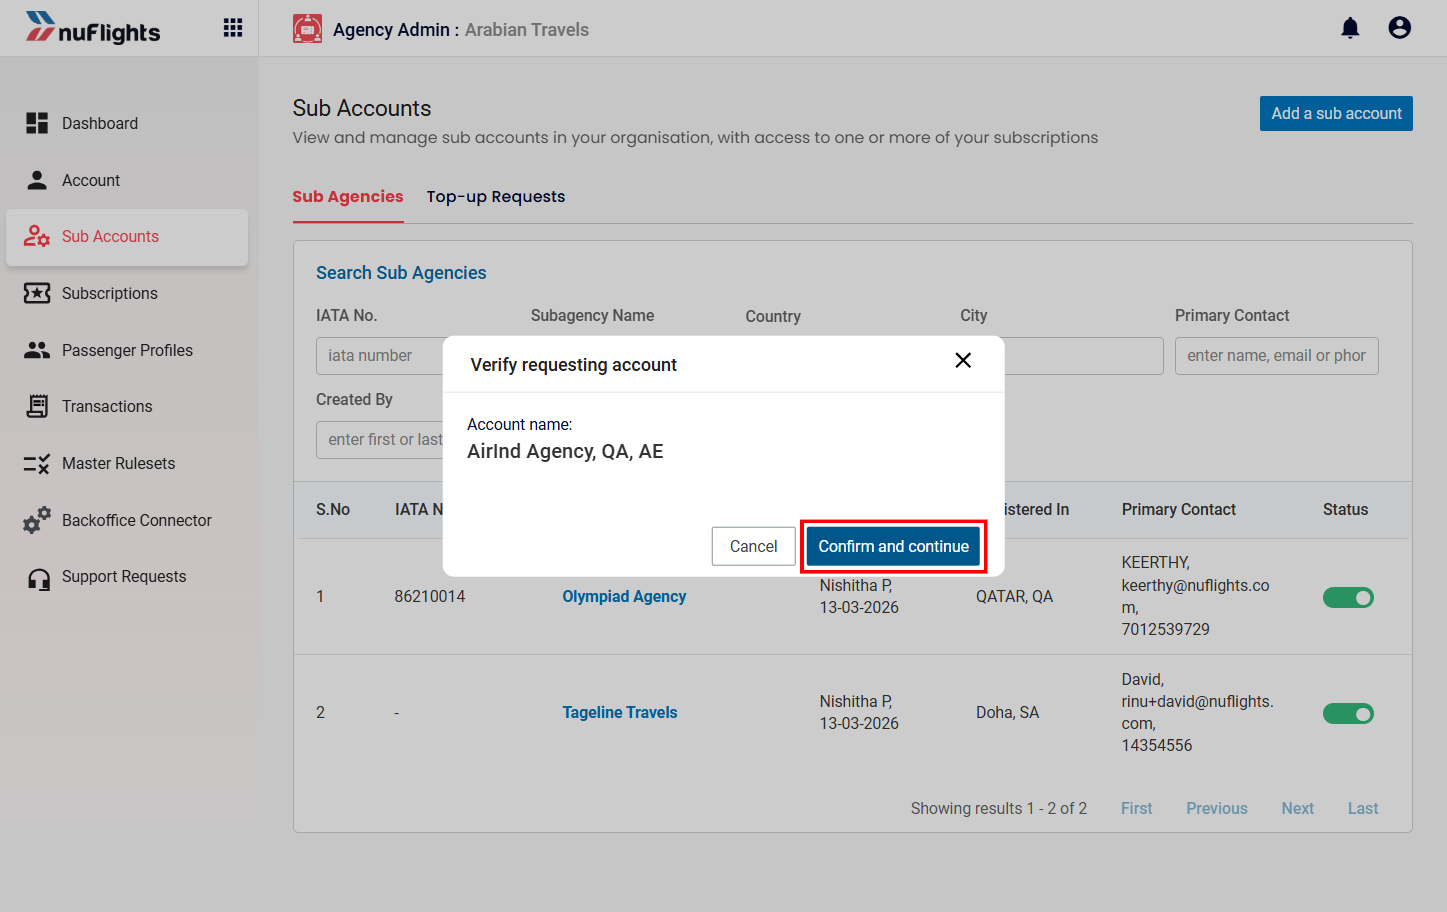
Verify Requesting Account
Step 3: Confirm Agency and Choose Relationship Type
If the agency already exists as a sub account, a Sub account request popup will appear.
You will see two options:
-
Option 1: Create a new sub account Create a separate sub account relationship with the same agency. Allows sharing subscriptions under a new relationship. Ownership of orders and business agreements can be maintained separately. Select Create a new sub account if a new relationship is required.
-
Option 2: Link to current sub account Reuse an existing sub account relationship. The requested subscriptions will be added to the selected existing relationship. Existing ownership and agreement settings will continue. Select Link to current sub account if you want to use an already available relationship.
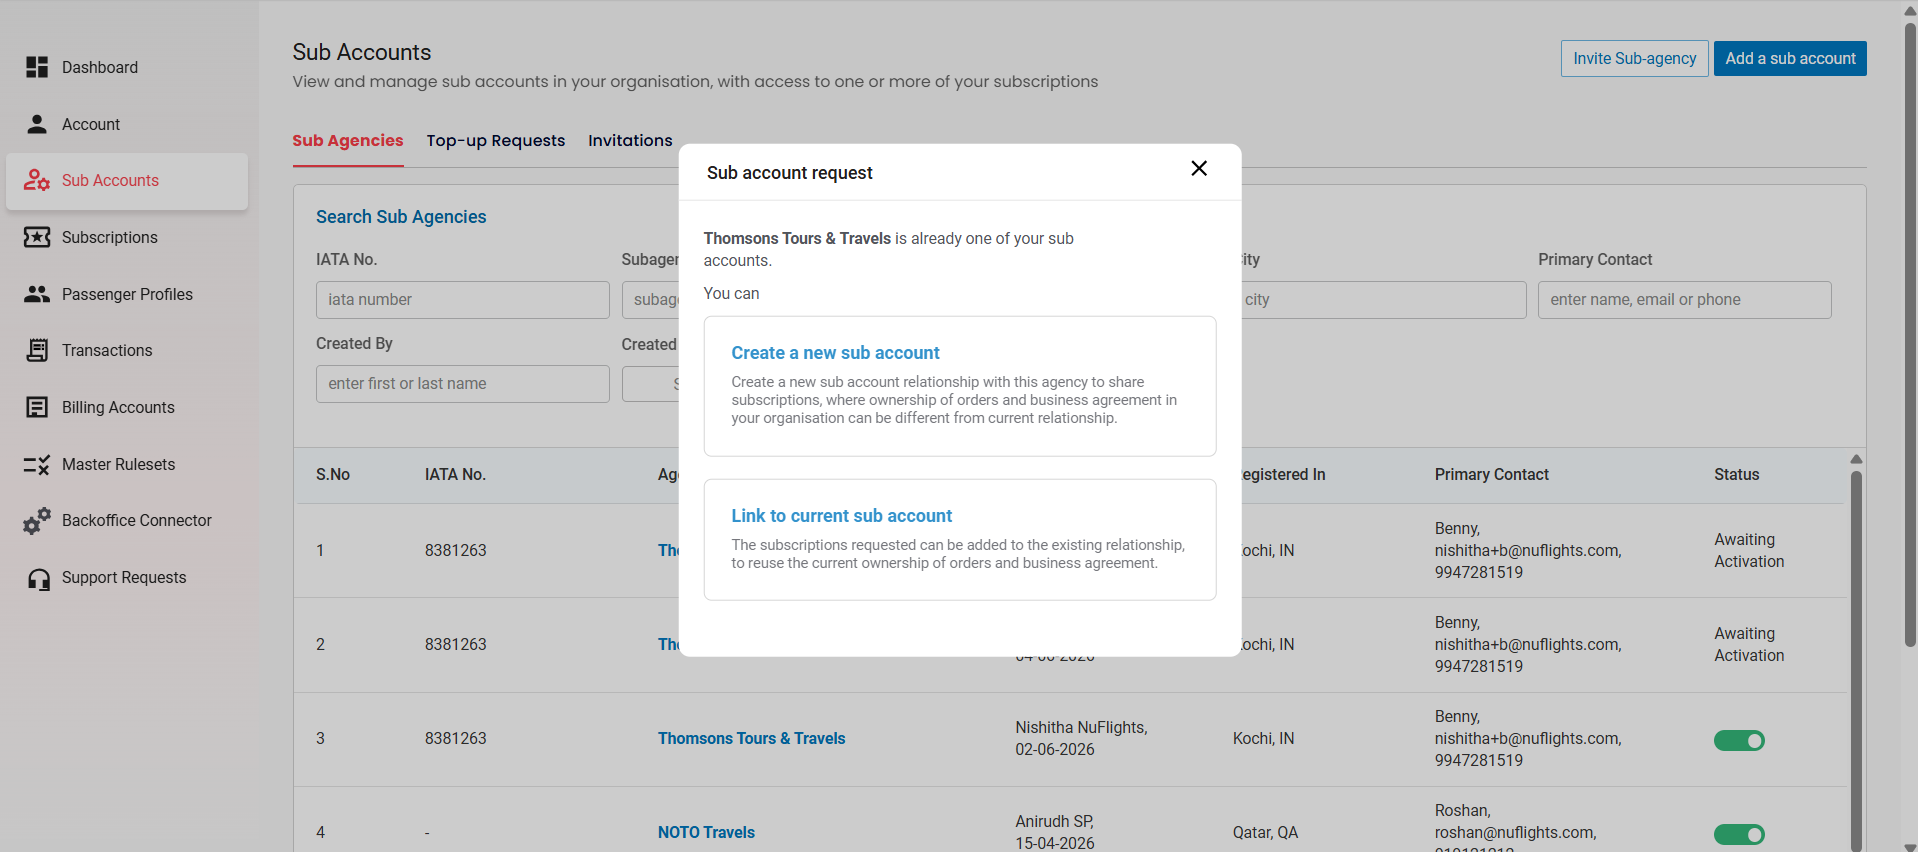
Sub Account Request Popup
Flow A – Create a New Sub Account
Step 4: Enter Reference Name
After selecting Create a new sub account:
- Enter a Reference Name for the new sub account relationship. Example: Thomsons Tours & Travels - TK
- Click Next.
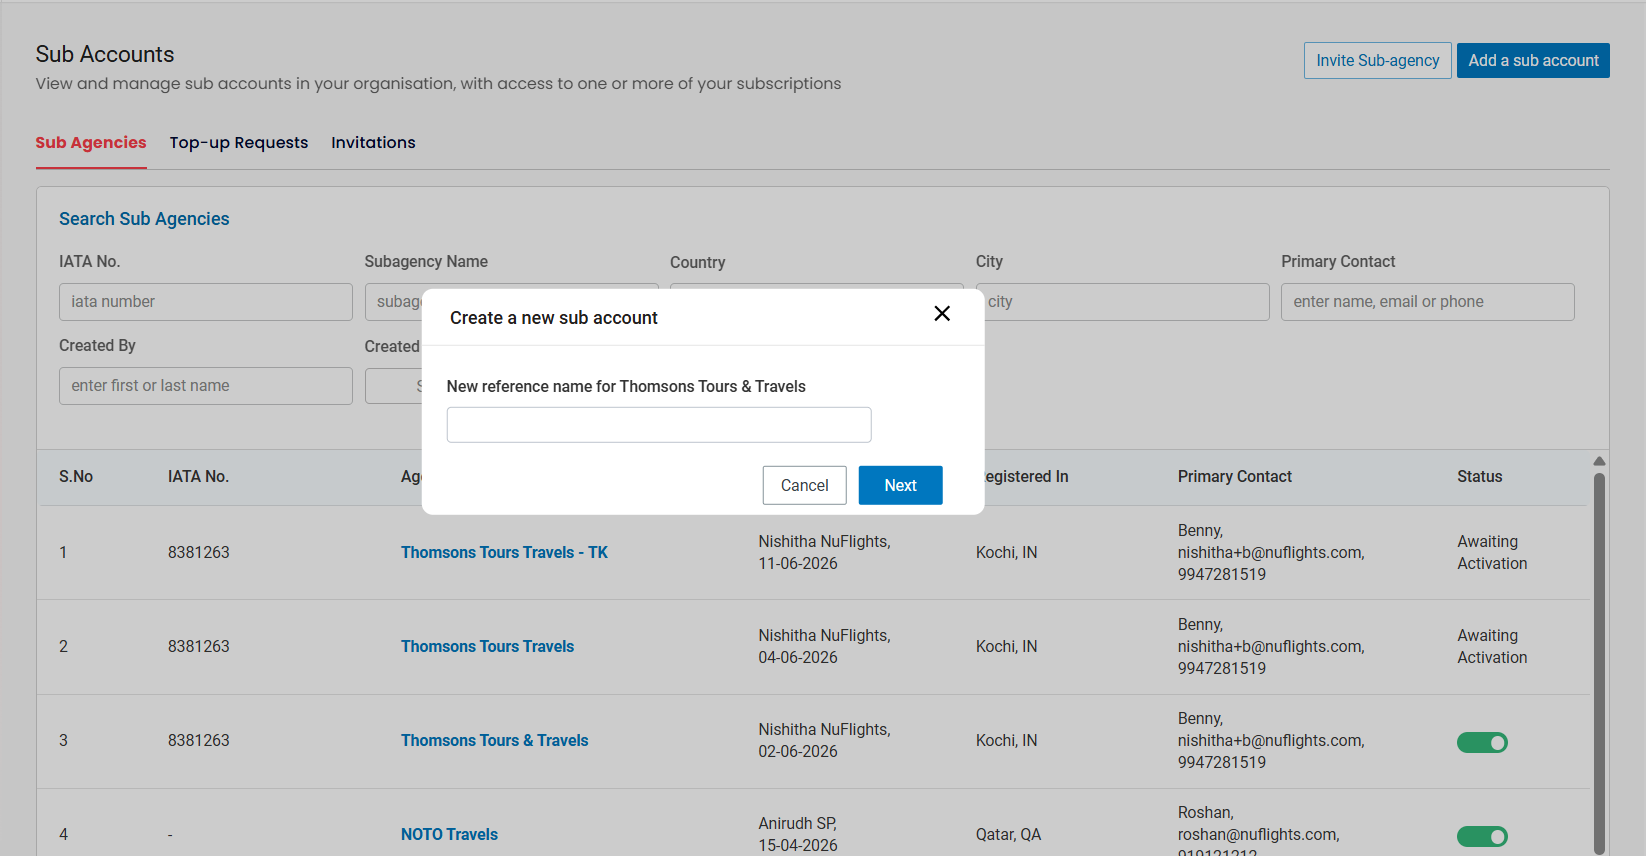
Create New Sub Account Reference Name
Step 5: Select Subscription to Share
You will be redirected to the Select Subscription to Share screen.
- Choose one or more subscriptions to share.
- Review the selected subscriptions.
Step 6: Submit Request
Click Submit / Continue to complete the request.
Result: A new sub account relationship is created and the selected subscriptions are shared.
Flow B – Link to Existing Sub Account
Step 4: Select Existing Account Relationship
After selecting Link to current sub account, an Add Account popup will appear.
- The screen displays available existing sub account relationships.
- Each relationship shows the account name and account type.
- Select the relationship to which the subscription should be linked.
Example:
- Thomsons Tours Travels - TK → Prepaid account
- Thomsons Tours Travels → Prepaid account
Click Next.
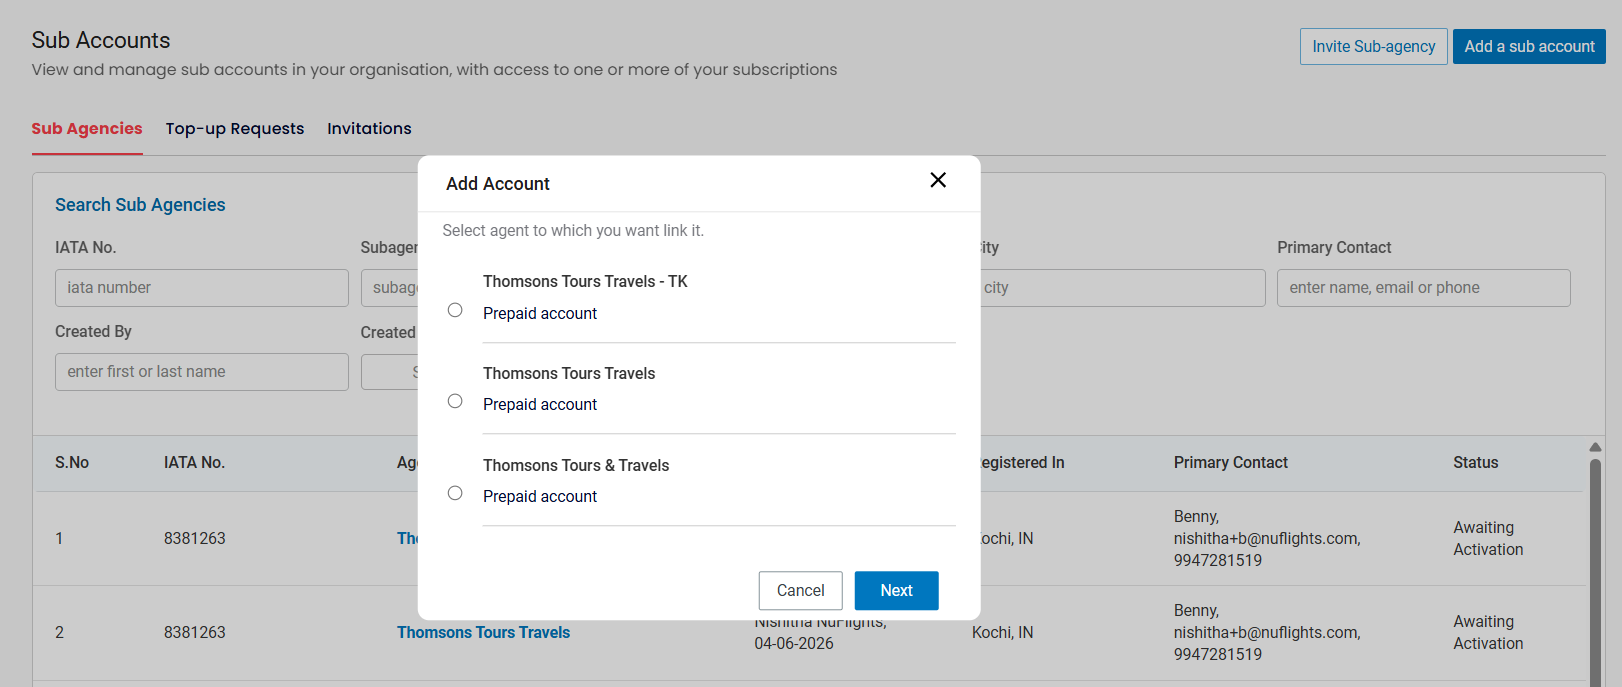
Link to Existing Sub Account Options
Step 5: Select Subscription to Share
After selecting the existing relationship:
- Choose the subscription(s) to be shared with that account.
- Review the selected subscriptions.
Step 6: Submit Request
Click Submit / Continue to complete linking.
Step 7: Confirm Subscription Selection
After selecting the subscription, click Continue.
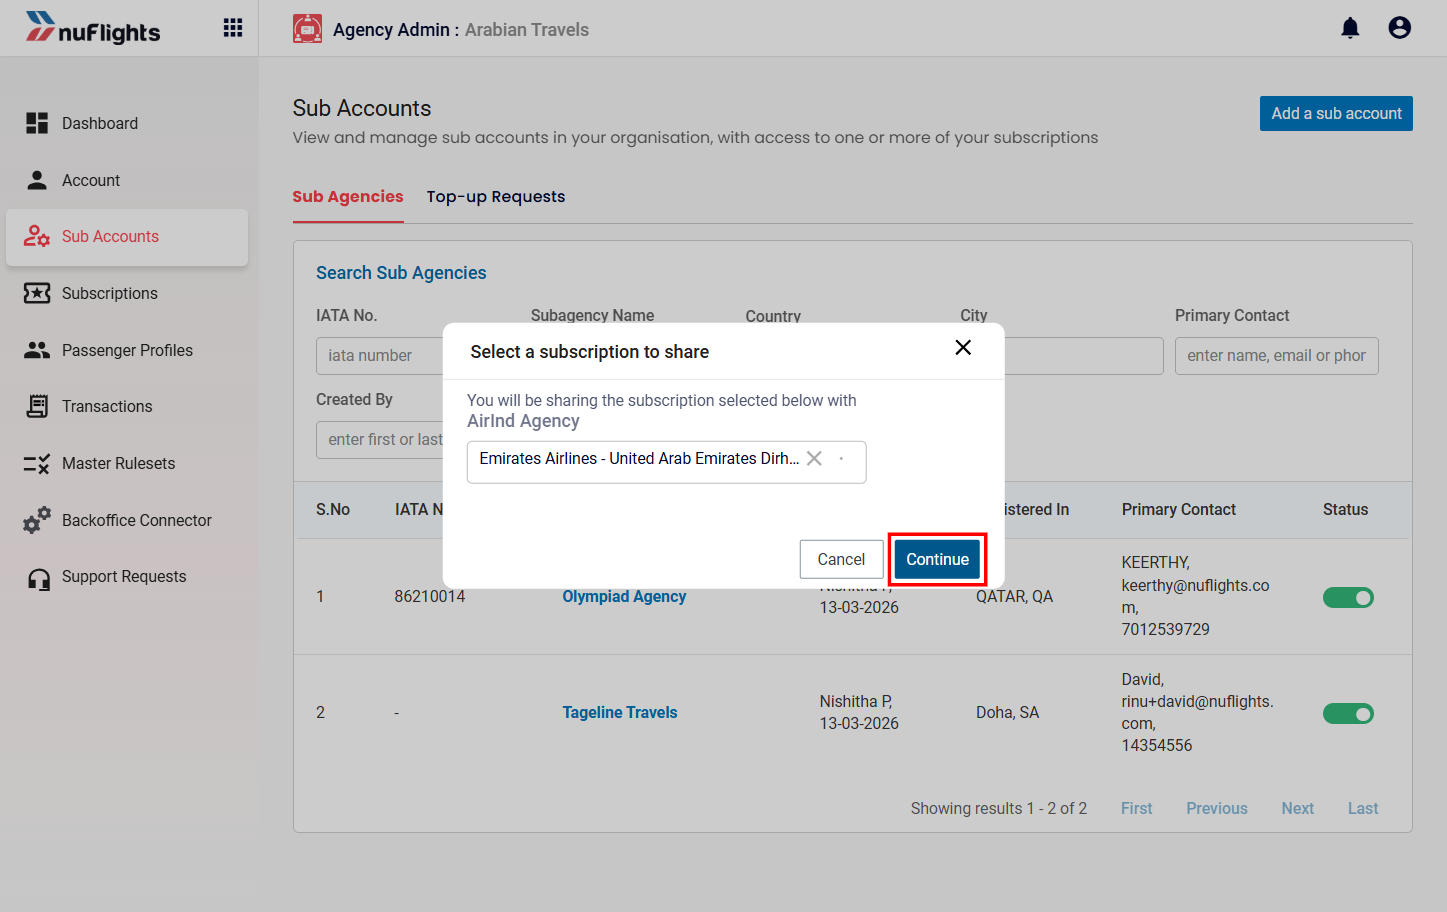
Confirm Subscription Selection
Step 8: Subscription Successfully Shared
Once the subscription is shared successfully, the system will display a confirmation message.
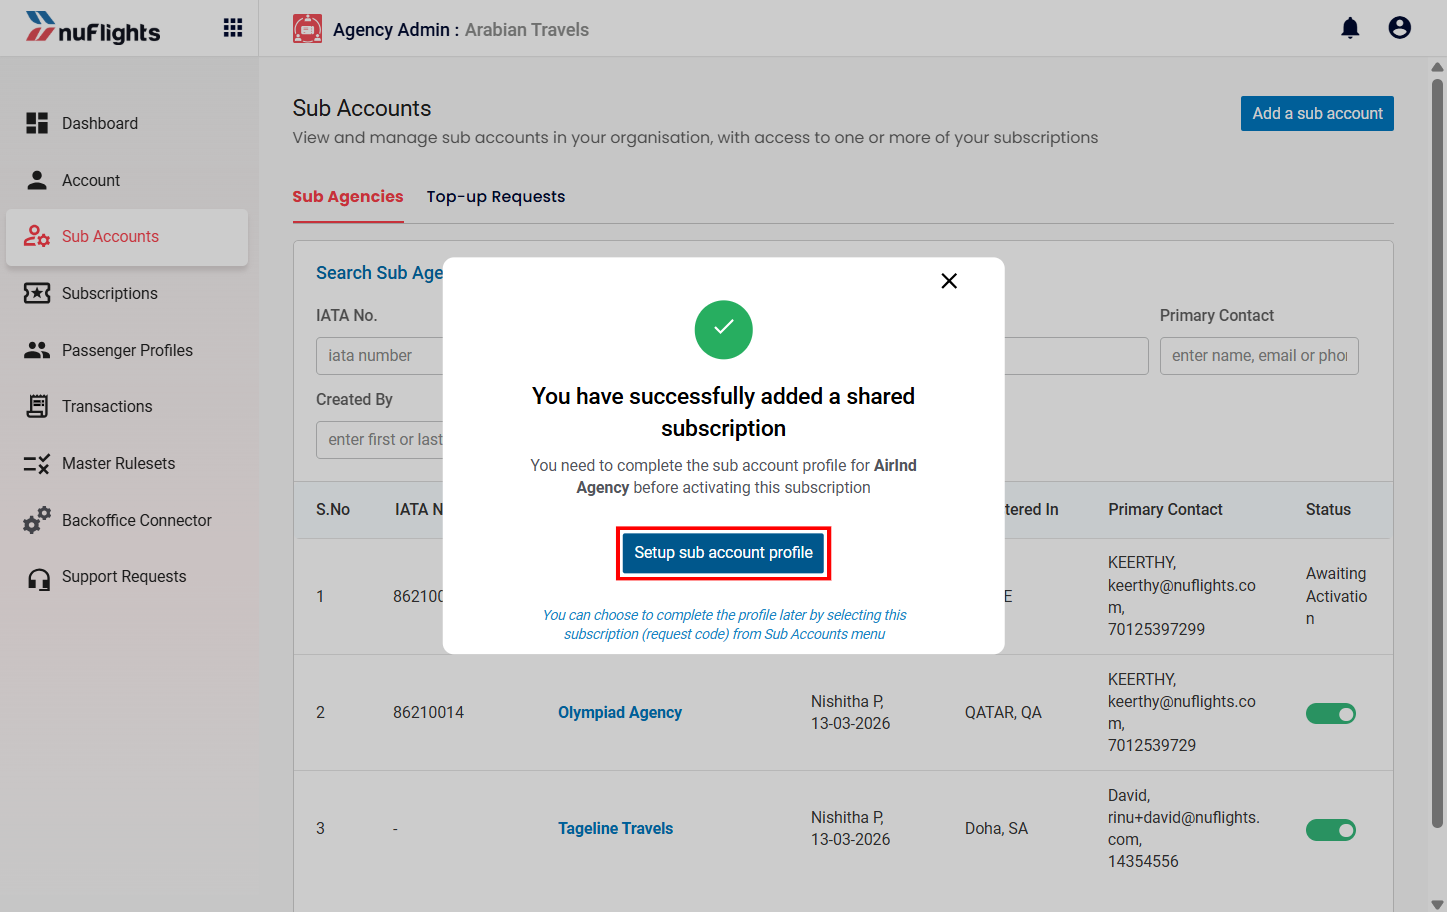
Subscription Shared Confirmation
Step 9: Set Up Sub-Account Profile
You will now be redirected to the Sub Account Profile page.
Here you need to enter the general details of the sub-agency:
- Customer account code
- Contact details
- Currency code
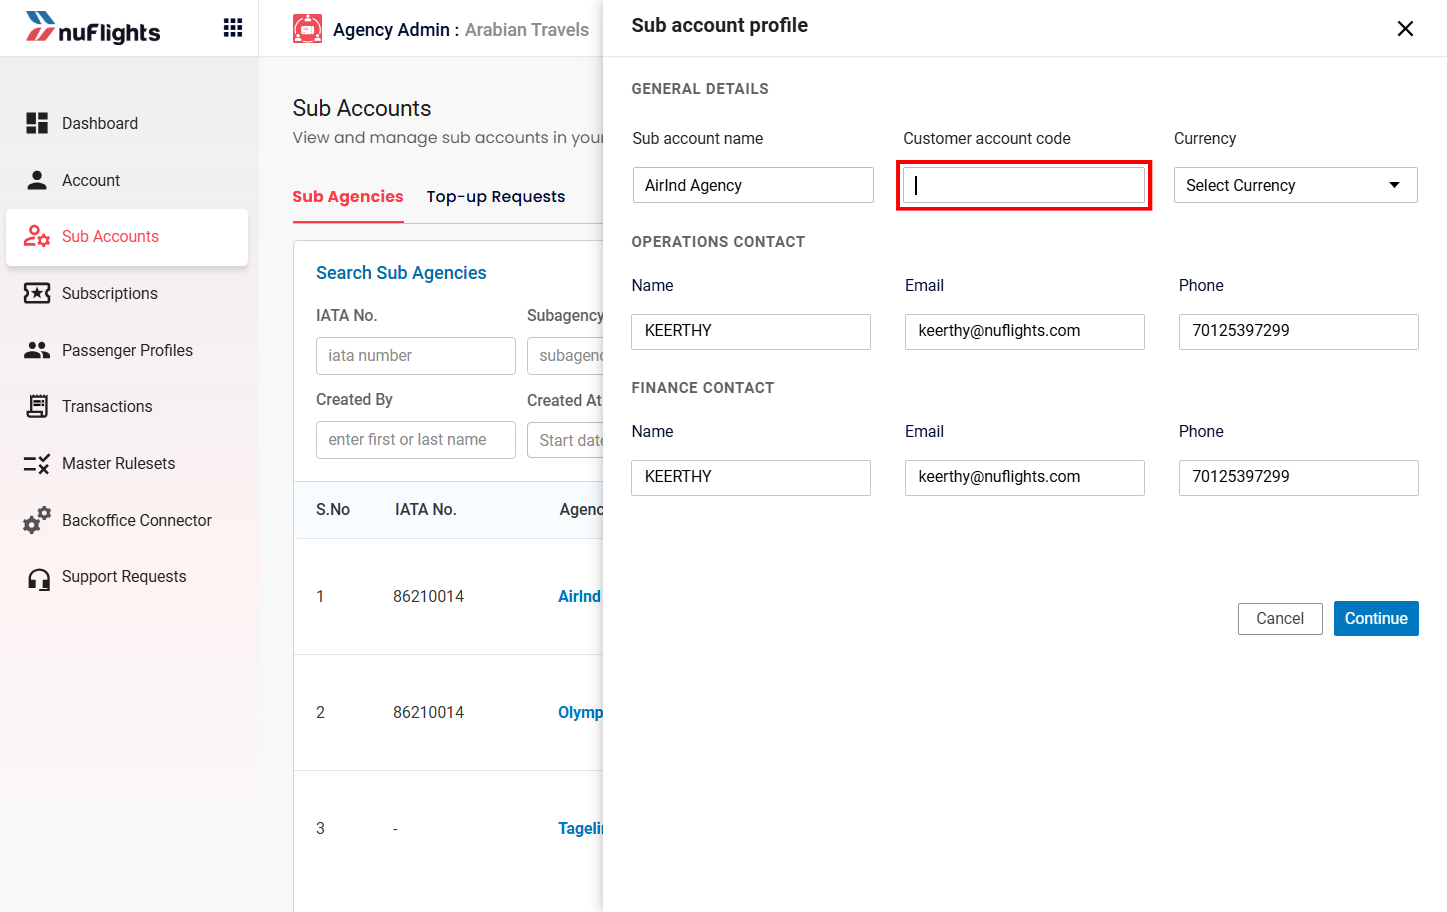
Sub-Account Profile Setup
Step 10: Save Sub-Account Profile
After entering the details, click Continue.
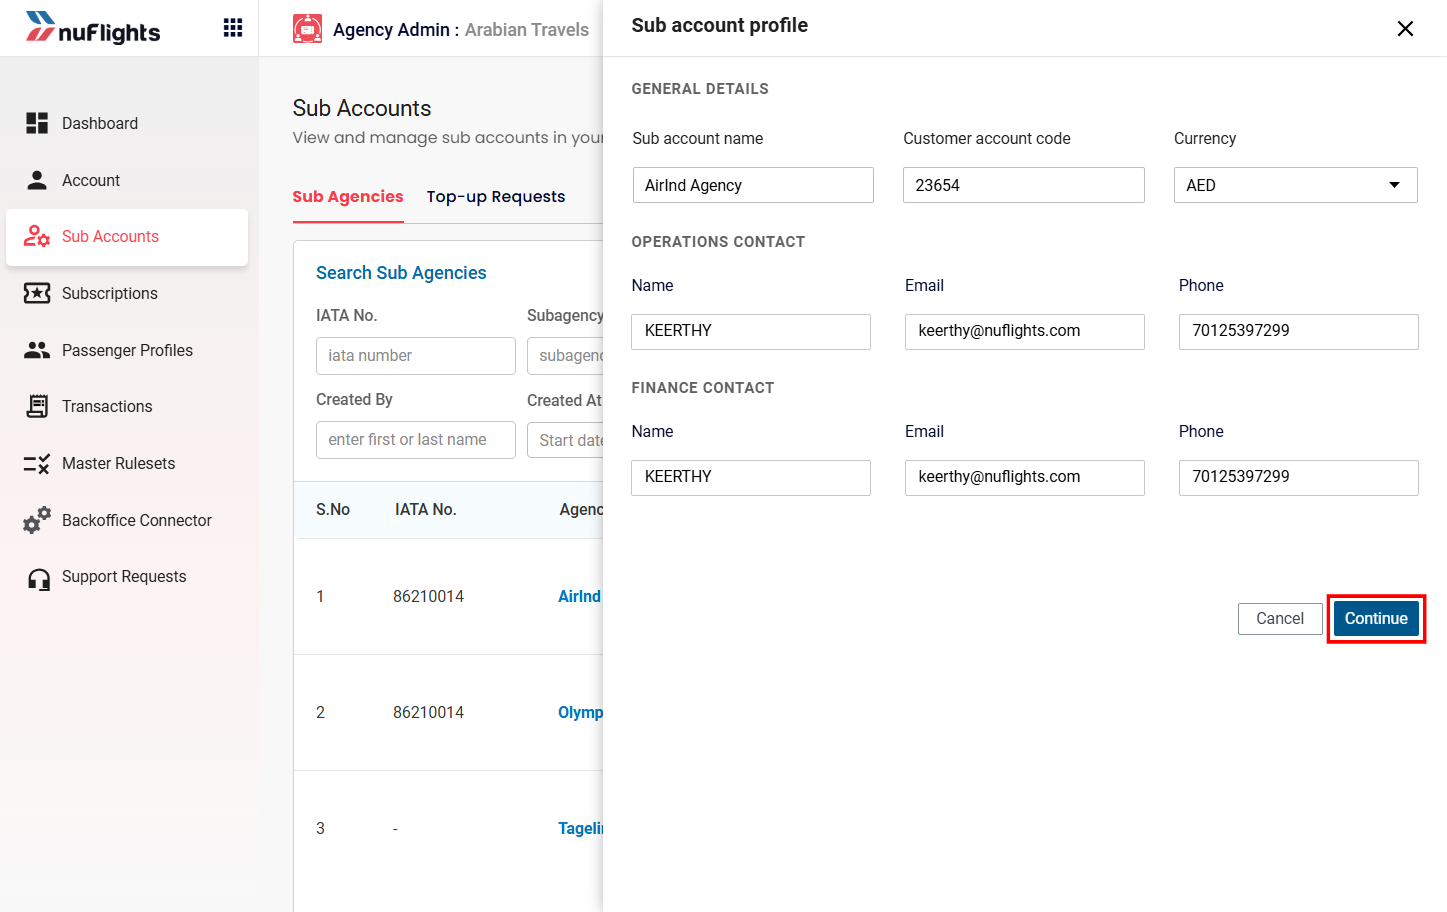
Save Sub-Account Profile
Step 11: Configure Financial Boundaries
Define the sub-agency's credit limits and operational financial parameters.
For detailed instructions on setting up limits and managing risks, please refer to the Credit Control & Financial Management guide.
Part 3: Ongoing Management & Monitoring
Editing Sub-Accounts
You can update contact details, change order owners, or toggle the status (Active/Inactive) of a sub-account at any time by clicking the name in the list.
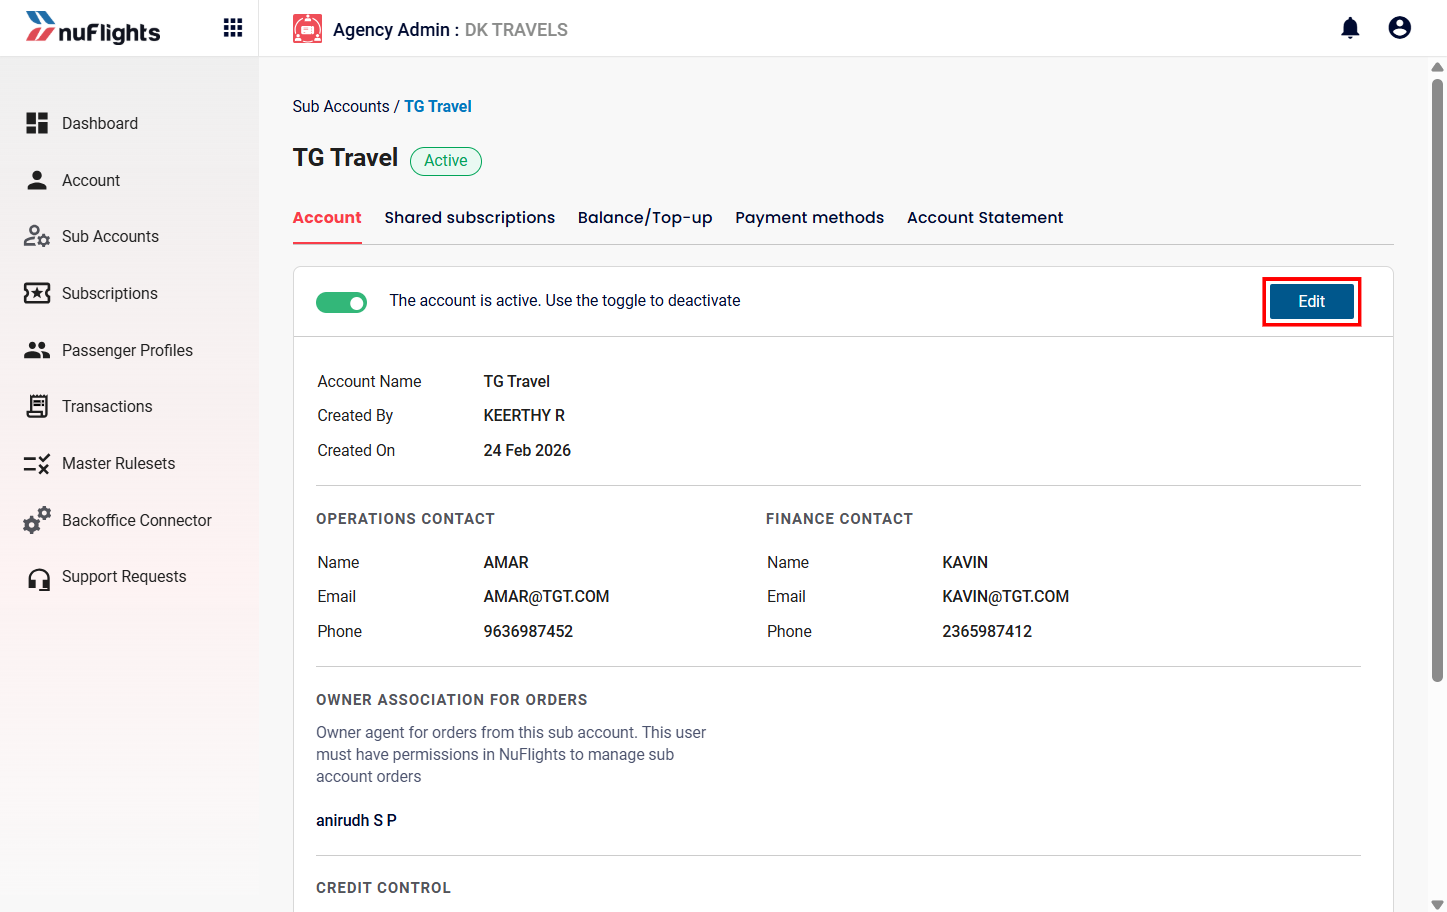
Empty State
Part 5: Financial Management & Top-Ups
Sub-agencies can request credit top-ups and monitor their financial standing directly through the portal. To ensure better organization, all financial workflows have been consolidated.
For the complete guide on requesting top-ups, tracking statuses, and auditing transactions, please see the Credit Control & Financial Management documentation.
Part 6: Sub-Agency Management Tabs
Inside the sub-agency page, several management tabs are available:
- Account
- Shared Subscriptions
Detailed financial tabs (Balance / Top-up, Payment Methods, and Account Statement) are covered in the Credit Control & Financial Management guide.
1. Account Tab
The Account tab displays the general profile and configuration details of the sub-agency.
2. Shared Subscriptions
This section shows which airline subscriptions are shared with the sub-agency.
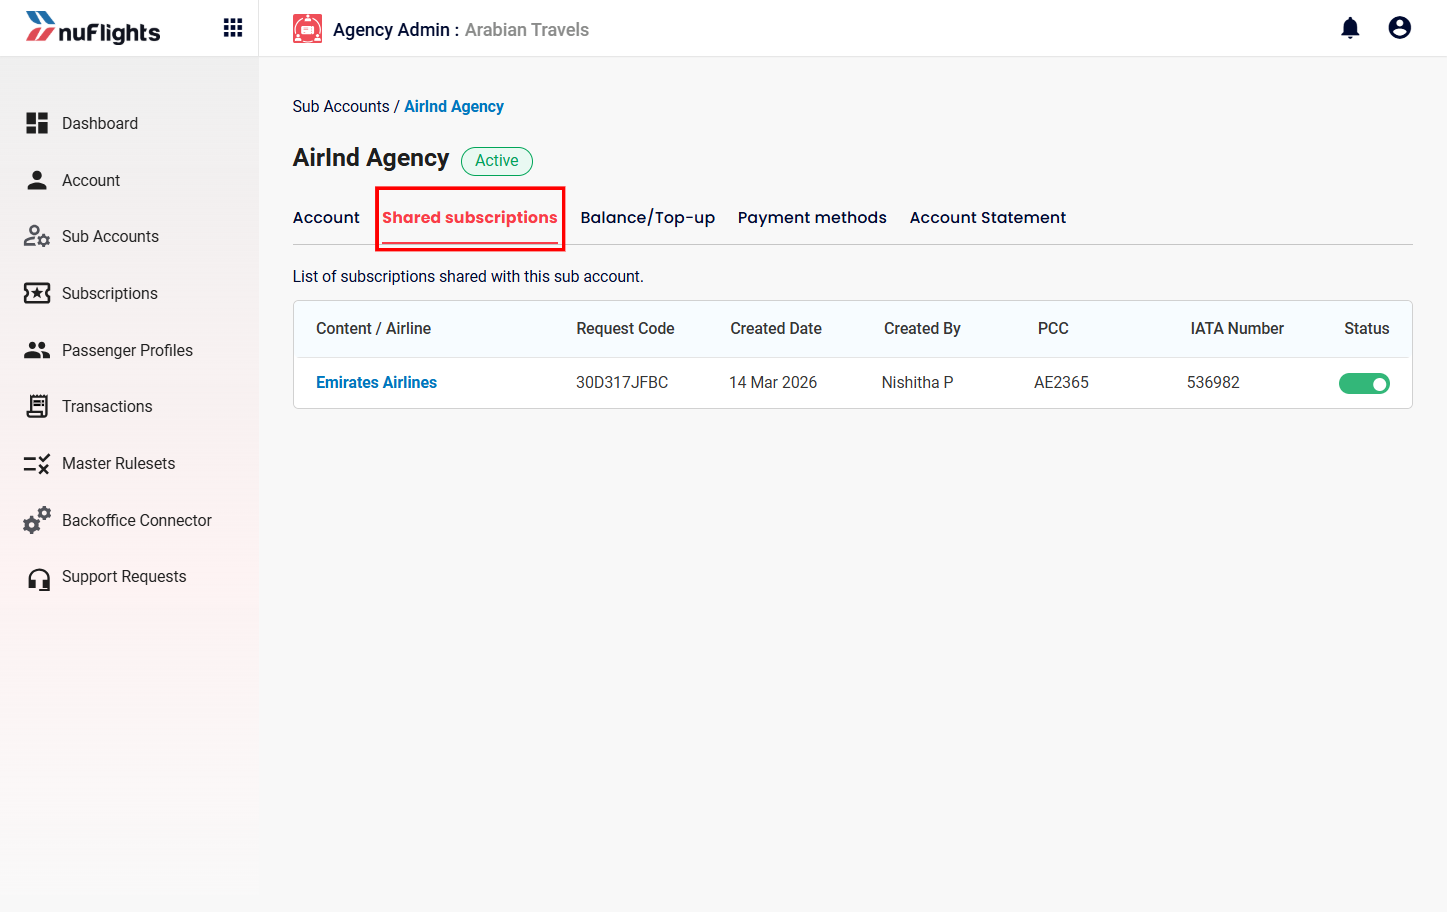
Sub-Agency Tabs Overview
Navigation: Sub Accounts → AirInd Agency → Shared Subscriptions
The table shows:
| Field | Explanation |
|---|---|
| Content / Airline | Airline whose subscription is shared |
| Request Code | Subscription request reference |
| Created Date | Date when subscription was shared |
| Created By | Admin who shared the subscription |
| PCC | Pseudo City Code used for airline access |
| IATA Number | Agency's IATA number |
| Status | Active or inactive subscription |
Part 4: Airline Order Flow (Sub-Agency)
Once the partnership is active and credit is allocated, sub-agencies can search and book flights directly through the Travel Workbench.
For detailed instructions on flight search, fare selection, quoting, and completing bookings, please refer to the Travel Workbench Documentation.